Autogenerate Forms and CRUD
Within DronaHQ Cloud, you'll find a robust tool that swiftly generates CRUD operations within an existing database, facilitating subcategory creation and a range of database functions like viewing, inserting, deleting, and updating data. Additionally, the Autogenerate Form feature expedites the creation of user-friendly forms, enhancing efficiency. Accessible on a fresh screen in DronaHQ Cloud, this function accelerates form development within the platform.
Autogenerate Form
The Autogenerate Form enables us to build user-friendly forms faster and more effectively. In the DronaHQ Cloud, you
have the option of Autogenerate Form on the fresh screen page to generate forms.

On click of Autogenerated Form option, you will be provided with some straight forward ways to auto-generate your form.
- Connectors
- Sheets
- Control
- Raw JSON
- Upload CSV
These options to create forms are basically to identify which type of controls are required as per your data to create a form. For instance, if your provided data is a number then it will detect numeric control for the data in the control. This makes the work easy and quick.
The default mapping of different data types to various controls can be seen in the below table.
| Data Type | Control |
|---|---|
| int, integer, smallint, tinyint, mediumint, bigint, float, decimal, dec, numeric, longint, double, bit, number, binary_float, binary_double, double precision, real, money, smallmoney, dec, double precision, fixed, smallserial, serial, bigserial, binary varying, varbinary, enum, set, long, raw, long raw | Numeric control |
| varchar, tinytext, text, mediumtext, longtext, varchar2, char, nvarchar2, nvarchar2, long, raw, long raw, character varying, character, bytea, blob, mediumblob, tinyblob, clob, nclob, bfile, rowid, urowid, longblob | Text control |
| bool, boolean | Toggle control |
| json, Object | JSON Editor control |
| Array | Single select, multi select |
| URL | Text control with URL configuration |
| Text control with Email configuration |
For any other data type which is not present in the table, will have Text control as the default mapped
control for the form.
Form generation with Connector
The first method we have for auto generation of form is with using connectors. On your screen, you will have a dropdown of connectors to choose from. Select the connector of your choice, after that It will show another dropdown to select the table from.
After selecting of the connector and table, click Next. It will showcase all the fields available in the data as
column name with their data types as detected type.
The DronaHQ Cloud tries to map the right controls considering the data that has been connected. In case you select any of the dropdown/radio/checkbox/select kinds of controls, you would have to configure the options for binding data after the form is created.
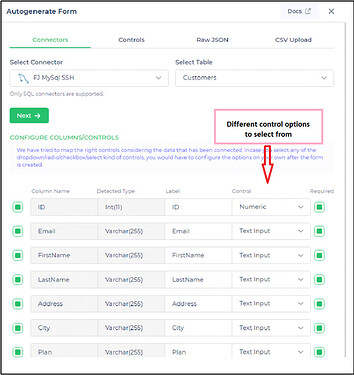
You will see that each of the columns has an autogenerated label name as well as a suitable type of control.
You can now further change the label name and type of control. Also, you can set the form fields as required fields
for input values in the form, this will make it a mandatory property to fill on that control.
Once you have configured the columns and controls of the form, click Next.
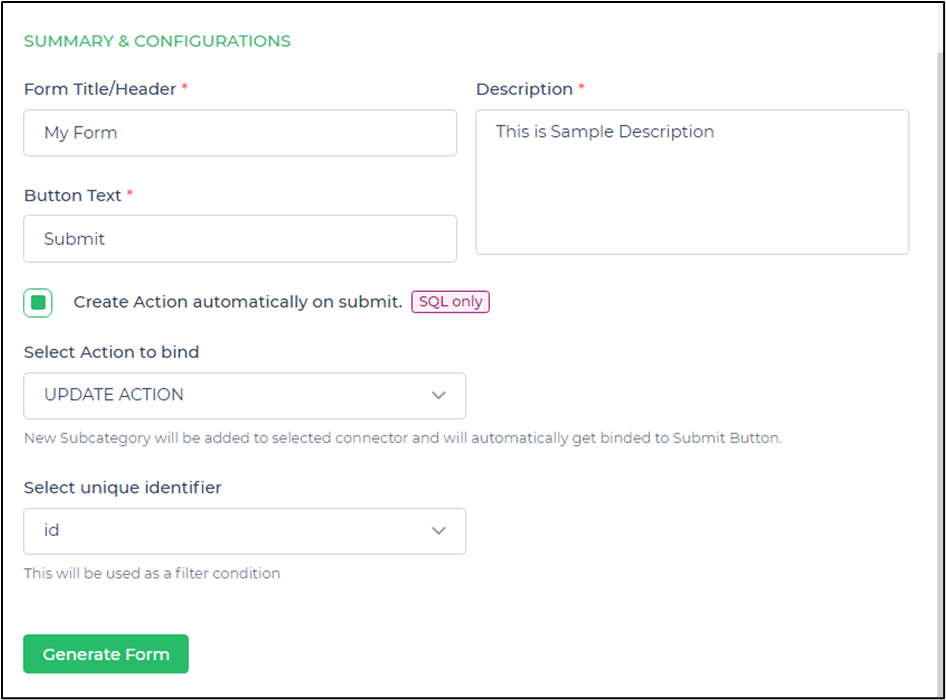
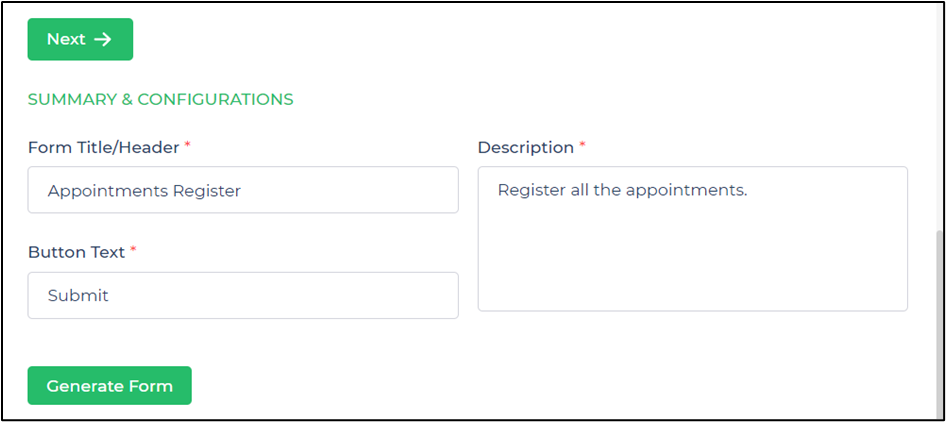
It will ask for summary details such as Form Title/Header, form button text, and Description of the form. This data
will help the user to recognize the form and its use case in your microapp.
Create Action automatically on submit
There is an additional feature that is available for only SQL connectors. If you are using a SQL connector to generate
your form then you will have a toggle button to add action on the submit button of your form.
The chosen action will automatically add a subcategory/API under the configured SQL connector with respective to the action. In this way you don’t have to exclusively add a subcategory/API to your connector to perform the action on your SQL database.
The action on submit button of form can be of two types:
Update:This will automatically add a subcategory with SQL syntax to update your database along with adding it in the action flow of the form button. Just select the unique identifier from the form’s columns which is to be used as filter condition.
You can check that the action has been added to the submit button in the action flow.
Also, a new subcategory to update data is added under the configured SQL connector.
Insert:This will automatically add a subcategory with SQL syntax to insert new data to your database along with using it in the action flow of the form button.

You can check that the action has been added to the submit button in the action flow.
Also, a new subcategory to insert data is added under the configured SQL connector.
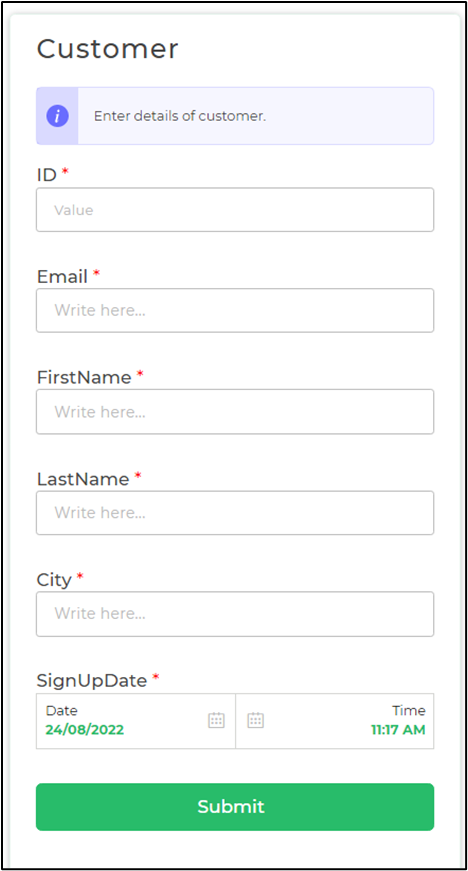
Click Generate Form. Your form is generated and ready to use.
Form generation with Sheets
In the DronaHQ Cloud we can generate forms using sheets too. To generate a form using sheets, you just have to make sure
that the sheet is uploaded or available in the DronaHQ Cloud account’s database, then simply select Sheets from the
options. It will detect all the values and their data type as columns and type of control then provide you the
configure columns/controls section on click of Next.
The DronaHQ Cloud tries to map the proper controls considering the data that has been connected. In case you select any of the dropdown/radio/checkbox/select kinds of controls, you would have to configure the options for binding data after the form is created.
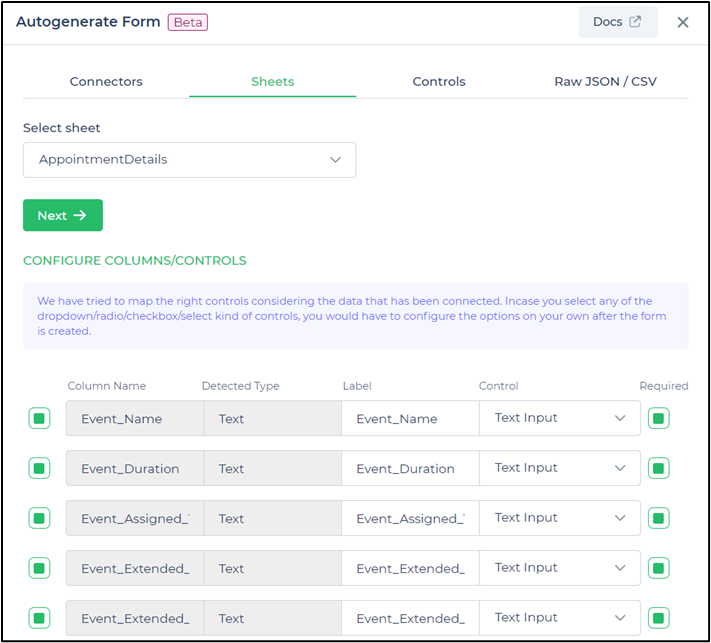
You will see that each of the columns has an autogenerated label name as well as a suitable type of control.
You can now further change the label name and type of control. Also, you can set the form fields as required fields
for input values in the form.
Once you have configured the columns and controls of the form, click Next.
It will ask for summary details such as Form Title/Header, form button text, and Description of the form. This data
will help the user to recognize the form and its use case in your microapp.
Click Generate Form. Your form is generated and ready to use.
Form generation with Control
The process of auto generation of form using control is very simple, provided the condition that the control should return a JSON value and the control should be present in that particular microapp.
On the screen, you have to select the control consisting of the JSON data from the dropdown.
Once you select the control, click Next, it will showcase all the fields available in the data as column name with
their data types as detected type.
The DronaHQ tries to map the right controls considering the data that has been connected. In case you select any of the dropdown/radio/checkbox/select kinds of controls, you would have to configure the options for binding data after the form is created.
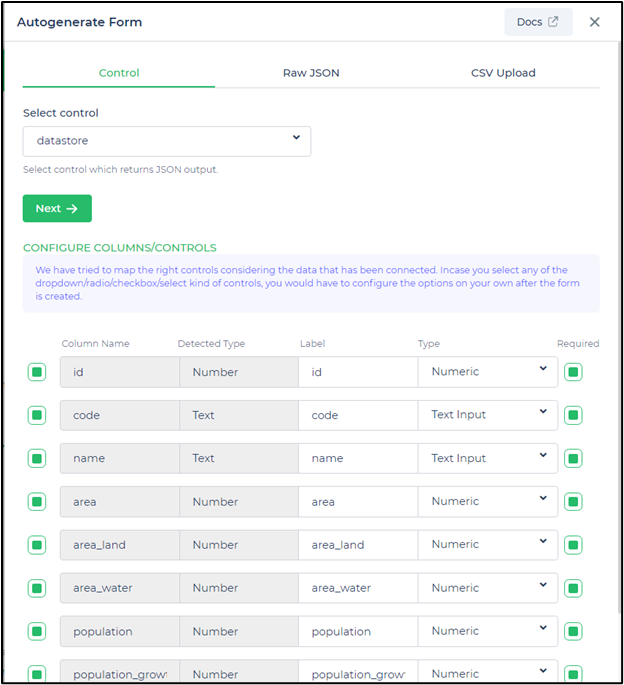
You will see that each of the columns has an autogenerated label name as well as a suitable type of control.
Form generation with Raw JSON/CSV
Next, we have to generate a form by providing raw JSON data or by uploading CSV file.
To generate form with raw JSON data simply copy your JSON data and paste it into the given area. It will detect all the
values and their data type as columns and type of control then provide you the configure columns/controls section on
click of Next.
The DronaHQ tries to map the proper controls considering the data that has been connected. In case you select any of the dropdown/radio/checkbox/select kinds of controls, you would have to configure the options for binding data after the form is created.
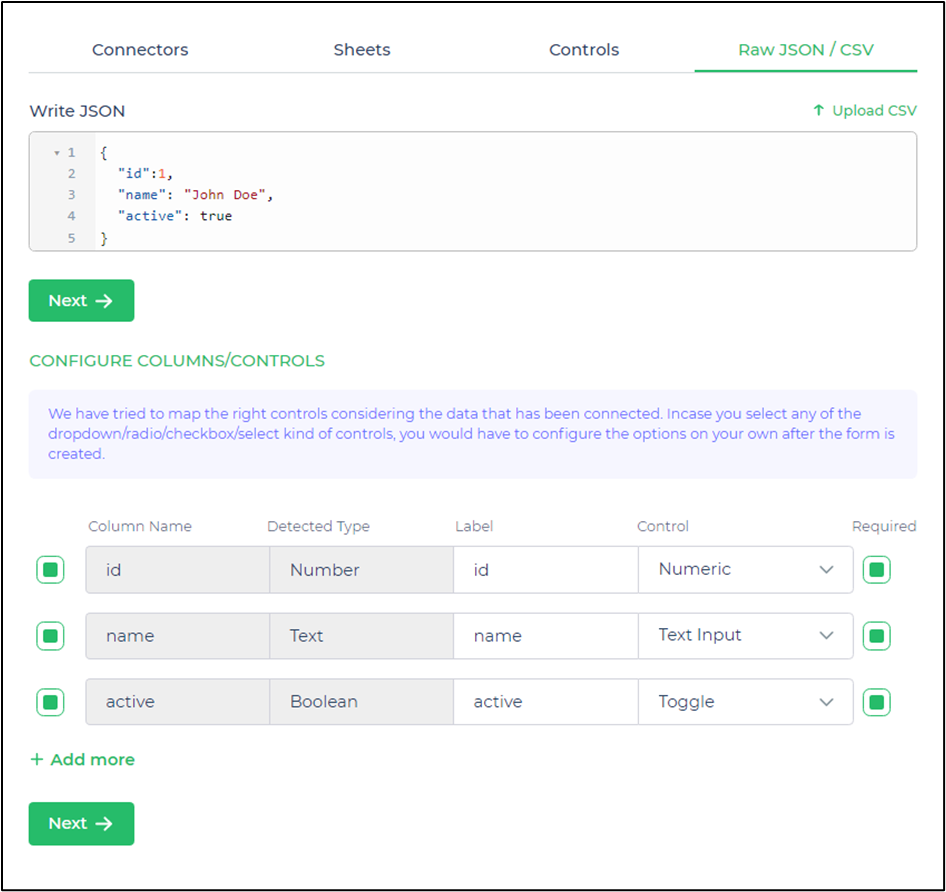
You will see that each of the columns has an autogenerated label name as well as a suitable type of control.
Now for the form generation with CSV upload, in this method you have to upload a CSV file with data in it, then it will
process the uploaded file, and just like in other methods of auto generation of form it will detect all the values and
their data type as columns and type of control then provide you the configure columns/controls section on click of
Next.
The DronaHQ tries to map the proper controls considering the data that has been connected. In case you select any of the dropdown/radio/checkbox/select kinds of controls, you would have to configure the options for binding data after the form is created.
You will see that each of the columns has an autogenerated label name as well as a suitable type of control.
Autogenerate CRUD
In the builder view, we can use the feature of autogenerate CRUD functionality with an existing database. Users can build subcategories and perform various functionalities in the connected database, such as viewing, inserting, deleting, and updating the data.

It is available only for SQL databases.
The auto-generate CRUD feature extends its utility to create a table on the builder screen also with applied actions on it; to perform the CRUD operations. This makes the whole procedure much easy and faster.
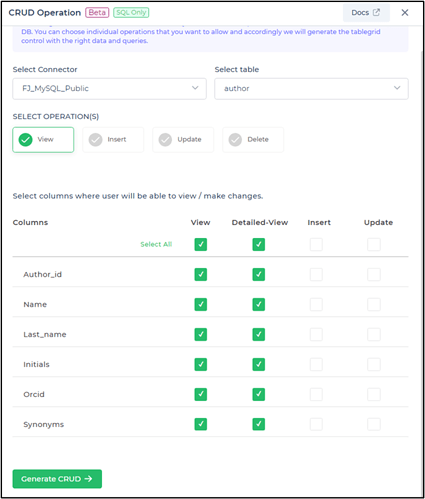
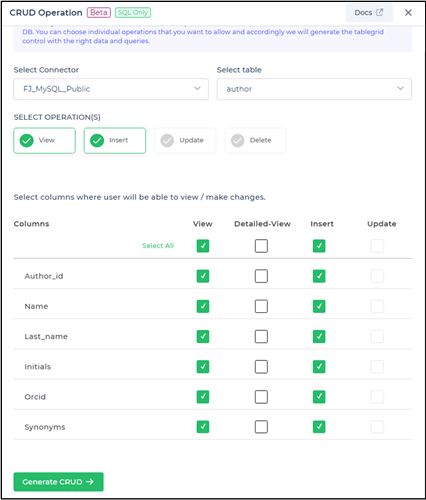
This option will generate an editable table control where you can view, add, update and delete rows from the selected SQL DB. You can choose individual operations that you want to allow and accordingly we will generate the table grid control with the right data and queries.
Click on the
Autogenerate CRUDoption. It will open up a side window, with aSelect Connectordropdown. Select the database you want to perform the CRUD operation.After selecting database it will ask to select the
table.Next, you will have various operations listed right below to choose from. You can select one more operation at a time. By default, the
Viewoperation will be chosen and it can’t be unselected.
View operation
With the View operation selected, you will have to next select the columns which all users will be able to view in the table grid control.
You can check the Select All option from the top row to select all the columns and make it available to view in the table grid control.
For the view operation we also have a column of Detailed-View, if you select it, it would display the whole row of data as a detailed view. Also, the detailed view option in the table grid gets toggled on.
Insert operation
Now, let’s look into the Insert operation. Once you select the insert option, the whole column of the insert will be available to choose from. You can check Select All to make every column available to insert from the user in the database or you can check only those columns which you want to insert from the user side.
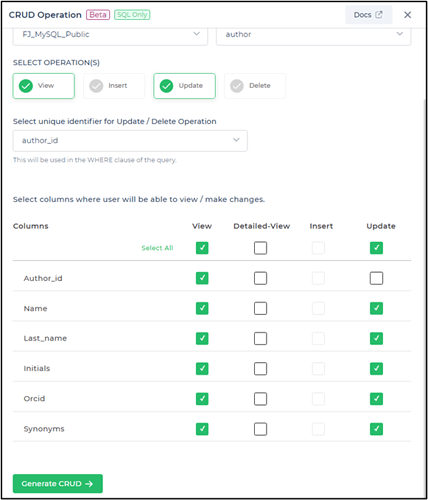
Update operation
When you select the Update operation, an additional dropdown is provided to select a unique identifier from the database table. This identifier is used to make reference as the primary key in the table to make successful updates.
Select a column that you want to make a unique identifier for the update operation. Once you select the update option, the whole column of the update will be available to choose from. You can check Select All to make every column available to update data from the user in the database or you can check only those columns which you want to make changes from the user side.
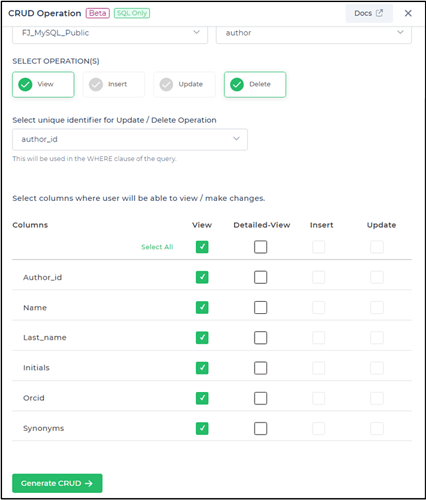
Delete operation
At last, we have the Delete operation. On selection of the delete operation, similar to the update operation an additional dropdown will be provided to select a unique identifier from the database table. This identifier is used to make reference as the primary key in the table to make successful deletes.
Select a column that you want to make a unique identifier for the delete operation.
- After selecting the operations and columns, click on
Generate CRUD.