Multistep Authentication
Multistep Authentication method is a nested or custom authentication. With multistep authentication, the user can provide two or more forms of authentication. A multistep authentication scheme considers using different resources of the same authentication factor to allow a user to access systems or information.
What you'll need
- DronaHQ Mobile App must be above
8.3.0and above version for using multi-stepOAuth-type > Non-shared credentials connector.
Configuring REST API connector
To add third-party connectors, under DronaHQ > Connectors, click (+) Connector > Connector.
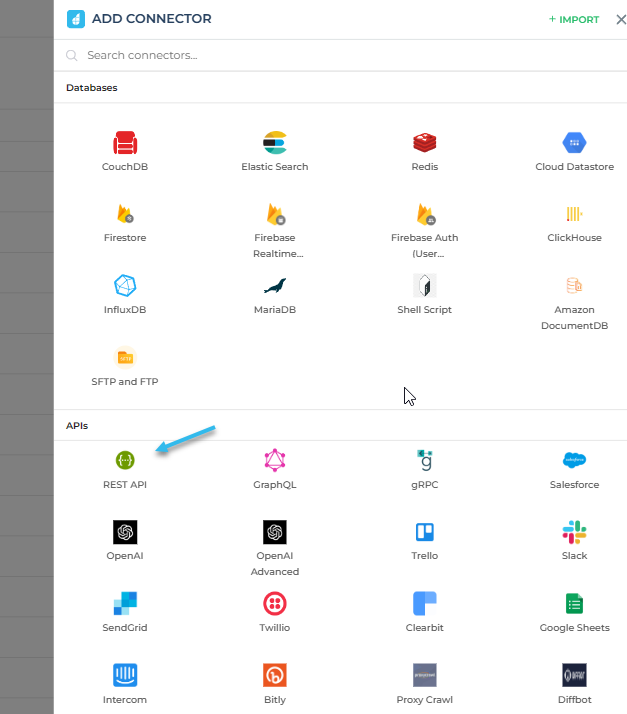
DronaHQ has different options including the use of the REST API and GraphQL that allows you to easily connect to the Third-Party API and database and access important systems. Both of them have a multistep authentication feature. We will be selecting the REST API for this example.
Configure API Category
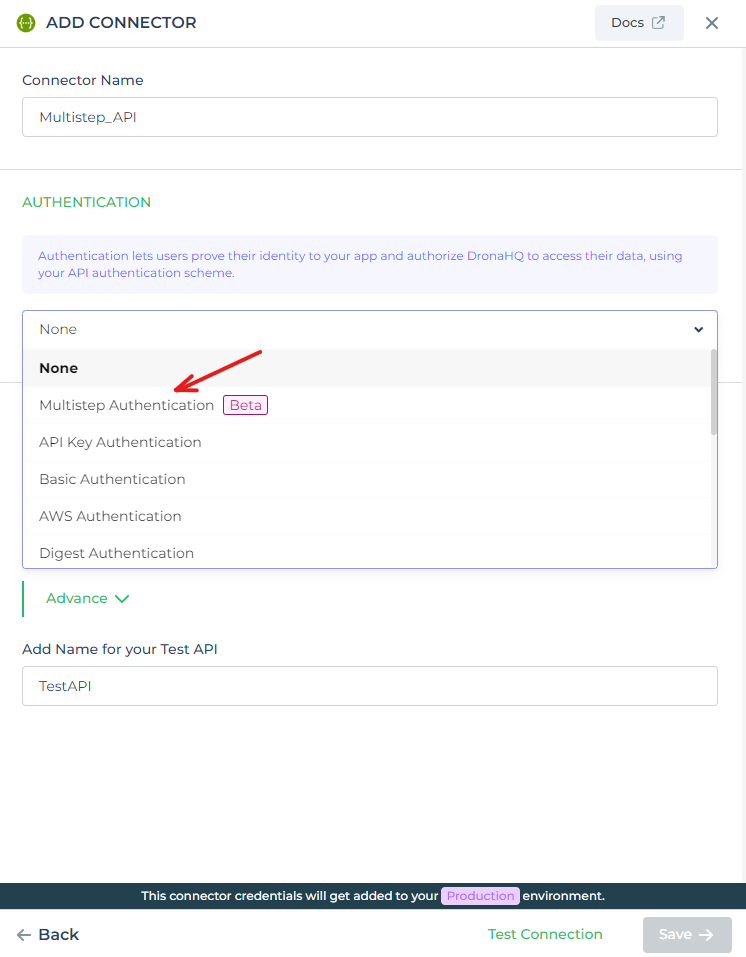
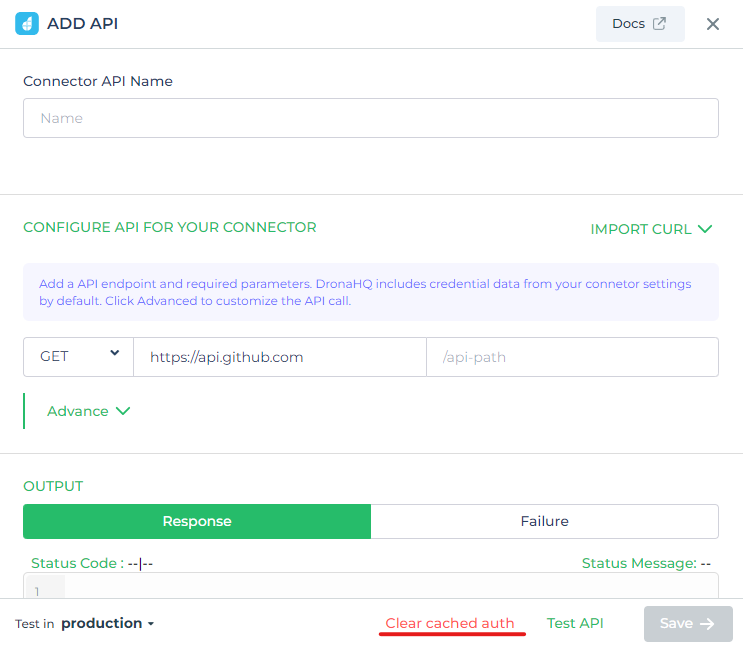
When configuring the APIs you need to provide the Authentication details for the respective authentication method. Let us see how to configure an API using the multistep authentication method. Once you select the REST API, enter the Connector name which should ideally be self-explanatory.
In the Authentication section, select Multistep Authentication.
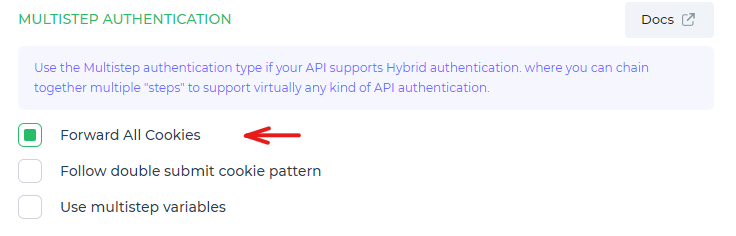
Configure Cookies settings (optional)
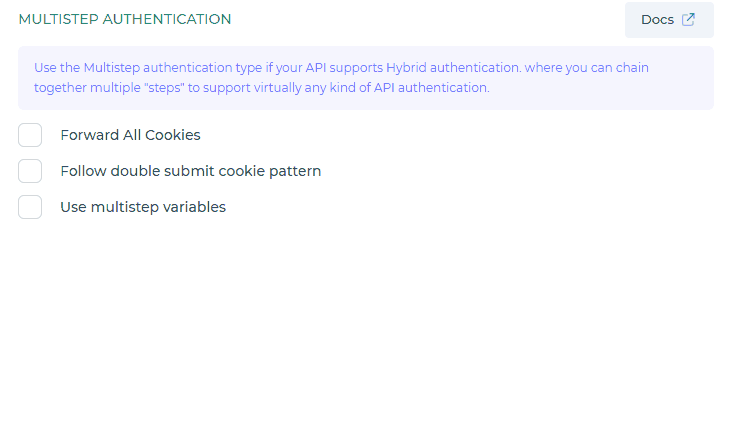
In Multistep Authentication, there are two cookie settings available: Forward All Cookies throughout the process, and Follow double submit cookie pattern.
Forward All Cookies
Cookie forwarding is an essential feature in DronaHQ's backend functioning for cookie-based authentication. When a client makes an initial API request, the API responds with a cookie containing an authentication token or session ID, which is retrieved from the response header and stored. DronaHQ then automatically includes and forwards this cookie as a header in all subsequent requests made to that API or connector, ensuring a seamless authentication process.
Follow double submit cookie pattern
The "Double Submit Cookie Pattern" is a highly secure option available when configuring Multistep Authentication in DronaHQ. Alongside the "Forward All Cookies" checkbox, you have the option to select this pattern. The concept is straightforward: a random value is generated and sent both as a cookie and as a parameter during API requests. The server ensures that both values match, providing an extra layer of security.
Here's how the process works in DronaHQ: When a session is created from an API request, the received cookie, derived from the session ID, is set in the user's browser. Simultaneously, another cookie containing the CSRF (Cross-Site Request Forgery) token is set. When the user submits a secure form, the token is extracted from the cookie and placed as a hidden input field in the HTML. During server-side processing, the received token in the form parameter is validated against the cookie value, granting authorization for the intended action to be completed. This ensures that the request is legitimate and not susceptible to CSRF attacks.
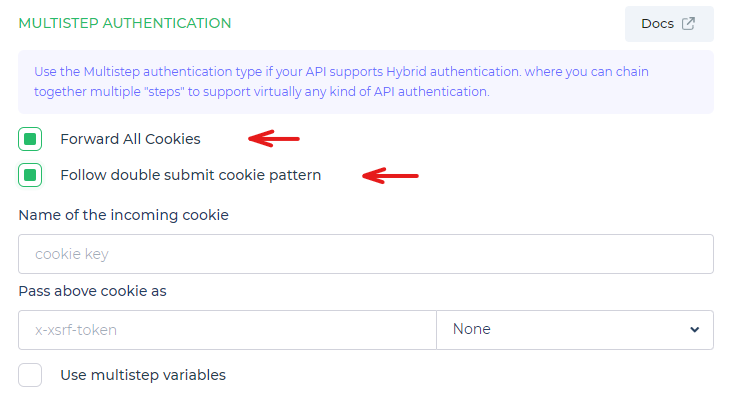
Provide the name of the incoming cookie as well as the name and location you want to pass your cookie. This name is usually application dependent.
Configure account-specific fields
Configuring account-specific fields for multistep authentication requires adding:
- Configure Multistep variables.
- Configure Auth Flow.
- Configure Refresh Auth Flow.
- Update variables.
- Configure Request Parameter.
- Sign-in Type.
- Configure Test API.
- Add Name for Test API.
Configure Multistep Variables
select Use multistep variables and click on + Add variable to create variable with static value and you can use that variable in Auth Flow and Refresh Auth Flow
Configure Auth Flow
click on + Add Step to add a Auth steps in auth flow, then you will get options to select from such as
API Request
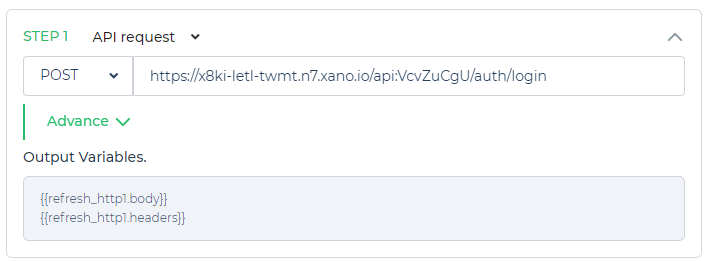
where you can configure it to make an API request to your server to obtain an authentication token. Simply provide the URL, from where you want to get back the request call output.
Basic Auth
Basic Auth is a simple authentication method. You just need to provide the username and password to complete authentication. On completion, it will return the auth token.
Callback Auth
A custom auth type which allows to extract data from query parameters after authorizing the user, which is usually a sign-in to the app's portal. Much similar to the authorization flow of user in OAuth v2.
Form
This is for the end-user to provide details to the backend, to have successful authentication.
JS Code
To transform the previous auth step's output.
JWT Bearer
This feature allows clients to securely authenticate and authorize their requests by leveraging JSON Web Tokens (JWT).
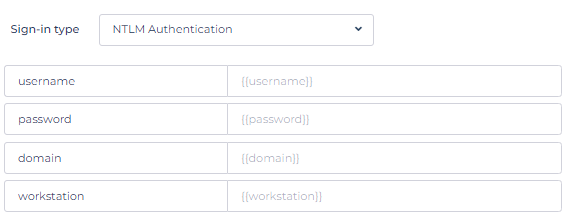
NTLM Authentication
NTLM (Windows NT LAN Manager) authentication is a widely used authentication protocol for Windows-based systems. It is a challenge-response-based mechanism where the client and server exchange messages to establish authentication.
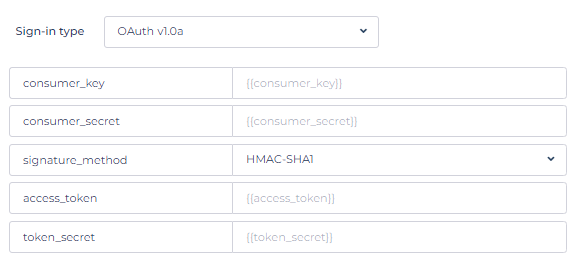
OAuth V1.0a
OAuth V1.0a is a legacy authentication protocol that enables websites or applications (Consumers) to securely access Protected Resources from a web service (Service Provider) through an API. It ensures that Users do not have to disclose their Service Provider credentials to the Consumers.
OAuth V2
OAuth V2 primarily focuses on authorization. Upon implementation, it provides an access token for use in authorizing requests within the DronaHQ integration.
OAuth v2 - Client Credentials
With OAuth V2 Client Credentials, applications can request an access token specifically for accessing their own resources, without requiring user involvement.
OAuth v2 - PKCE
OAuth 2.0 with the PKCE method is an advanced security approach REST API configuration.
SSO Token
This method will provide output variables based on the active SSO token in the current account
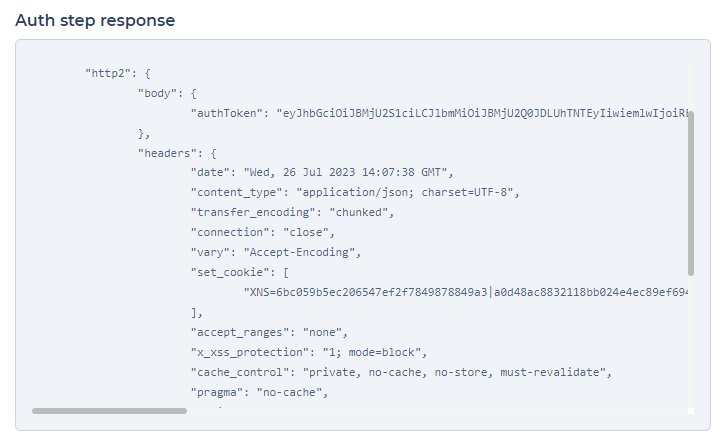
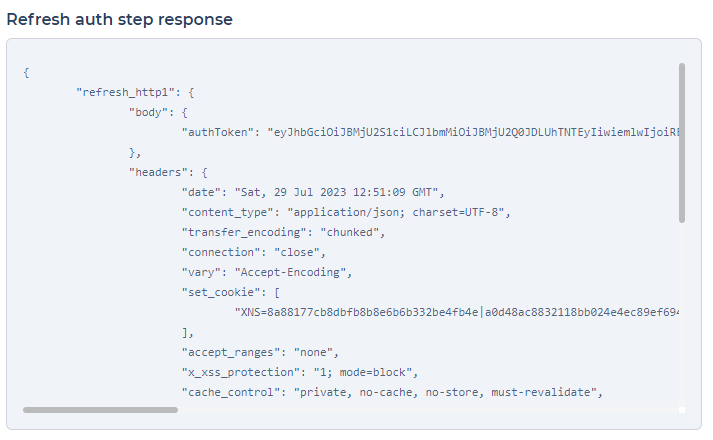
In this process, each step generates an output variable that can be utilized in the subsequent steps. For example, you can access the value of {{form1.username}} to refer to the username captured in the first form.
After configuring the authentication steps, you can proceed by clicking on Test Auth flow to observe the output of the authentication process in action.

Configure Refresh Auth Flow
You can configure a set of multiple steps that run automatically after a 401 response when requesting API. This is useful for refreshing a user’s authentication session without them needing to refresh the page.
You can either add your own steps by clicking
+ Add Stepand then you will get options to select from such as.API Request
where you can configure it to make an API request to your server to obtain an authentication token. Simply provide the URL, from where you want to get back the request call output.
JS Code
To transform the previous auth step's output.
OAuth V1.0a
OAuth V1.0a is a legacy authentication protocol that enables websites or applications (Consumers) to securely access Protected Resources from a web service (Service Provider) through an API. It ensures that Users do not have to disclose their Service Provider credentials to the Consumers.
SSO Token
This method will provide output variables based on the active SSO token in the current account
you can also paste the copied steps from your clipboard by clicking
Paste step.Once you have configured the Refresh flow steps, similar to the Auth Flow, you can proceed by clicking on
Test Refresh flowto witness the Refresh flow process in action and observe its output.Or you can toggle on the
Same as Auth Flowbutton, it will use the same auth steps mentioned in Multistep Authentication.You also get a toggle button of
Use Stored Credentials; This is useful to fetch the stored credentials and use it in theform modalautomatically without showing it to the end user at the time of refreshing.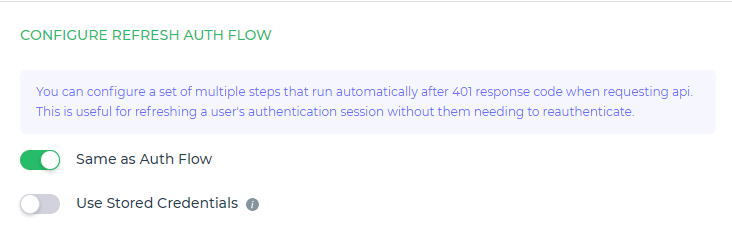
Same as Auth Flow
Update Variables
This section becomes accessible only if the Same as Auth Flow option is not selected.
you need to update the variables from your refresh auth flow output to your actual auth flow output in order to use it in the next step of multistep authentication. Updating variables comes in use when we face an error and the Refresh Auth flow takes action. This creates a new auth token saved in different parameters, so in order to send the new token as a header to test our API endpoint, we need to set the variable’s value of Auth flow the same as of Refresh Auth flow.
To add an Update variable, simply click on + Add variable. On the left side, specify the Auth Flow output variable, and on the right side, provide the corresponding Refresh flow output variable within double curly brackets {{}}. You have the flexibility to update both single-level and nested-level variables.

Configure Request Parameter
This section is to save the authentication token which we get back from the server, as parameters. These parameters will be added into all the API endpoints for all your added Api’s automatically in respective locations (Querystring/header/body).
To add an Request parameter, simply click on + Add parameter.
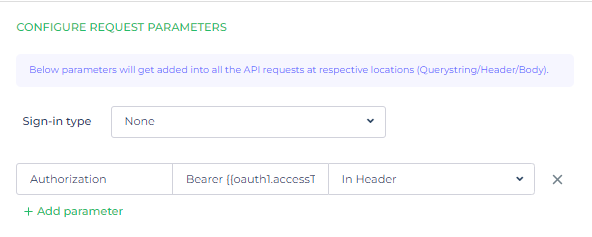
Configure Sign-In Type (optional)
This allows to set the authentication type for the resource API. Sign-In Type supports
- NTLM Authentication.
- OAuth V1.0a.
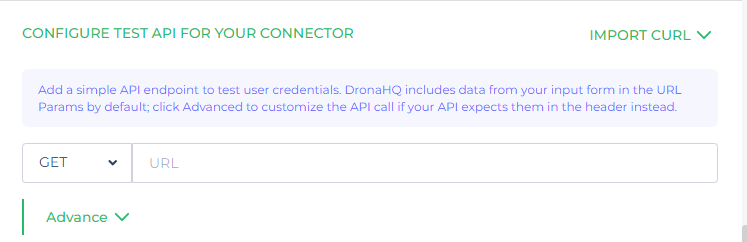
Configure Test API
Add a simple API endpoint to test user credentials. DronaHQ includes data from your input form in the URL Params by default; click Advanced to customize the API call if your API expects them in the header instead.
After ensuring that all the essential configurations are in place, you can simply save your work once it has been successfully tested.
DronaHQ maintains two different types of cache data, one in the frontend/browser and one in the backend/ DronaHQ cloud.
All the outputs from our auth flow steps – form, API request, OAuth V2, and others- are cached in the frontend securely whereas all the outputs from our auth flow with shared credentials – OAuth V2, OAuth V2 - Client Credentials, OAuth V2 - PKCE- are cached in the backend in this way tokens/outputs are never directly exposed to end user.
You can also clear cached data present in the front end from the Query of the configured connector by clicking on Clear cached auth. It is helpful to either rerun the auth flow or use different credentials other than stored previously
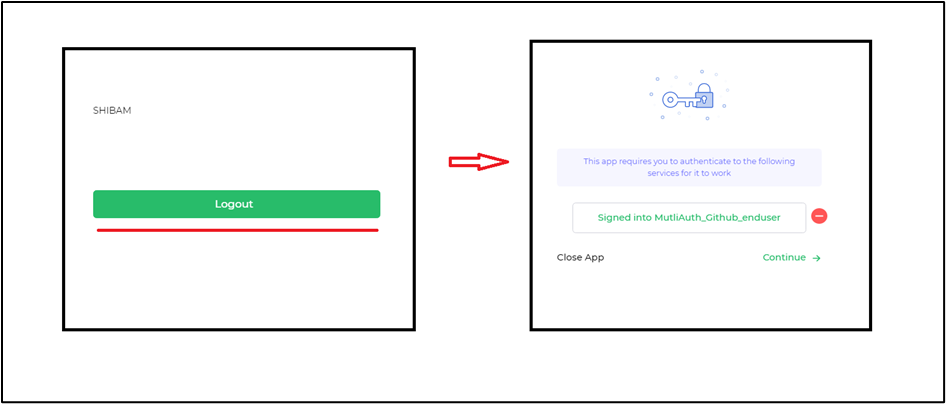
Managed Auth Screen
We have a toggle button of Show Managed Auth screen during app start under Settings > App Settings > Multistep Auth Connector.
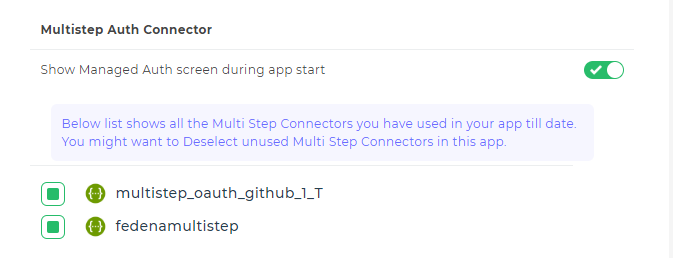
By enabling this setting, you gain access to a unified screen that displays all multistep authentication types used in our app. This convenient feature allows you to authenticate all configured services within the app on a single page, streamlining the process and consolidating multistep authentication connectors across various controls.
Additionally, it displays all the Multi-Step Connectors utilized in your app to date. Consider deselecting any unused Multi-Step Connectors within the app.
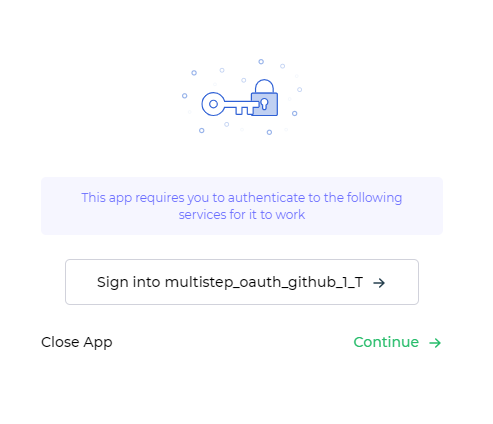
When the toggle is set to OFF, each action on the app screen will prompt for authentication. In situations where a single multistep authentication connector is used across different controls on the same screen, you'll need to authenticate repeatedly for each popup. Neglecting to do so can lead to potential crashes when fetching data from the API endpoint during the authentication process.
However, DronaHQ smartly utilizes previously entered credentials for different screens, provided the connector remains the same. This optimization ensures an enhanced user experience by reducing redundant authentication steps and avoiding unnecessary prompts during multistep authentication.
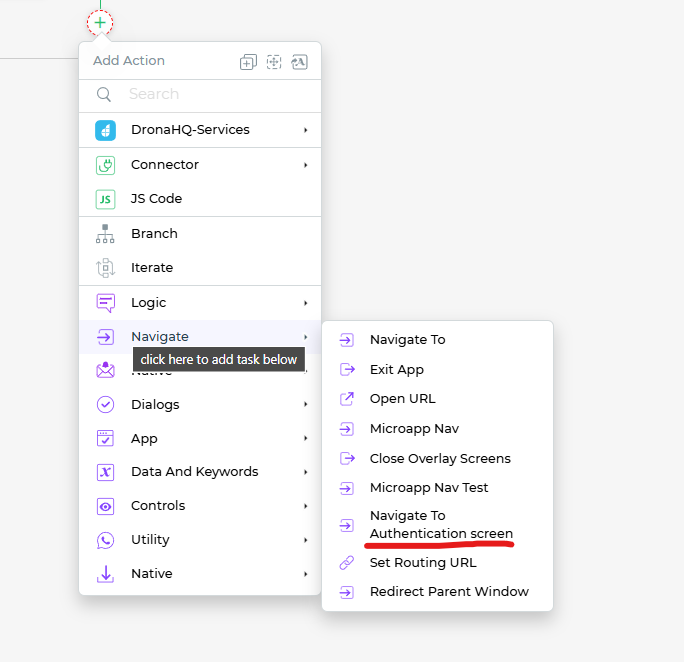
Navigate to Authentication screen – Action Flow
When a user needs to clear the cached authentication data or switch to different credentials for connector authentication, DronaHQ offers an on-screen action called Navigate to Authentication Screen. This action facilitates the clearing of cached tokens saved in the backend/frontend of the app after successfully authenticating the connector.
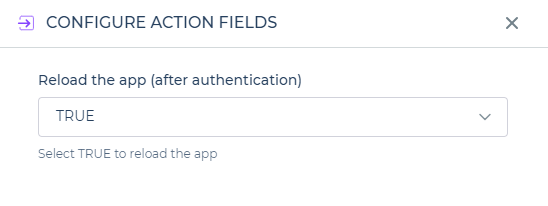
In the following screen of Configure Action's Fields, you will encounter a dropdown menu where you can choose between two options: Reload App after Authentication or Continue without Reloading.
When set to TRUE, after the user authenticates on the Managed Auth screen and clicks Continue, the app will be reloaded, starting from the beginning. However, if set to FALSE, after the user authenticates on the Managed Auth screen and clicks Continue, the app will resume from where the user left off, and all data will remain unchanged.
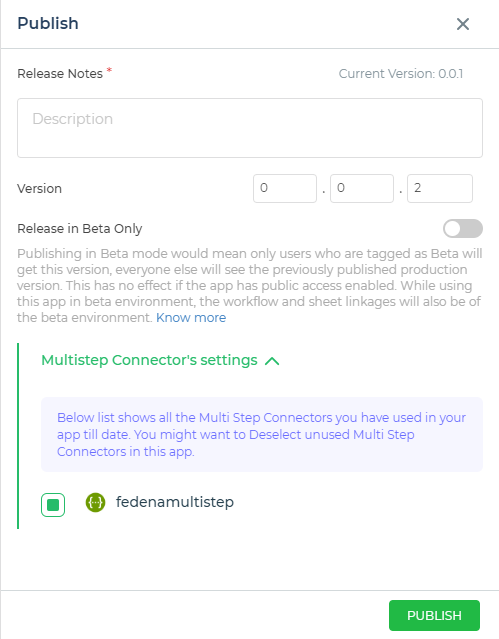
App Publish Screen
While publishing the app, you have the option to either select a used Multistep connector or deselect an unused Multistep connector from the Multistep connector's settings.
Multistep Auth steps
API Request
- Auth Flow
- Refresh Flow
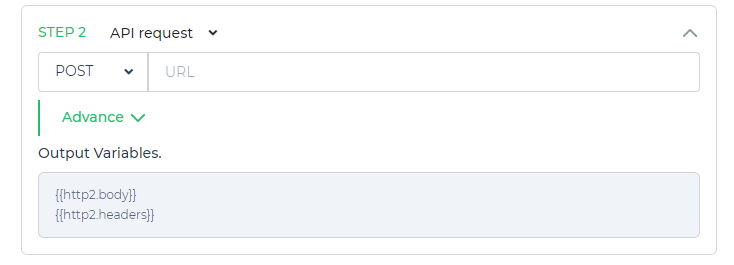
Upon configuring the API request, DronaHQ will automatically generate two default variables: body and headers. These variables are essential for passing relevant data to the server and managing the request's headers.
Ensure to fill in the required details correctly, allowing for a seamless authentication token retrieval process from your server.
Callback Auth
A custom auth type which allows to extract data from query parameters after authorizing the user, which is usually a sign-in to the app's portal. Much similar to the authorization flow of user in OAuth v2.
Decode params- when it toggleONit will decode the query params from the redirect url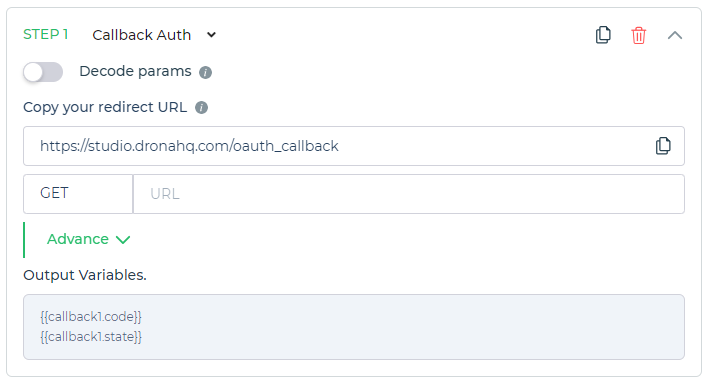
Callback Auth
In this Callback Auth, the name of the output variable will change depending on the output received. Therefore, after configuring the callback auth step, it is essential to test the authentication flow by clicking Test Auth flow button to obtain the updated output variables before proceeding with the configuration of the remaining flow.
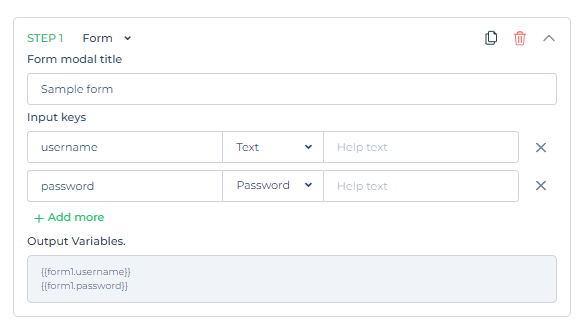
Form
After selecting the form, you will be prompted to provide various details, including the form modal title and the addition of input keys. These input keys can be of different types, such as text, email, number, and password. The purpose of these input keys is to enable the end-user to provide the necessary information to successfully authenticate with the backend. DronaHQ will automatically generate output variables based on the input fields
You have the flexibility to include multiple input keys in the form, each serving a specific purpose:
Text: Use this for text-only input in the form.Number: Utilize this for entering numeric values in the form.Email: Specify this input type to capture email addresses with the correct email ID format.Password: Save this input type for securely storing password-related information.By incorporating these input keys into the form, you can create a robust and user-friendly authentication process that caters to different data requirements.
Form After configure the form step, click on
Test Auth flowit will popup the form modal where user can enter credentials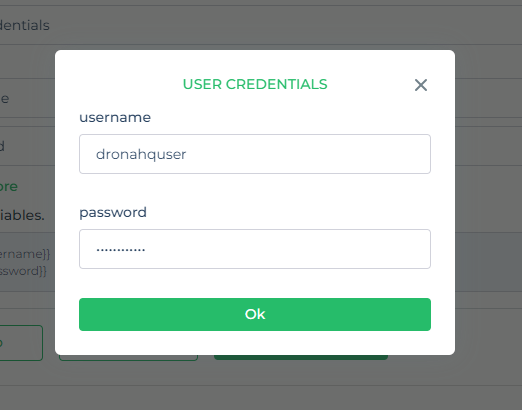
Form preview 
Form response
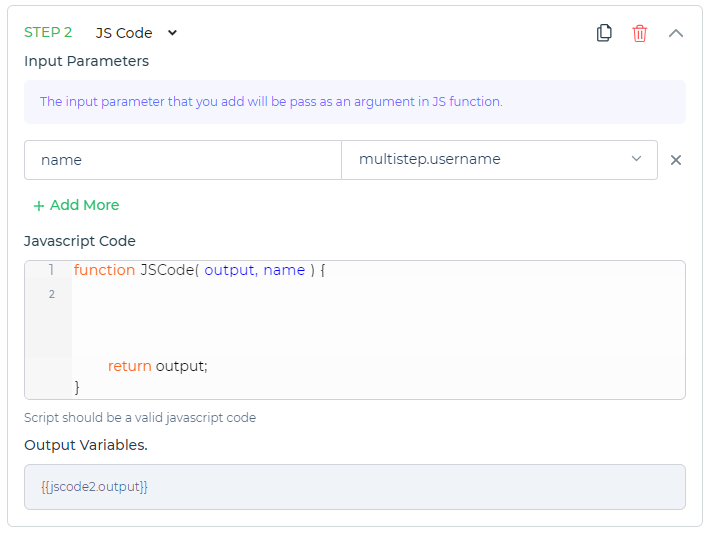
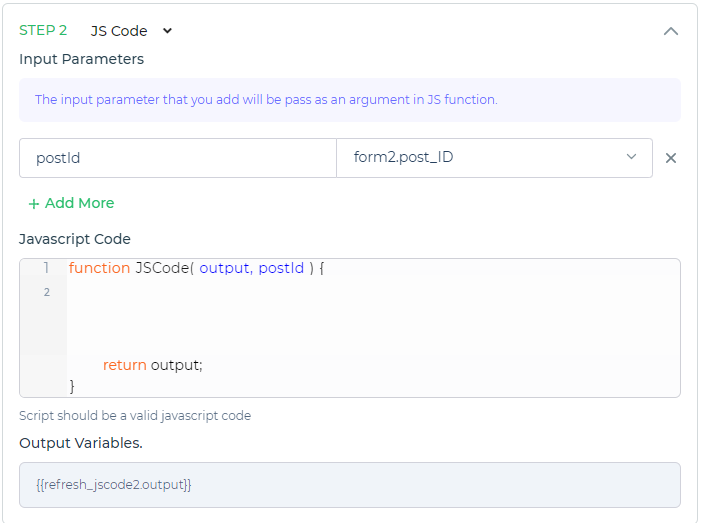
JS Code
- Auth Flow
- Refresh Flow
You can leverage JavaScript's built-in methods to transform the output of the previous authentication step.
Click on + Add More to add the JSCode parameter. Give parameter name and select previous step's output or the multistep variable from the dropdown
You can leverage JavaScript's built-in methods to transform the output of the previous authentication step.
Click on + Add More to add the JSCode parameter. Give parameter name and select previous step's output or the multistep variable from the dropdown
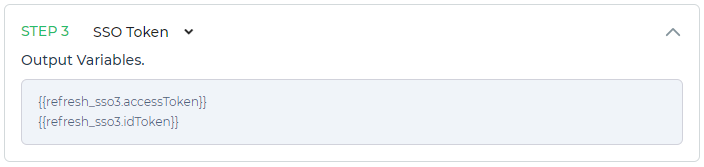
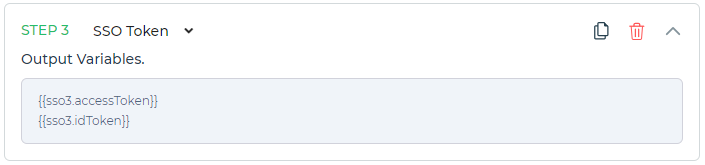
SSO Token
- Auth Flow
- Refresh Flow
By selecting the SSO Token method, DronaHQ will automatically generate output variables based on the active SSO token in your current account. This streamlines the process and eliminates the need for manual setup.
For a more in-depth understanding of SSO tokens and their usage, you can find detailed information in the provided link. Embracing the SSO token method can simplify your multistep authentication flow while ensuring seamless and secure access to your account resources.