Configuring SSO with SAML
Prerequisites
To set up SAML SSO in DronaHQ, you will need:
- SAML Metadata configuration from your SAML SSO provider. This configuration will include -
- Entity ID
- Login URL / SSO URL
- X509 public certificate info
- Binding type
- SAML Configuration setup at your SSO provider's portal with DronaHQ details. DronaHQ
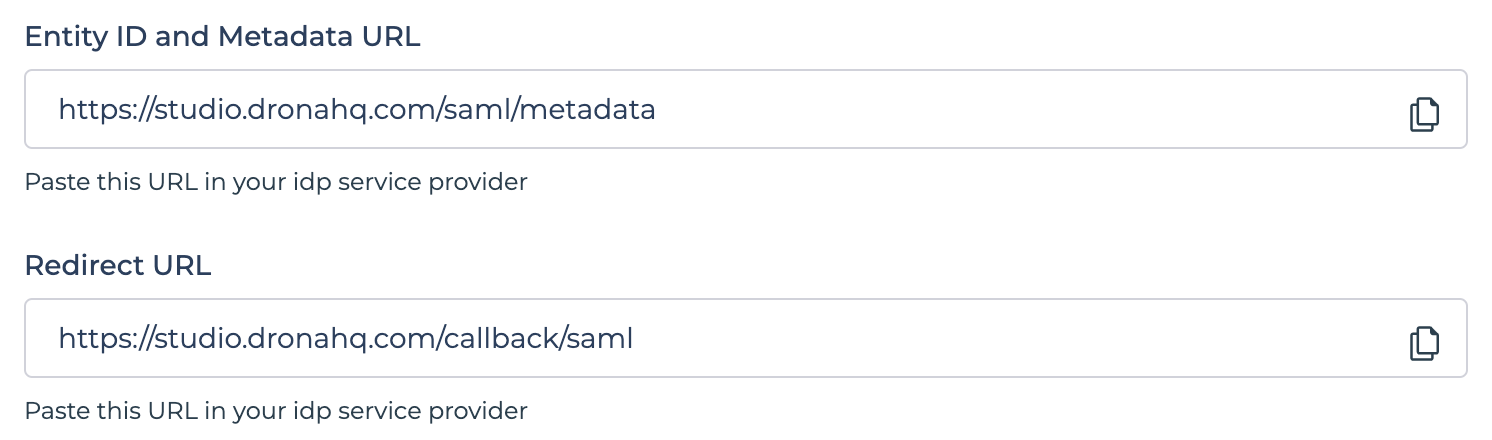
Entity ID and Metadata URLandRedirect URLcan be located atManage Users -> SSO CONFIGURATION -> + Add SSO -> SAML 2.0.
Ensure you understand how your SSO provider formats user attributes in received claim, as DronaHQ decodes these tokens as JWTs. You must provide DronaHQ with the corresponding path in the decoded JWT that contains the user's information.
Adding SSO Configuration
For setting up SAML SSO in DronaHQ, Go to Manage Users -> SSO CONFIGURATION -> + Add SSO -> SAML 2.0
Enter form with below fields -
| Field | Description |
|---|---|
| Name | Provide Friendly Name of this SSO configuration |
| Entity ID | Enter Entity ID from your SAML SSO provider metadata file. Metadata file is an XML file that you can usually locate on your SAML SSO provider dashboard. Additionally, you can often find this data by navigating to https://<Your Identity Provider URL>/federationmetadata/2007-06/federationmetadata.xml. |
| Login URL / SSO URL | Enter Login URL / SSO URL from your SAML SSO provider metadata file. |
| X509 public certificate | X509Certificate file in .cer format. Refer here for more information on creating this file |
| Binding type | Supported Binding type can be either HTTP POST, HTTP Redirect or HTTP Redirect. You can get it from your SAML SSO provider metadata file. |
| Restricted Domain | Enter domain name for which you want your users to login with for this SSO Configuration. You can add multiple domain names as well. eg - domain1.com , domain2.com. DronaHQ will automatically redirect to SSO url when we encounter any user’s sign in request with an email id belonging to the given restricted domain. |
| Want Auth request signed | It refers to digitally signing the AuthnRequest message when enabled. Digital signing adds a layer of security and ensures the integrity and authenticity of the message. |
| Add Claim List | You can map your User's ID, Name, Email and Group with corresponding values in DronaHQ. Here, you need to provide exact path of corresponding key present in SAML assertion received from your SSO provider. For eg - Add email to map against DHQ User Email, this will refer to email key present in SAML Assertion. |
| Enable JIT user provisioning | Just in time (JIT) user provisioning enables DronaHQ to provision user accounts when users sign in via SSO for the first time. This means you won't have to manually invite each user to DronaHQ first. |
| Enable SCIM User Provisioning | Enable this in case you want to create, update and deactivate User accounts at your SAML provider portal and sync it with DronaHQ user management. Once enabled, you can Configure DronaHQ SCIM API URL and Authenticate the requests using given Bearer Token at your SSO provider's portal. For more info refer this |
- Enable JIT user provisioning toggle to automatically add new users provisioned by SSO into DronaHQ
- Map group name to provide restricted access of the App to the specific group of end users. For Example, you may want to restrict the Finance related Apps to your Finance team members in your organization and HR specific apps to your HR Team in your organization and so on. By default all users will be mapped to the Default group in DronaHQ.
- If user's group is mapped with DronaHQ Group, and at time of user login, if its group name doesn't exists then DronaHQ will create a new group with same name and map it with this user.
Steps
- Setup SAML configuration similar to above, at your SAML SSO provider's portal.
- Fill the above form.
- Once, the form is filled, click on
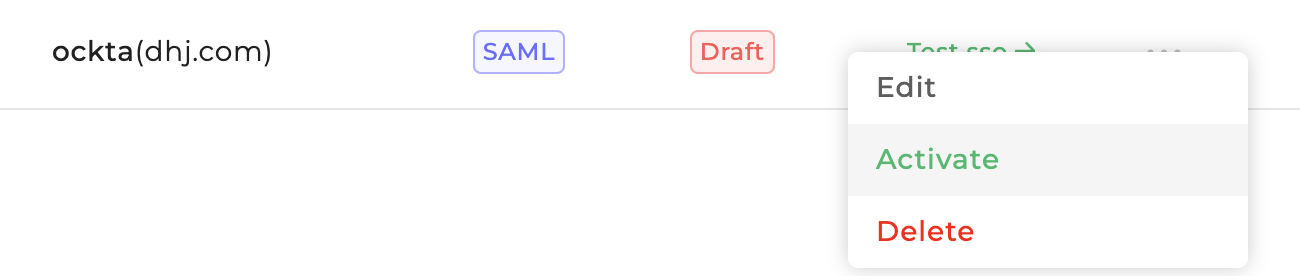
Save to draftoption to save your SSO Configuration. - You will be able to view your recently saved SSO configuration in the list. You can click on
Test SSObutton and it will open SSO Login url in a popup. Once you login successfully and if everything is set up correctly, then finally you will see a success message at the bottom. - Now, that testing is successful, you can click on the
more optionfor above SSO configuration and click onActivateto make it live.
Once live, all your users belonging to above given domain will be redirected to your SSO login from both the End User Portal and Creator Portal.
Creating X509 public certificate
Locate X509Certificate in your SAML SSO provider metadata file. Create a new file with name ending with .cer extension with its content in below format
- Insert
-----BEGIN CERTIFICATE-----to the beginning of the file . - Add
X509Certificatevalue from metadata file. - Append
-----END CERTIFICATE-----to the end of the file. For example:-----BEGIN CERTIFICATE-----
MIICPTCCAassjdTSEAgIGAUIAVrpxMA0G
......
96sa3ZdjPPASWFasd8l6ZW86yLAECUXQ==
-----END CERTIFICATE----- - Save it and is ready to upload in
X509 public certificatesection
Conclusion
With SAML (SSO) integration in DronaHQ, users can login into DronaHQ using a single set of login credentials.
With SCIM User Provisioning, User accounts can be created, updated, and deactivated centrally, ensuring efficient administration across all connected applications.