Build Your First App
⭐ Level - Beginner
⏱️ Time - 15 minutes
This tutorial guides you through the steps to create a simple database GUI using Dronahq. The application connects to a sample PostgreSQL database, allowing you to read and update customer information. You'll learn to:
- Create a new application.
- Connect to a database and fetch data.
- Display the data in a Tablegrid control.
- Build form to view customer details.
- Edit and update the customer detail.
- Publish the application
Here's a screenshot of the final result:
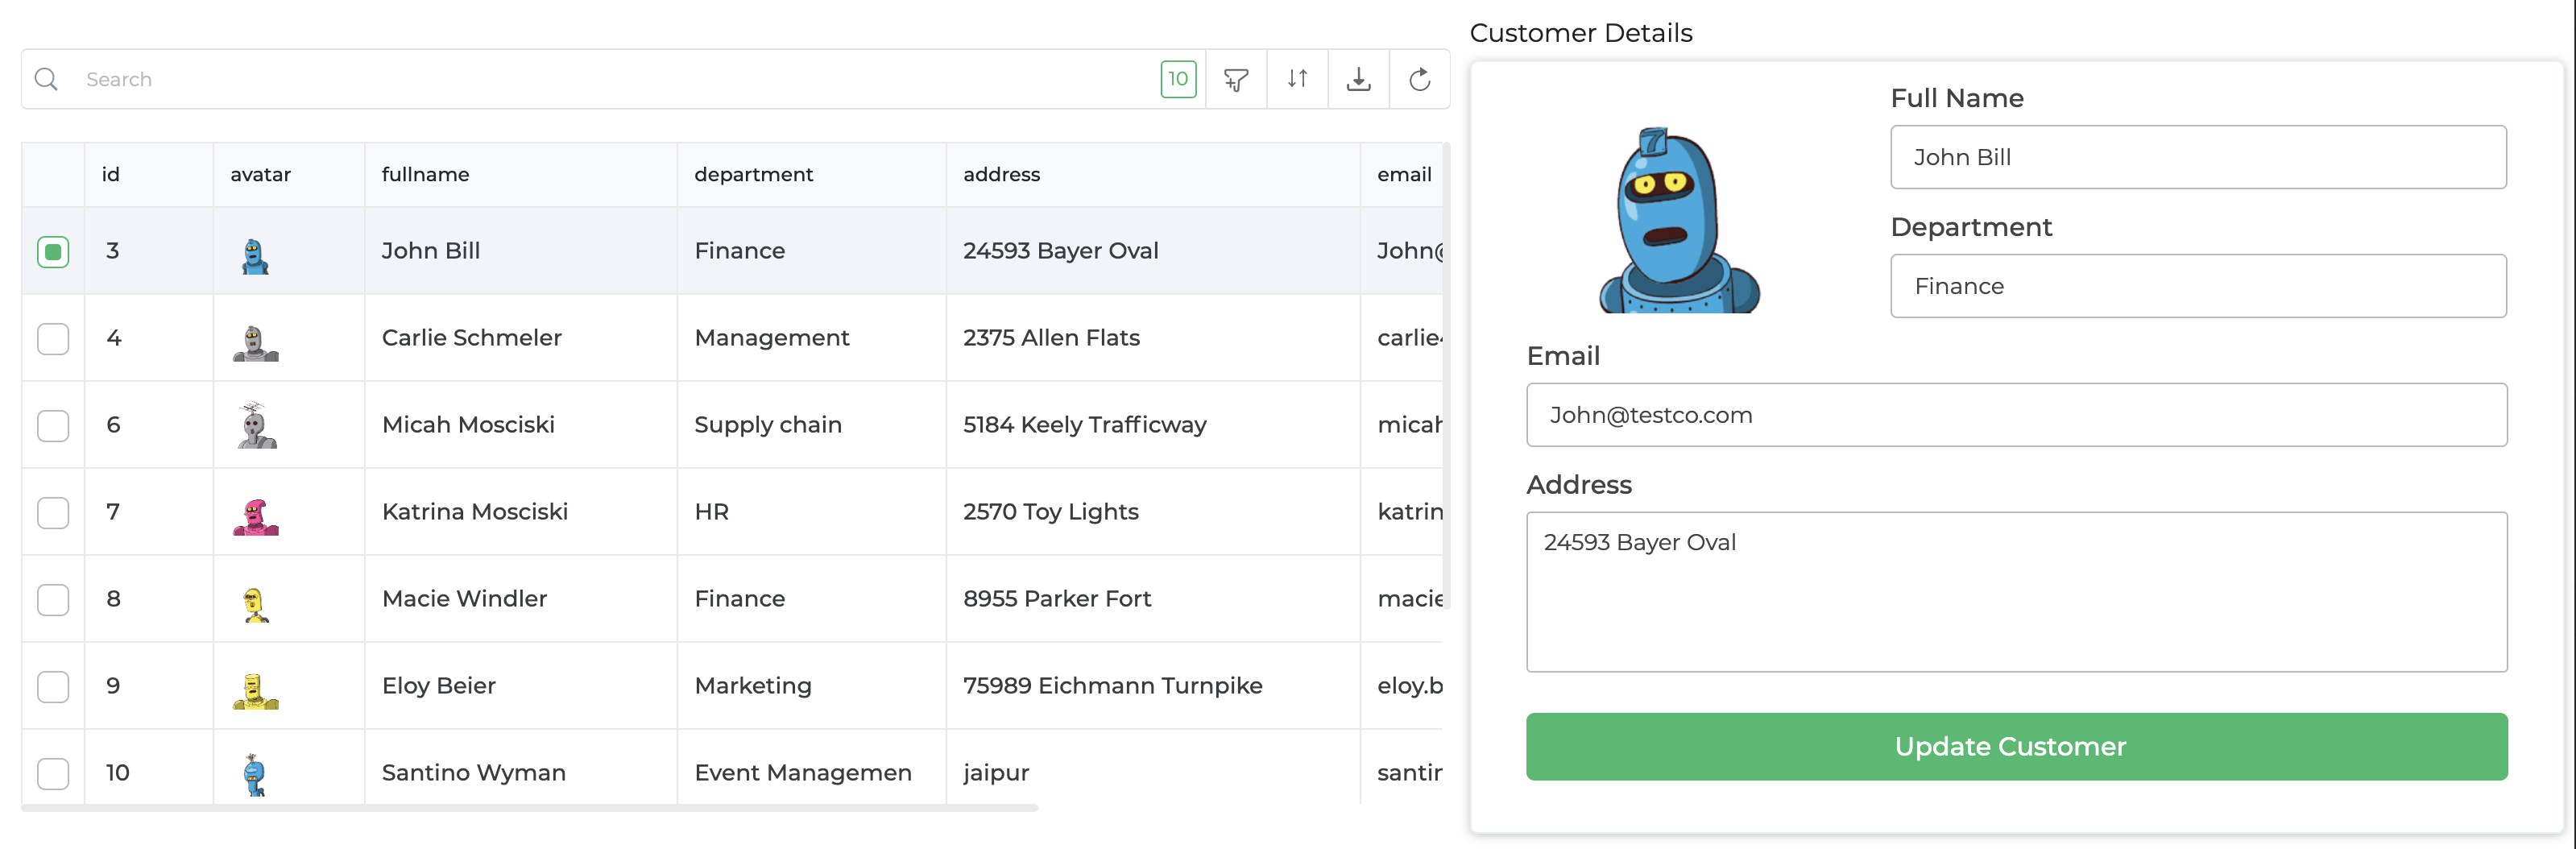
Let's get started!
Prerequisites
- An Dronahq account. If you don’t have one, sign up on Dronahq Cloud.
Create a new application
When you login into DronaHQ, it opens
My Appson the homepage by default. You need to create a new empty application for this tutorial. To create a new app, click the+icon (which is usually the first icon on the screen). SelectBlank App -> Add App Name, Description, Logo -> CREATE APP.Here, you can give App name as
Customer Management, provide description asApp to manage customer infoand choose any logo.
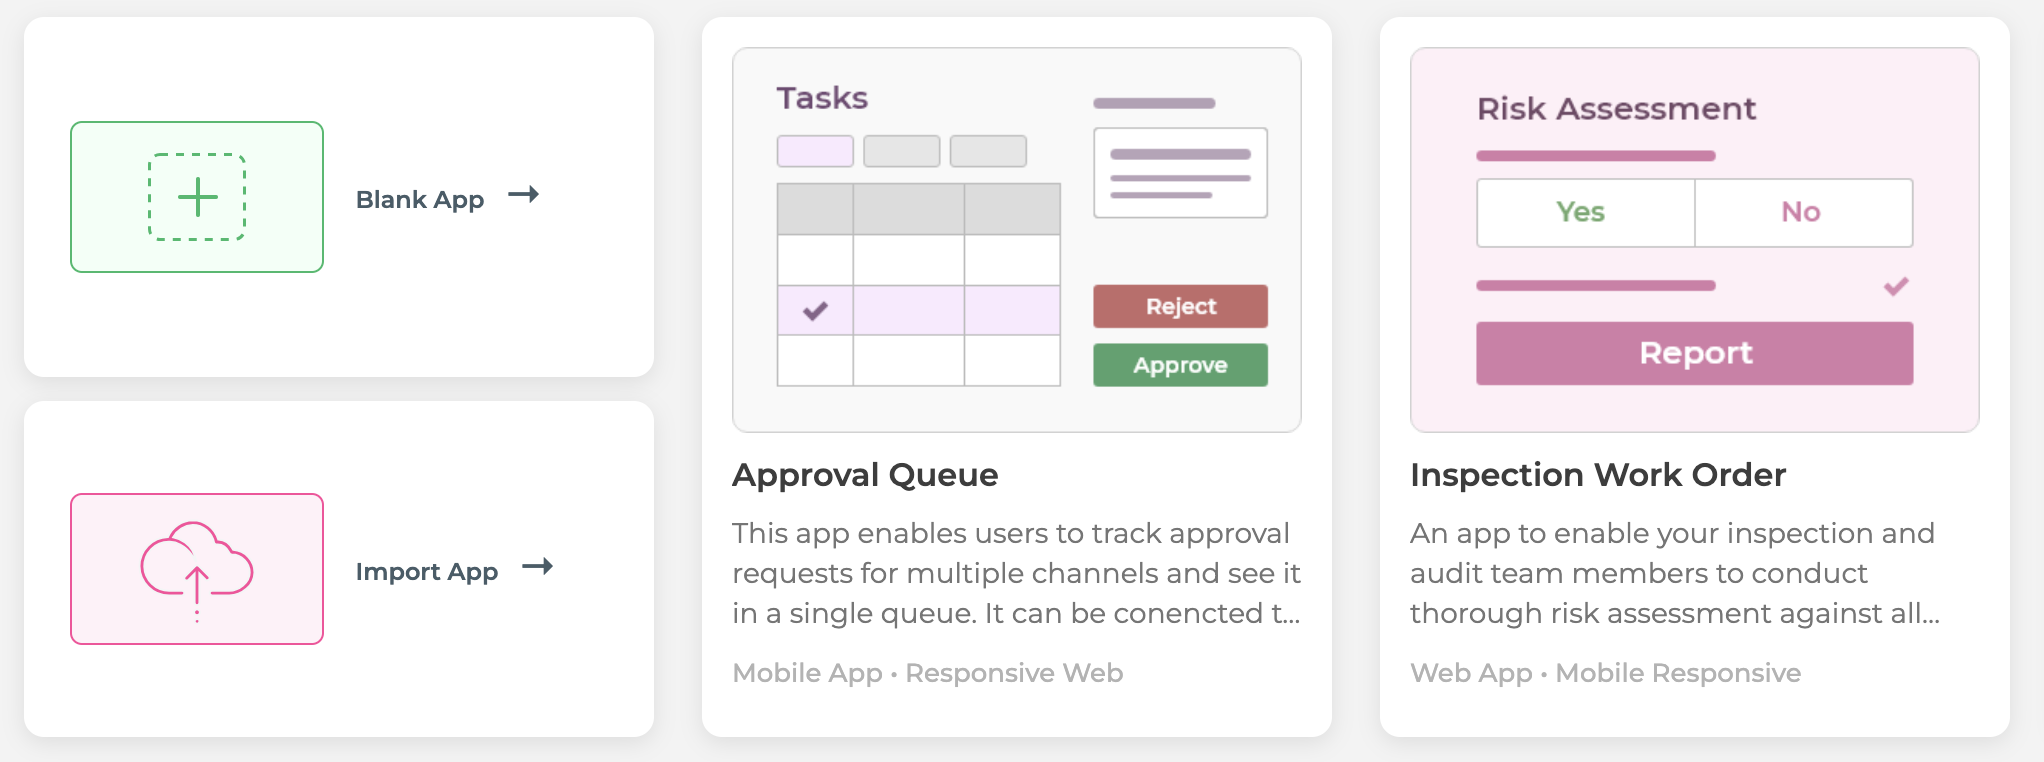
- Blank App will open in a new tab with default
Screen 1added.
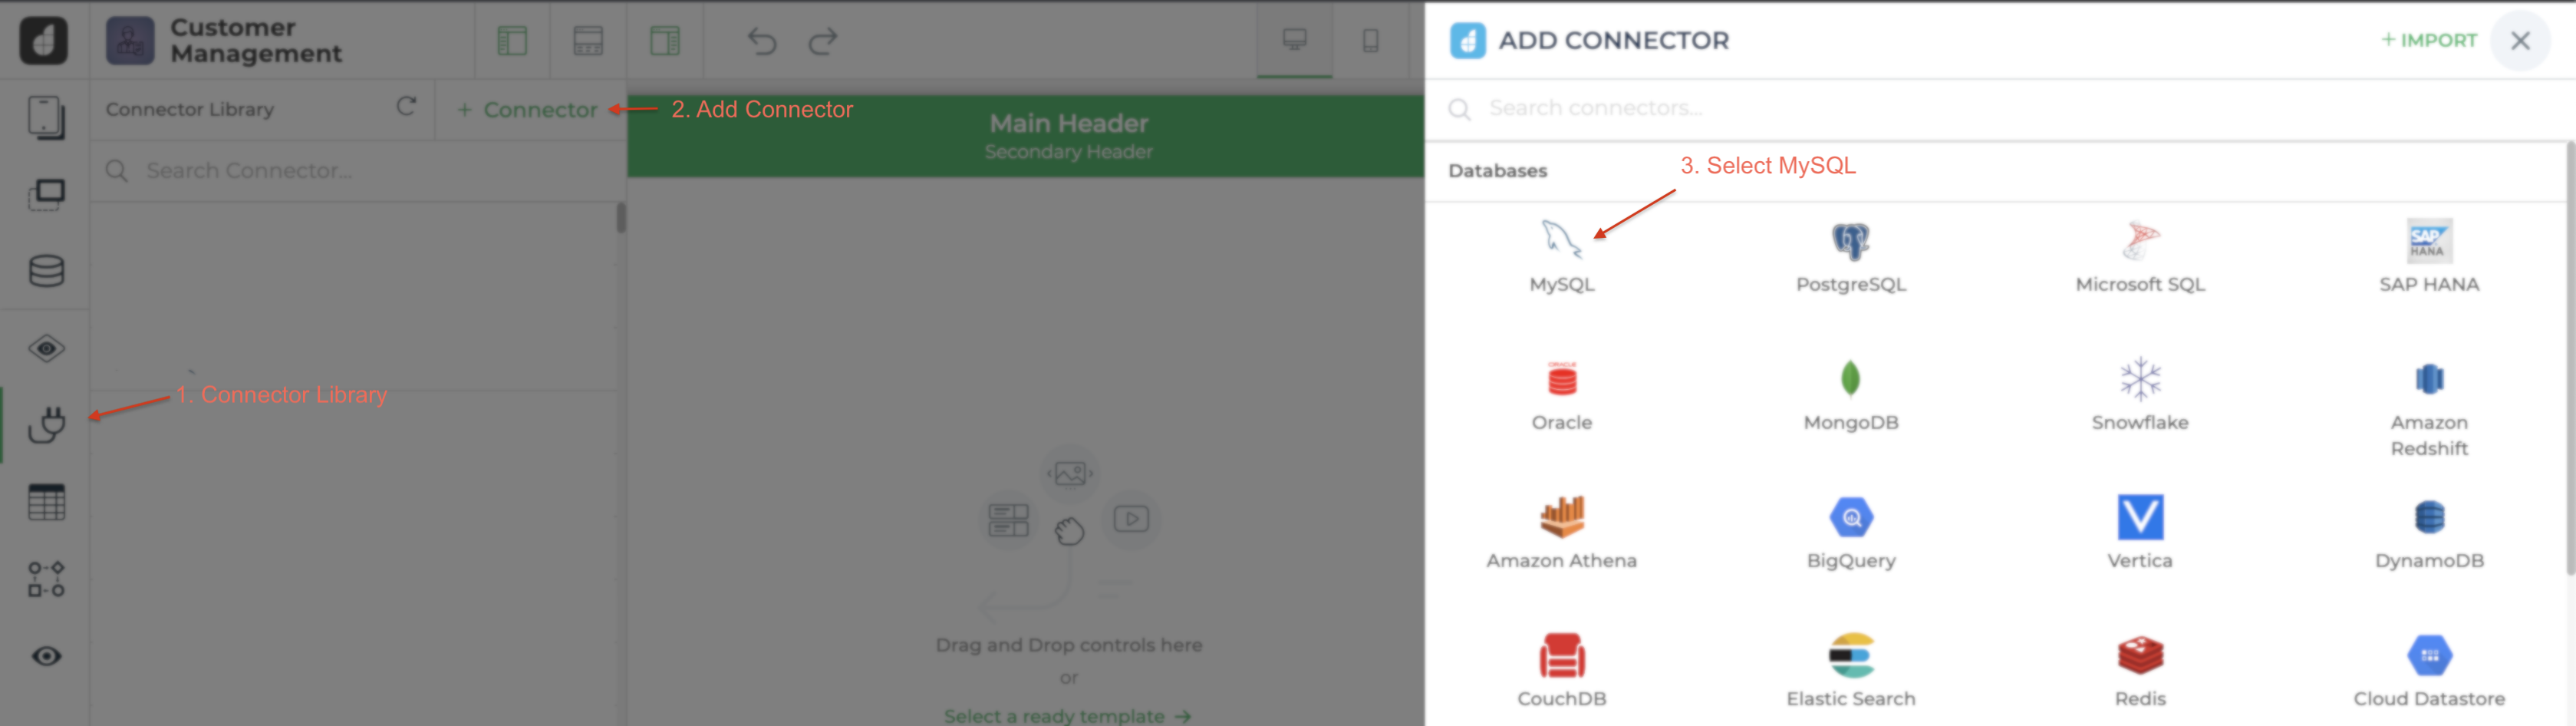
Connect to a Datasource
Here, we will connect to a mysql database.
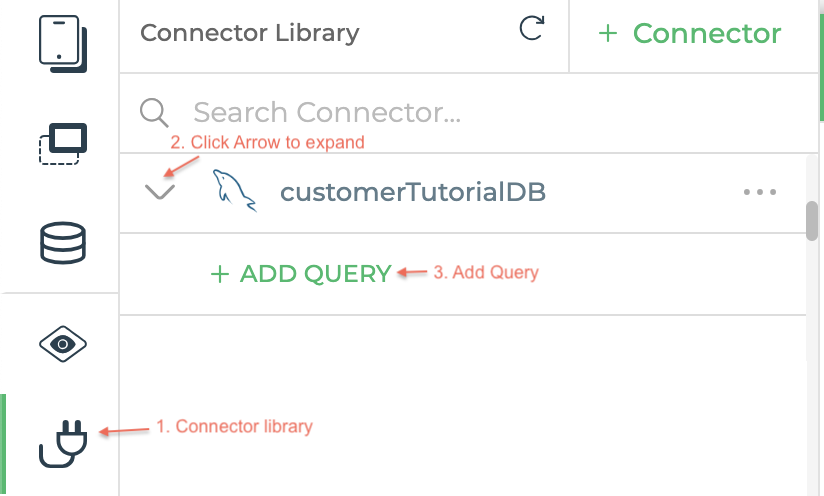
- Go to
Connector Library -> + Connector -> MySQL
Enter
Connector NameascustomerTutorialDB.Enter connector string which will be in a format represented below.
mysql://<username>:<pwd>@db-dhq.c8jniapv05hb.us-east-1.rds.amazonaws.com:3306/dbonbordingClick the
Test connectionbutton to test the connection and ensure the database is valid.
- Click
SAVEto create and save the database connection. You'll see thecustomerTutorialDBdatabase in Connectors listing.
🚩 You've successfully connected to the MySQL database that contains customer information.
Fetch customer data and Display in Table Grid
Click the
Controlsoption in navigation menu to the left of screen.Drag a
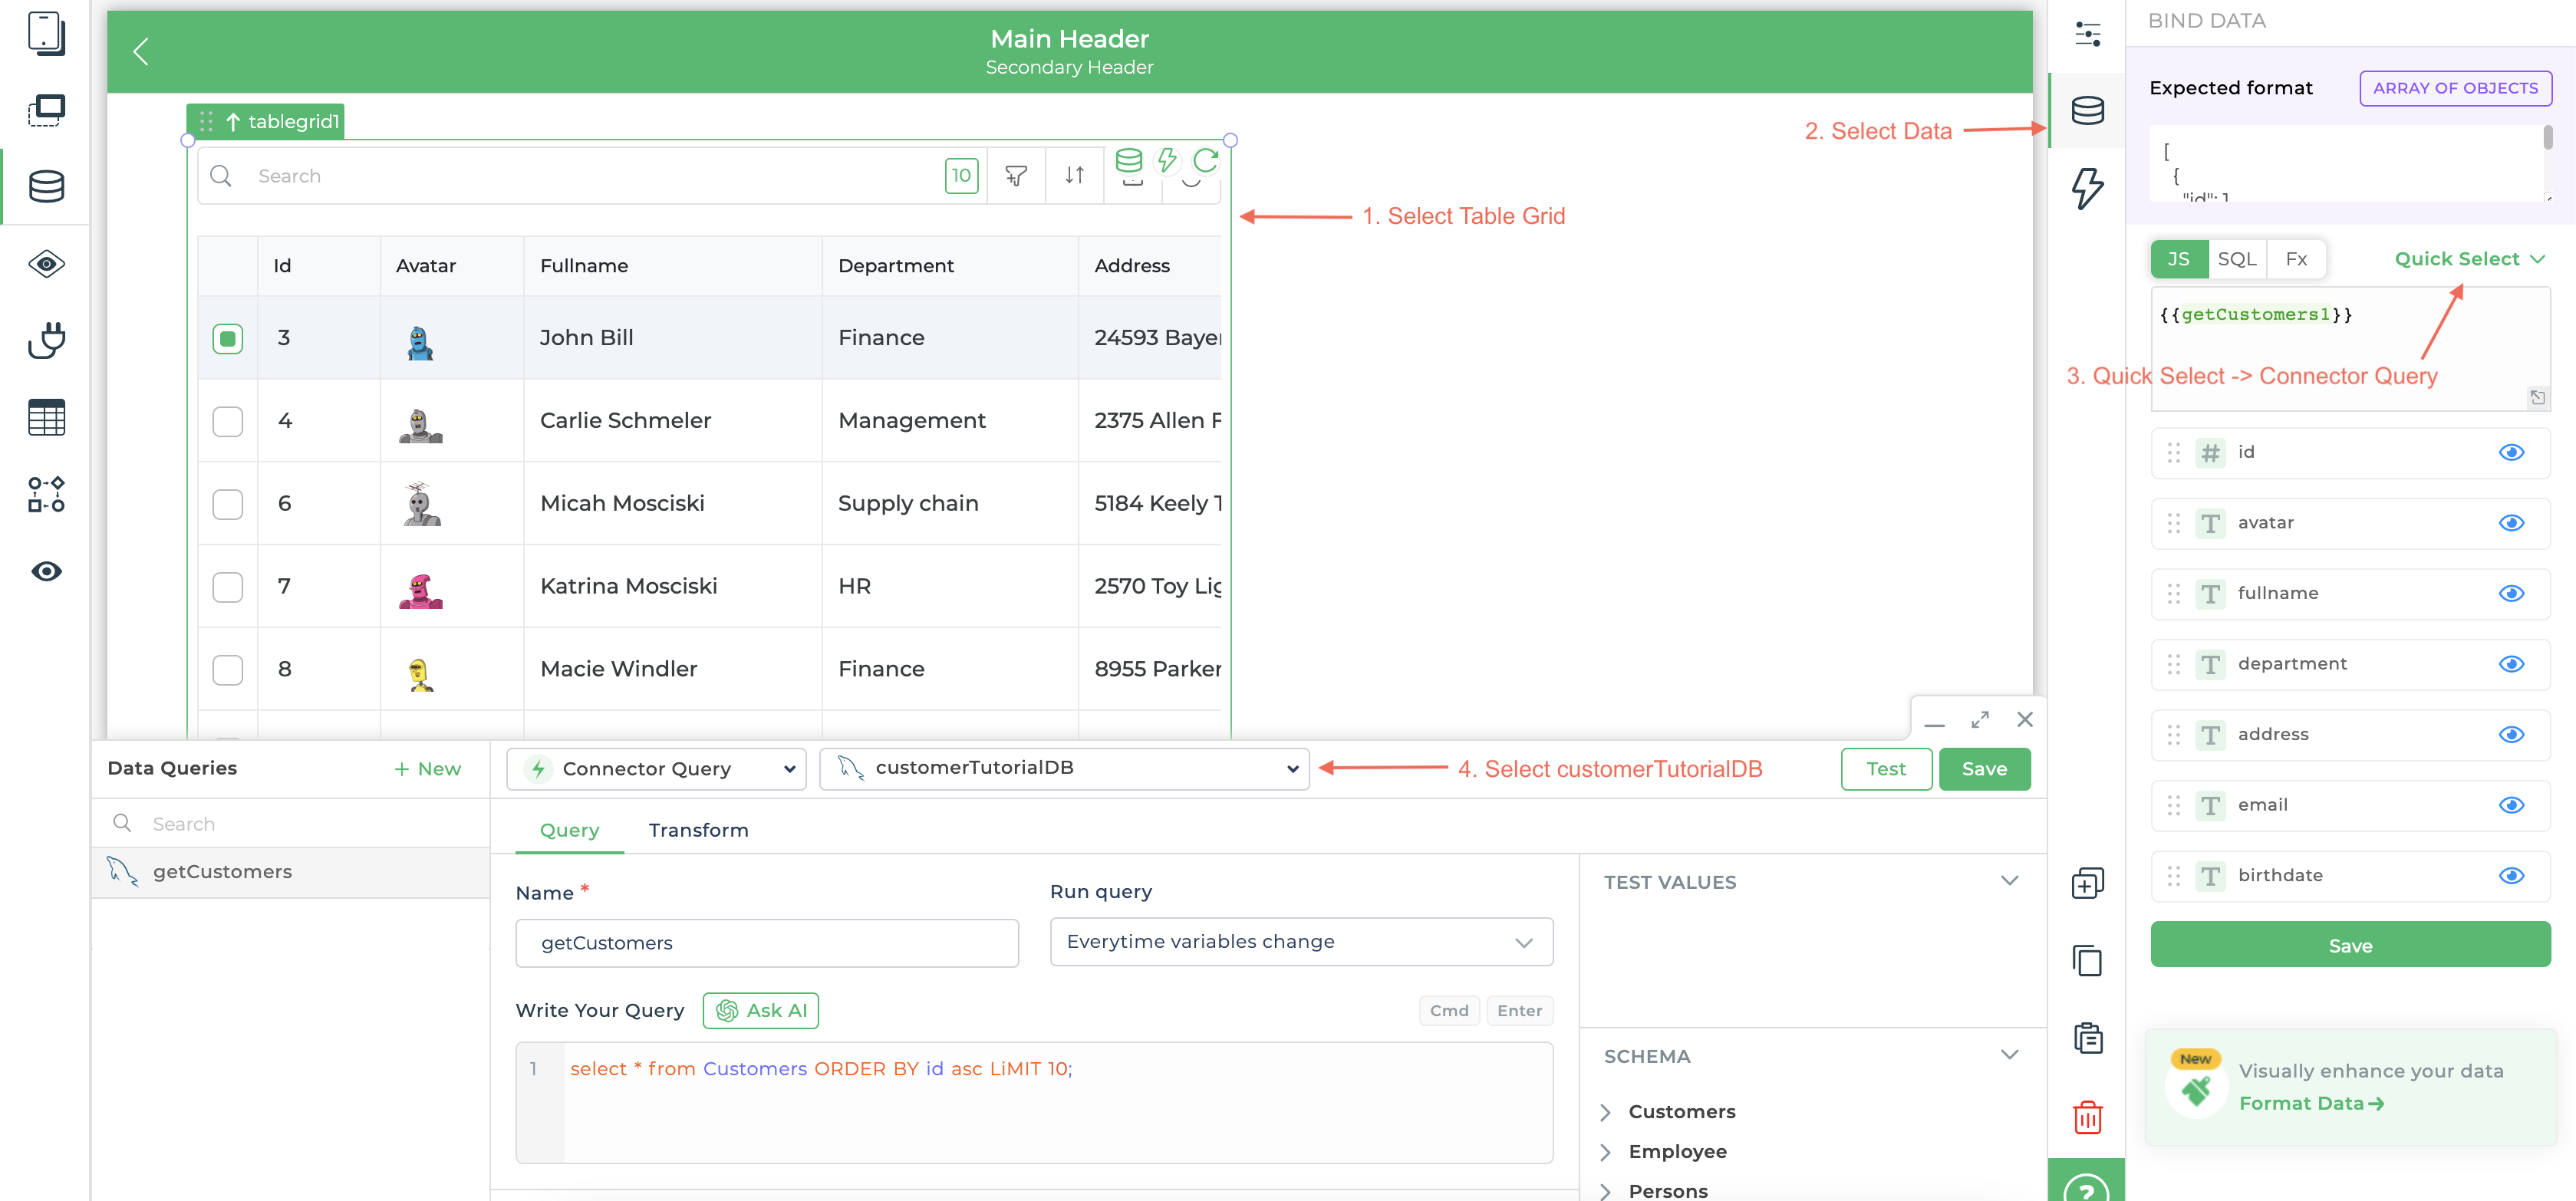
Table Gridcontrol and drop it to the on the canvas.Select
Table Gridcontrol and selectDataoption in navigation menu to the right of screen.Select
Quick Select -> Connector Query -> customerTutorialDB. It loads the query editor which list all the tables ofcustomerTutorialDBdatabase.Enter query name as
getCustomers.Enter below query under
Write Your Queryto get first 10customers.
select * from Customers ORDER BY id asc LiMIT 10;
- Click on
Test Queryand thenSavethis query once test is successful.
Under
Transform Response -> Filter Keysyou can choose the list of keys that will be displayed in Table Grid control. If no keys are selected then all the Keys will be selected.Click
Test & Save. This will display customers list in Table Grid control.
🚩 You've created your first query to fetch the list of customers in the database and displayed the results from getCustomers query to Table Grid control.
Build form to view customer details
From the
Controlsoption, drag and drop aContainercontrol on the canvas to the right of the Table Grid control.Select
Containercontrol and on thepropertypane to the right of the Screen, underLabelsection, turn off the hidden toggle and rename the Text toCustomer Detailsfrom Container.Now add
Imagecontrol in the above container. SelectImagecontrol, on thedatapane to the right of the Screen, type{{tablegrid.avatar}}and clickSave.Now, add
Text Inputcontrol in the above container, Select thisText Inputcontrol- On the
propertypane to the right of the Screen, underLabelsection, rename the Text toFull Namefrom Default value. - On the
datapane to the right of the Screen, type{{tablegrid.fullname}}and clickSave.
- On the
Now, Let's do the same for Customer's department. Add another
Text Inputcontrol in the above container, Select thisText Inputcontrol- On the
propertypane to the right of the Screen, underLabelsection, rename the Text toDepartmentfrom Default value. - On the
datapane to the right of the Screen, type{{tablegrid.department}}and clickSave.
- On the
Now, Let's do the same for Customer's email address. Add another
Text Inputcontrol in the above container, Select thisText Inputcontrol- On the
propertypane to the right of the Screen, underLabelsection, rename the Text toEmailfrom Default value. - On the
datapane to the right of the Screen, type{{tablegrid.email}}and clickSave.
- On the
And finally, for Customer's address, Add
Textareacontrol in the above container, Select thisTextareacontrol- On the
propertypane to the right of the Screen, underLabelsection, rename the Text toAddressfrom Default value. - On the
datapane to the right of the Screen, type{{tablegrid.address}}and clickSave.
- On the
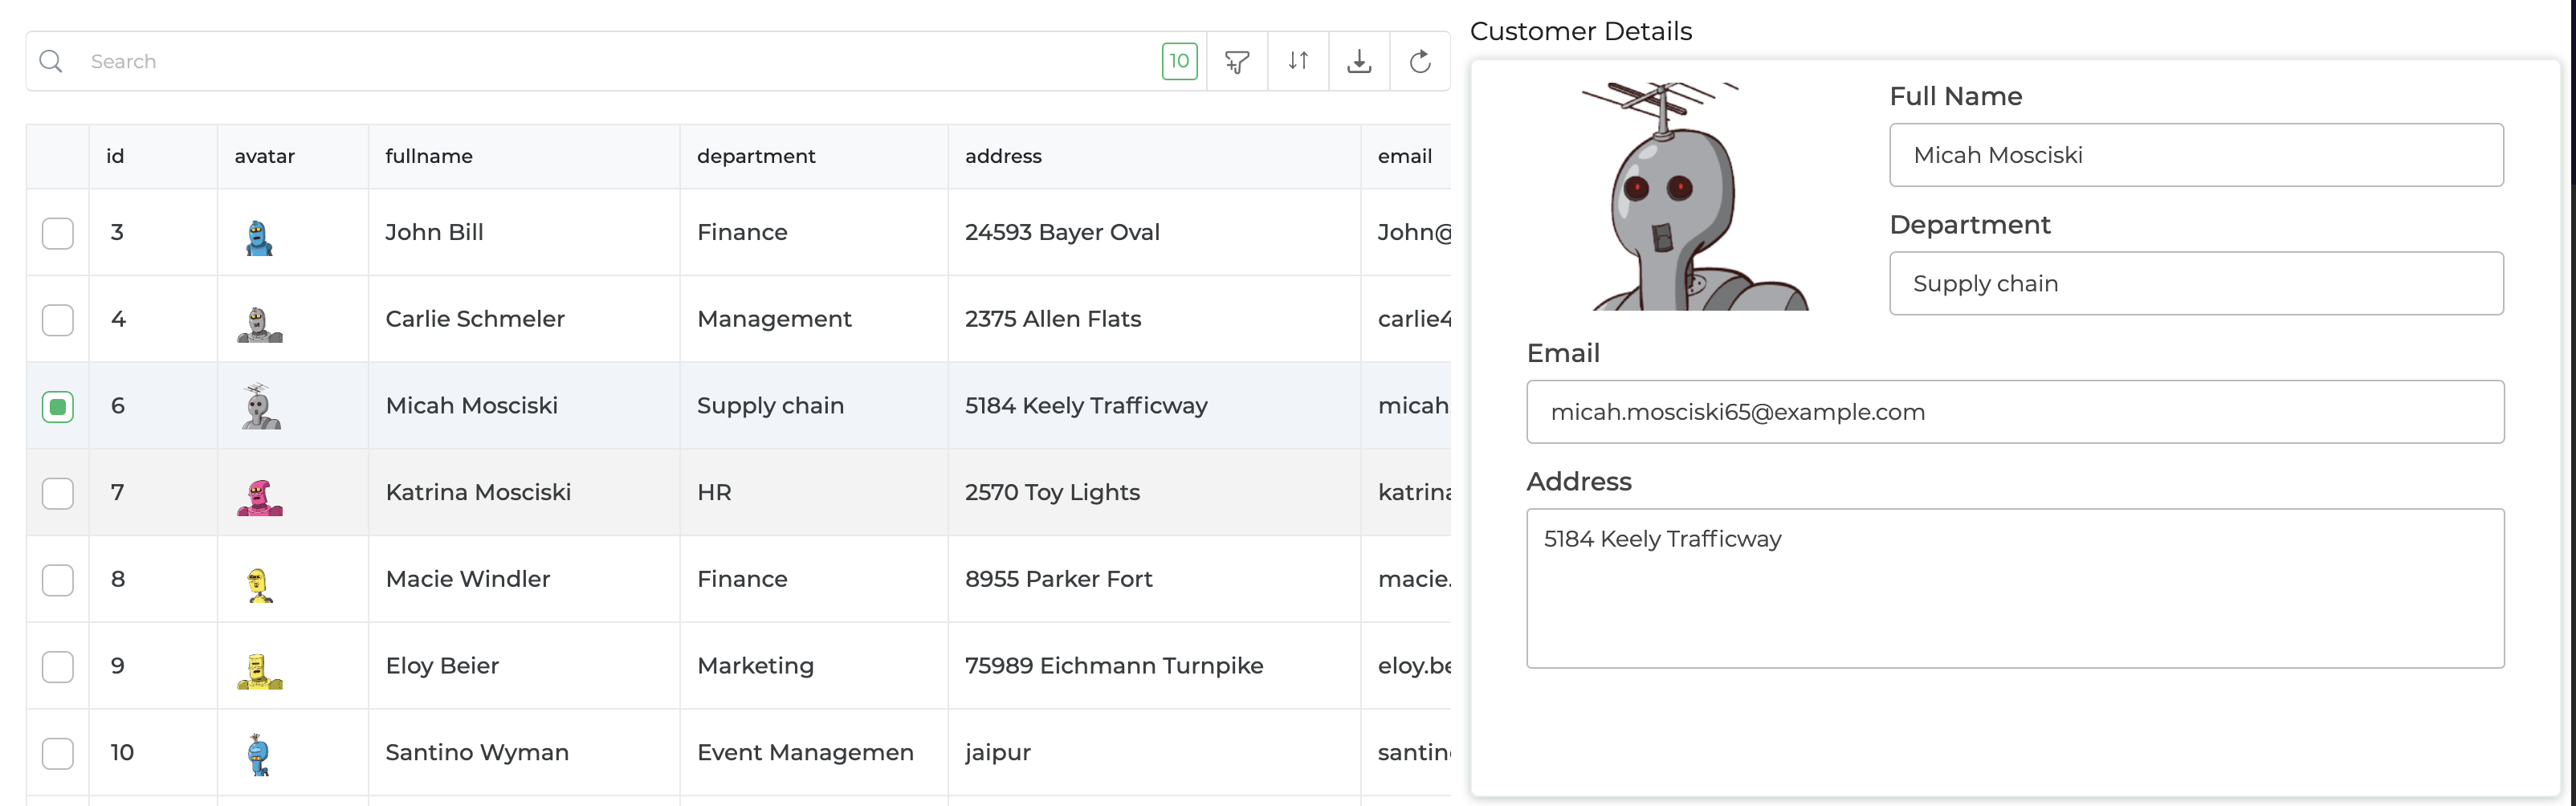
🚩 You've completed binding the data to the controls on the Form. Select the rows on the Table Grid to view the corresponding customer details on the Form.
Update customer details
- Select
Connector Library -> customerTutorialDB -> + New Query.
It loads the query editor which list all the tables of
customerTutorialDBdatabase.Enter query name as
updateCustomer.Enter below query under
Write Your Queryto updateCustomerstable.
 UPDATE Customers
  SET fullname = "{{CustomerFullName}}",
  department = "{{CustomerDepartment}}",
  address = "{{CustomerAddress}}",
  email = "{{CustomerEmail}}"
  WHERE id = {{CustomerID}};
Provide Test values for CustomerID field as 100. For other fields you can provide provide any test value or keep it empty.
Click on
Test Queryand thenSavethis query once test is successful.Now, in our form, From the
Controlsoption, drag and drop aButtoncontrol in our Container control.Select this
Buttoncontrol- On the
propertypane to the right of the Screen, scroll down to thePROPERTIESaccordion, rename the Text toUpdate Customerfrom Action. - On the
eventspane to the right of the Screen, selectbutton_clickevent and follow below steps.
- On the
Click
+ (Add) -> Server Side Actions -> customerTutorialDB -> updateCustomerClick
Continueand provide following query parameters with that of corresponding control.- For CustomerAddress, Add
{{address}} - For CustomerDepartment, Add
{{department}} - For CustomerEmail, Add
{{email}} - For CustomerFullName, Add
{{fullname}} - For CustomerID, Add
{{tablegrid.id}}
- For CustomerAddress, Add
Click
Continueand thenFinish.In the success leg, we need to reload Tablegrid control's data to see the updated change. Click
+ (Add) -> Run Data Queries -> getCustomers. ClickContinueand thenFinish.
Tablegrid control is getting data from getCustomers data query. Thereby, triggering a change in getCustomers data query by re-running it, the result will be passed to Table Grid control automagically.
Click on
Previewbutton on the top right of the screen toTestthe application andFinally, click on
PublishandEnter Release Notes -> Publishto deploy your application. You can click onShareoption to view various sharing options usingOrganizational access or Public URL access.
The databases used in tutorials are public and shared by all Dronahq users, so ensure that you don't input confidential information during testing. The Test databases automatically resets, so any updates made to these databases are temporary
🚩 Congratulations on successfully building your first app that can display data from the database and save the updated data back into the database using Form.
In this tutorial, you explored a few different controls and created a simple database GUI to view, query, and update data on a sample MySQL database. You can use these skills to build your own app.