Create white branded mobile apps (beta)
DronaHQ provides an automated way to create your own white branded Mobile Apps for Android and iOS platforms from DronaHQ console.
White branded mobile apps creation is only available on Business plan of DronaHQ cloud edition.
We will soon enable this feature on Self-hosted dashboard as well for Business plan users.
Contact us here in case you would want to try out the beta for your organization.
Prerequisites
Below are the prerequisites you will need to create your white branded mobile app
General Prerequisites
- App Icon for your app -
1024px x 1024px - SSO Login & Callback URL (Optional)
Android Prerequisites
App Notification Icon for your app -
128px x 128px. Should have transparent background and logo should have only white color. It appears in Android Notification Bar when any notification is received by the App. View Sample ImageKey Store For Signing App (Optional) - Refer this to create one
- Key Store file (.jks)
- Key Store password
- Key store alias
- Key store alias password
iOS Prerequisites
Main App Provisioning Profile (.mobileprovision)
Create an App Identifier on Apple developer account with unique Bundle ID of your choice with following capabilities to be Enabled -
Push Notifications, Sirikit and App groups Capabilities. For example if App bundle id mentioned above iscom.company.testappthen Create an App identifier named -com.company.testapp. Once, App id is created, you can createApp Store/Ad Hoc Distribution Provisioning profilefor above App id depending on your Build Type and download it.Rich Notification Extension Provisioning Profile (.mobileprovision) (Optional)
Required, if you want your App to support App Notifications with Images. Create App Identifier on Apple developer account with Bundle ID -
<Bundle Id of App>.Rich-Noti-Extensionand EnablePush Notifications Capabilities. For example if App bundle id iscom.company.testappthen Create an App identifier named -com.company.testapp.Rich-Noti-Extension. Once, App id is created, you can createApp Store/Ad Hoc Distribution Provisioning profilefor above App id depending on your Build Type and download it.Siri Extension Provisioning Profile (.mobileprovision) & Siri UI Extension Provisioning Profile File (.mobileprovision) (Optional)
Required, if you want to use Siri shortcuts in your app to open MicroApp quickly using Siri. Create 2 App Identifiers on Apple developer account with Bundle ID -
<Bundle Id of App>.Shortcuts-Siriand<Bundle Id of App>.ShortcutsSiri-UI. For example, if App bundle id iscom.company.testappthen Create an App identifier named -com.company.testapp.Shortcuts-Siriandcom.company.testapp.ShortcutsSiri-UI. Once, App id is created, you can createApp Store/Ad Hoc Distribution Provisioning profilefor above App ids depending on your Build Type and download it.Status App Widget Extension Provisioning Profile (.mobileprovision) (Optional) Required, if you want to be able to add widgets of Status App in your phone's home screen. Create App Identifier on Apple developer account with Bundle ID -
<Bundle Id of App>.StatusAppWidget-ExtensionFor example if App bundle id iscom.company.testappthen Create an App identifier named -com.company.testapp.StatusAppWidget-Extention. Once, App id is created, you can createApp Store/Ad Hoc Distribution Provisioning profilefor above App id depending on your Build Type and download it.Status App Widget Extension Provisioning Profile (.mobileprovision) (Optional) Required, if you want to be able to add widgets of Recent Opened MicroApp in your phone's home screen. Create App Identifier on Apple developer account with Bundle ID -
<Bundle Id of App>.MicroAppWidget-Extention. For example if App bundle id iscom.company.testappthen Create an App identifier named -com.company.testapp.MicroAppWidget-Extention. Once, App id is created, you can createApp Store/Ad Hoc Distribution Provisioning profilefor above App id depending on your Build Type and download it.Apple Distribution certificate (.p12)
Key ID, API Key (.p8) and Issuer ID (Optional) Required, if you want to upload App directly on Appstore.
- Create an App on Appstore Connect with same bundle id used above.
- Refer this link for Creating App Store Connect API key
This is useful in case you don't have Mac machine to upload generated IPA using Transporter App to Appstore connect.
Creating white branded mobile App
You can access this feature from Account settings -> Domain & Branding -> WHITE BRANDED MOBILE APP CREATION
Click on + CREATE and select App Type and fill below forms -
You can either create only Android App or only iOS App or both App types while inputting white branded mobile app form.
COMMON
| Field | Description |
|---|---|
| App name | Provide App Name which you want to provide for your App. |
| Bundle Identifier | Please enter unique identifier for your app. Should be same for both android and ios. Bundle identifier or Package name once set, cannot be updated later. eg - com.company.appname. |
| About the App | Enter your App description. |
| Support Email ID | Provide support email id that will be displayed to your end users in case they face any issues in app signin. |
| Url Scheme | It should be a unique text without any space or special characters, that can be used by any other app to invoke this App. For example, if you enter helloworld then dhq-helloworld will be your App's url scheme to invoke this app. |
| App Sign-in | Enable this if you have Custom SSO Implemented in your account and you want users to directly land on this SSO page for Sign-in into the App. |
| SSO Login URL | Optional. Enter you SSO login URL for your users to Sign IN if App Sign-in is enabled. |
| Callback URL for SSO Login | Optional. Enter you SSO Callback URL if App Sign-in is enabled. |
| Hide Sign In Header | Optional. Enable this if you want your SSO Page to be displayed full screen. If disabled, default Sign In Header is displayed. |
| App Background Theme | Select App theme color which will be used in launch screen background color and few other places. |
| App Icon (png) | App Icon for your app. Only Image with 1024 x 1024 px is supported. |
ANDROID
| Field | Description |
|---|---|
| App Notification Icon Upload | App Notification Icon for your app. Only Image with 128 x 128 px is supported. View Sample Image. |
| Build Type | Release or MicroApp debuggable. Use Release version to upload it on Playstore. MicroApp debuggable is for troubleshooting use case. |
| Build Generation Type | Apk or Bundle. Use Bundle for uploading App on Google Playstore. |
| Use My Signing Keystore | Enable this if you want to provide your own signing keystore to sign the Apk/Bundle. If disabled, we will use our keystore to sign the app. Check this for creating your own signing keystore |
| Key Store (.jks) | Optional, Provide .jks file that will be used for signing this app. Please store this .jks file securely for using it in future. |
| Keystore password for signing the apk | Optional, Keystore password for Keystore file. |
| Key store alias | Optional, Keystore Alias name. |
| Key store alias password | Optional, Password for Keystore alias. |
IOS
| Field | Description |
|---|---|
| Build Type | Appstore or Adhoc build type. |
| Main App Provisioning Profile (.mobileprovision) | App's Main provisioning profile file. Check prerequisites on how to create this file. |
| Enable Rich Notification | Enable this if you want your App to support App Notifications with Images. |
| Rich Notification Extension Provisioning Profile (.mobileprovision) | Optional, App's Rich Notification extension provisioning profile file. Check prerequisites on how to create this file. |
| Enable Siri | Enable this if you want to use Siri shortcuts in your app to open MicroApp quickly using Siri. |
| Siri Extension Provisioning Profile (.mobileprovision) & Siri UI Extension Provisioning Profile File (.mobileprovision) | Optional, App's Siri and Siri UI extension provisioning profile files. Check prerequisites on how to create this 2 files. |
| Enable Status App Widget | Enable this if you want to be able to add widgets of Status App in your phone's home screen. |
| Status App Widget Extension Provisioning Profile (.mobileprovision) | Optional, App's Status App extension provisioning profile file. Check prerequisites on how to create this file. |
| Enable Recents MicroApp Widget | Enable this if you want to be able to add widgets of Recent Opened MicroApp in your phone's home screen. |
| Status App Widget Extension Provisioning Profile (.mobileprovision) | Optional, App's Status App Widget extension provisioning profile file. Check prerequisites on how to create this file. |
| Apple Distribution certificate | Apple Distribution certificate file with .p12 extension of your Apple account. |
| Distribution Certificate Password | Password for importing your Apple distribution certificate. |
| Upload iPA to App Store Connect | Enable this to upload this iPA to Appstore connect. |
| Key ID, API Key (.p8) and Issuer ID | Check prerequisites on how to get this id and file which is required by DronaHQ to upload the App on your Apple Appstoreconnect account.. |
Once, you submit the form successfully, your request for creating apps will be queued and you will receive an email once your individual Android or iOS App is generated.
You can also check the status of your App in Account settings -> Domain & Branding -> WHITE BRANDED MOBILE APP CREATION page.
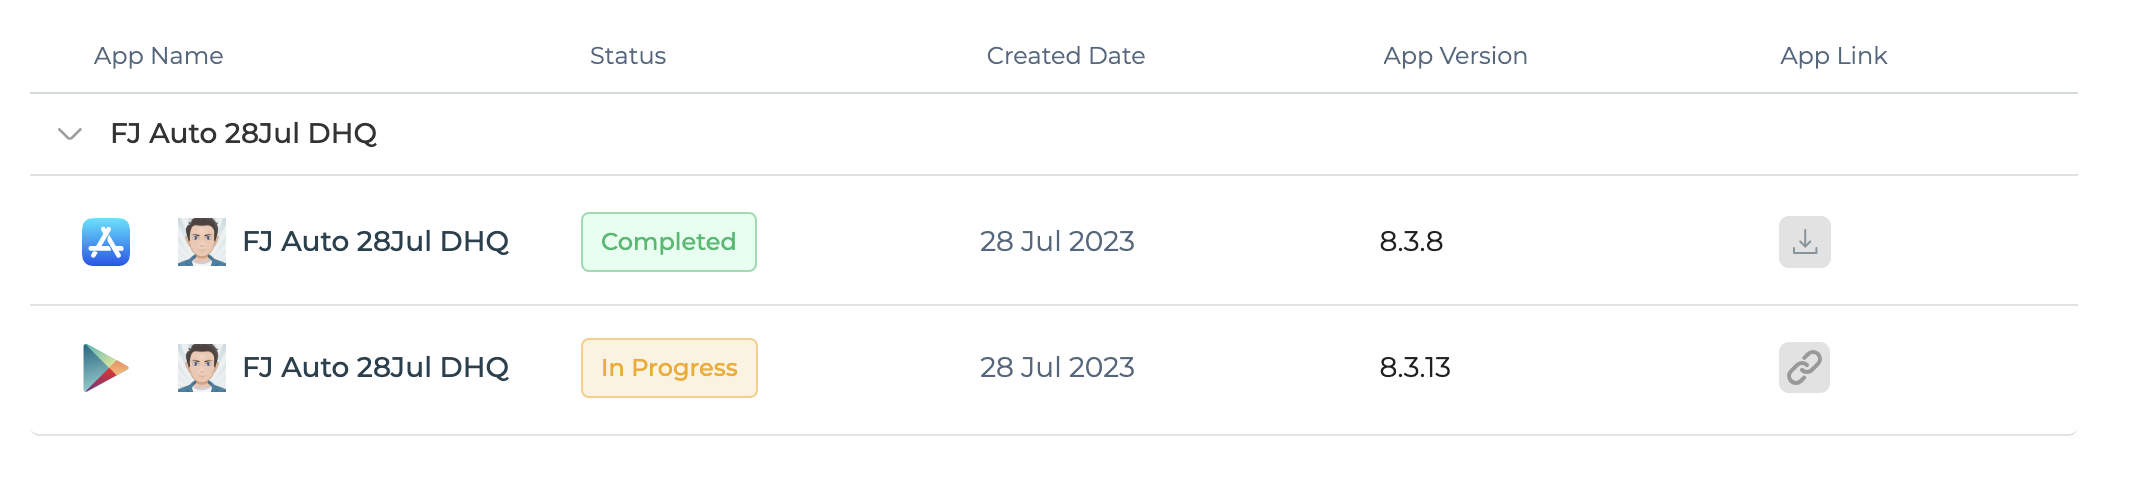
For Apps, showing status as completed, you can also download the App from the App Link column.
Testing and Publishing
Once the app status is downloaded, you can install it in your Android/iOS device and test how your app's branding and colors are set in your App. Once you are satisfied with your app, you can choose to distribute using Android Playstore and iOS App store respectively.
- For installing App on iOS device, you can either choose Adhoc distribution to directly install or choose testflight installation for release app type.
- You will require Android Playstore Developer account to distribute using Android Playstore.
- You will require Apple Developer/Enterprise account to distribute using iOS Appstore.
Creating Keystore (.jks) file
Java Key Store (JKS) file is required to sign your Android Application (Apk / Bundle). If you already have a Keystore file generated or you want DronaHQ to create one, you can skip this step. This steps involves creating a private key from your computer.
We will be using Java Keytool utility that comes with any standard JDK distribution and can be located at %JAVA_HOME%\bin
From a command prompt, we can type the following to get a JKS.
keytool -genkey -v -keystore my-release-key.jks -storetype JKS -alias alias_name -keyalg RSA -keysize 2048 -validity 10000
Where you need to provide the following details:
- Keystore password – you’ll need this to unlock this Keystore again in the future. If you lose this password, it is pretty much impossible to recover it.
- Re-enter Keystore password.
- Your First Name and Last Name.
- Name of the Organization Unit.
- Name of the Organization.
- Name of the City or Locality.
- Name of the State or Province.
- Two letter Country Code.
- Confirmation of above details, enter
yes. - Key password (It can be same as Keystore password).
Here,
- 10000 is the number of days this keystore will be valid for.
- my-release-key.jks is the name of the keystore file that will be generated.
- alias_name is the Alias name for your keystore. you can give any friendly name of your choice instead.