Secure Embed
Secure Embed lets you integrate a DronaHQ-published agent directly into your product while scoping every conversation to your own users — without requiring them to create a DronaHQ account.
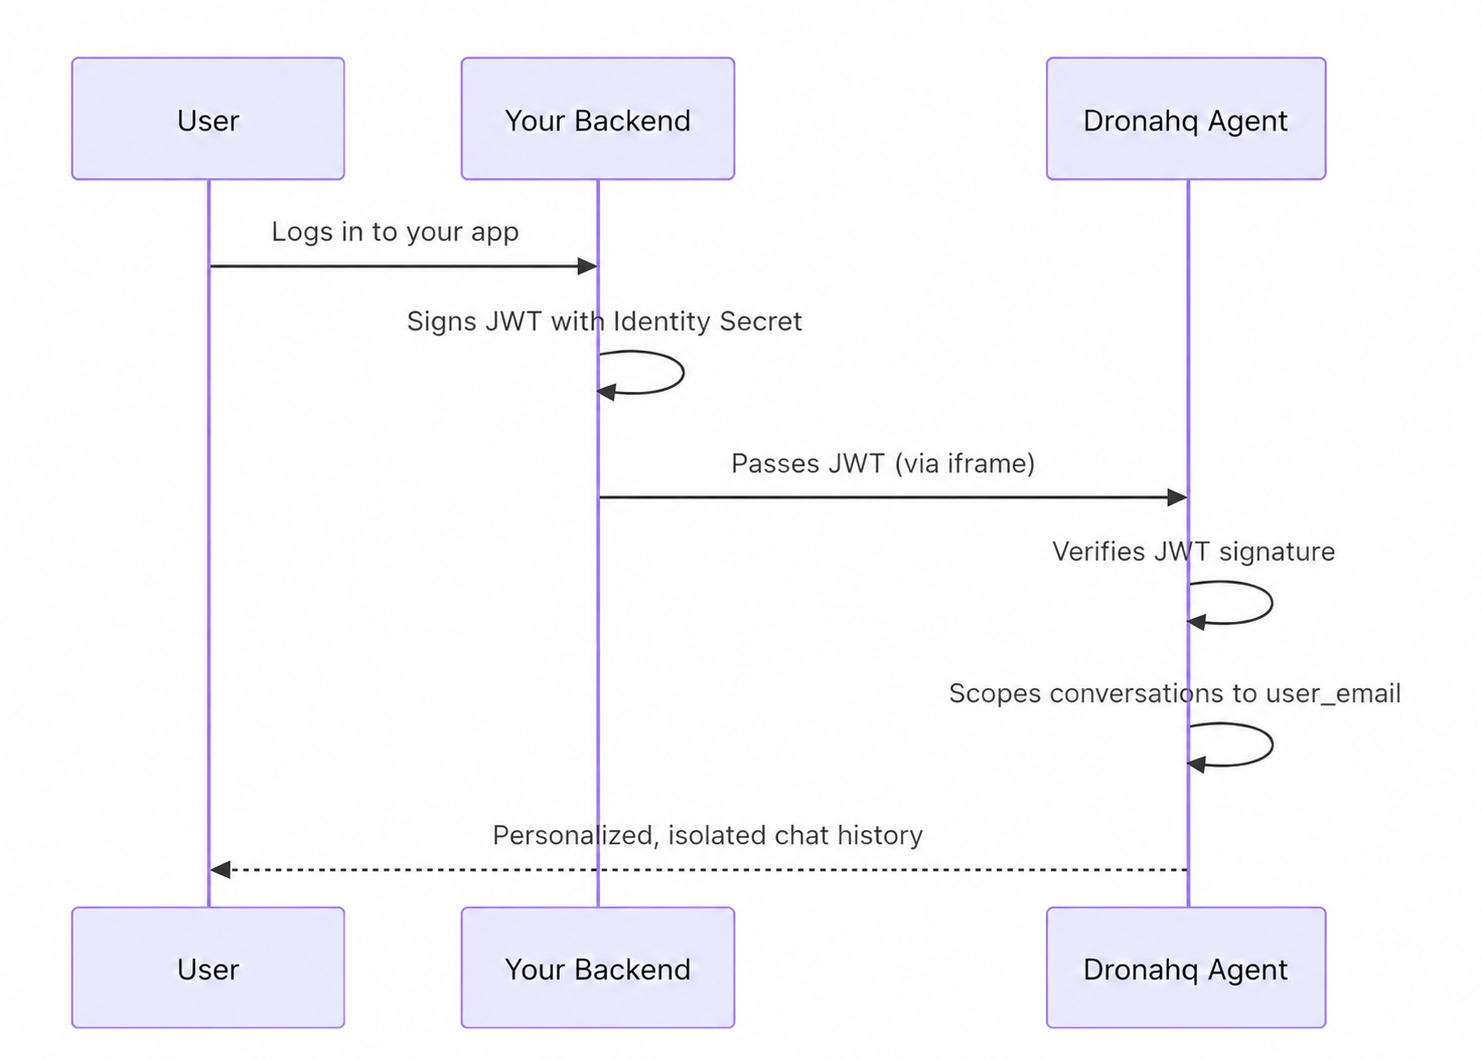
The mechanism is straightforward: your backend signs a lightweight JWT using a secret you generate in the DronaHQ Agent Builder. You pass that token to the embedded agent (via the embed widget or a direct iframe). DronaHQ verifies the signature and automatically isolates conversation history per user based on the user_email you provide.
What you get
- Per-user conversation history — no DronaHQ login required for your end users
- Full control over user identification from your own auth system
- Works with both the embed widget and direct iframe embedding
- Automatic token refresh when JWTs expire mid-session
Quick Setup
Step 1: Generate your Identity Secret
Open your agent in the DronaHQ Agent Builder, click Share to open the publish side panel, and find the Secure Embed section.
Click Generate Secret and copy the value. Store it securely on your backend — treat it like a password.
Never expose the Identity Secret in frontend code. It must only live on your server.
Step 2: Sign a JWT on your backend
Create an HS256-signed JWT containing your user's ID.
The token must include:
| Claim | Type | Required | Description |
|---|---|---|---|
user_email | string | Yes | Your app's unique user identifier |
variables | object | Optional | Key-value pairs that override agent variable values |
exp | number | Recommended | Expiration timestamp (Unix seconds) |
Node.js
const jwt = require('jsonwebtoken');

const token = jwt.sign(
  {
    user_email: "<user_email>",
    variables: {
      name: "<user_name>",
    }
  },
  process.env.DHQ_IDENTITY_SECRET,
  {
    algorithm: 'HS256',
    expiresIn: '<expires_in>'
  }
);
Using variables
The variables object lets you pass runtime values from your backend directly into the agent.
When a key inside variables matches a variable already defined in the agent's variable section, the JWT value takes precedence and overrides it for that session.
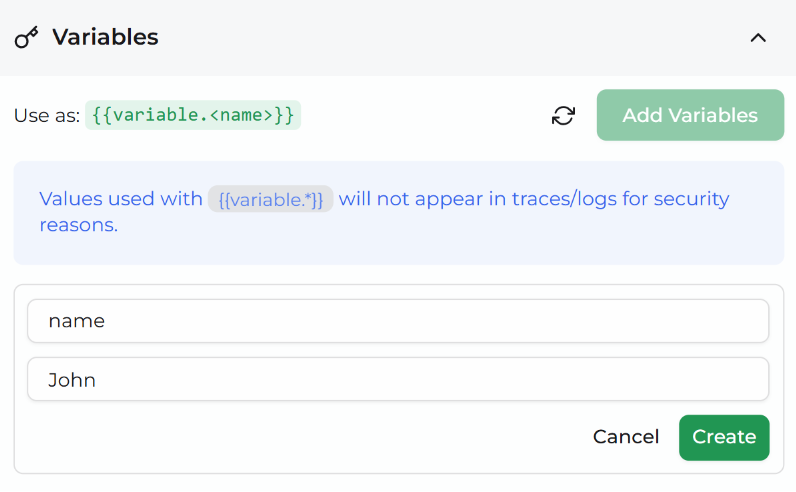
This is useful for personalising the agent with user-specific context — for example, passing in the user's name, role, or any other attribute your backend has at login time — without needing to configure those values statically inside the agent.
variables: {
  name: "Jane Smith",   // overrides the default value of `name` set in the agent
  plan: "enterprise",   // overrides the default value of `plan`
}
Any variable not included in the JWT payload continues to use the default value configured in the agent's variable section.
Step 3: Pass the token to the agent
Choose the integration method that fits your setup.
Direct iframe
Append IDENTITY_TOKEN and HIDE_LOGIN as URL query parameters:
<iframe
  id="dronahq-agent"
  src="https://app.dronahq.com/agent/YOUR_SLUG?IDENTITY_TOKEN=YOUR_JWT&HIDE_LOGIN=true"
  style="width: 100%; height: 600px; border: none;"
></iframe>
To set the token dynamically:
const token = await fetchTokenFromYourBackend();

const iframe = document.getElementById('dronahq-agent');

iframe.src = `https://app.dronahq.com/agent/YOUR_SLUG?IDENTITY_TOKEN=${token}&HIDE_LOGIN=true`;
Automatic token refresh for iframes requires a postMessage listener — see the Automatic Token Refresh section below.
Automatic Token Refresh
When a JWT expires during an active conversation, the DronaHQ agent automatically requests a fresh token from the parent window using postMessage.
If a new token is provided, the failed request is retried seamlessly — the user never sees an error.
How it works
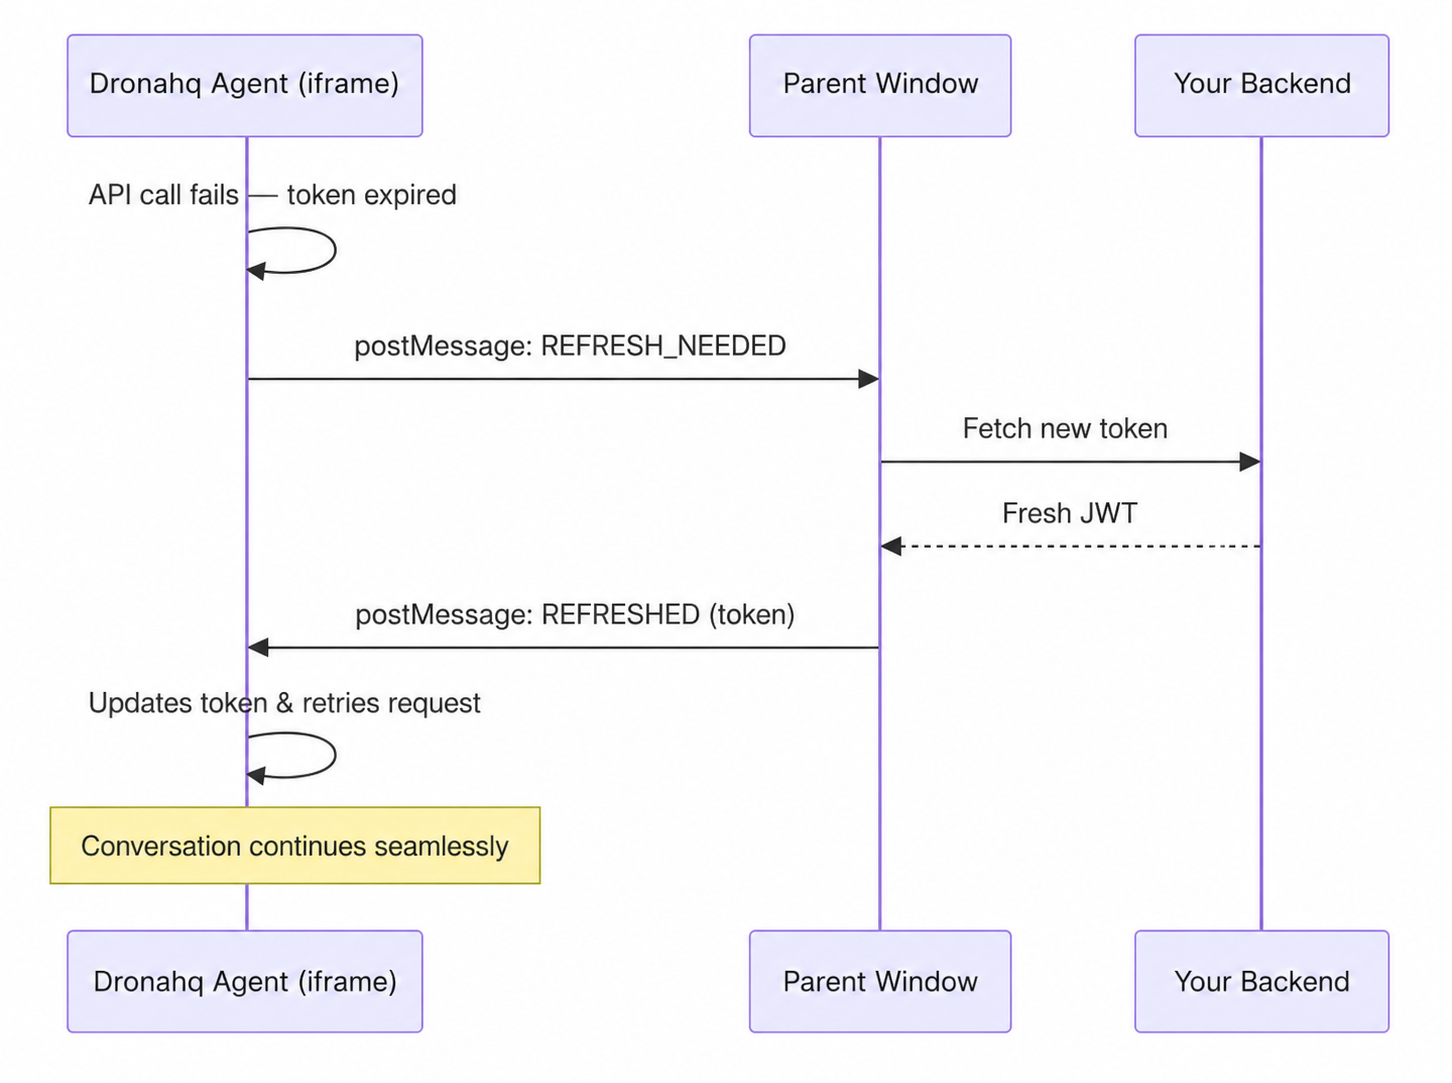
If the parent doesn't respond within 10 seconds (e.g. no listener configured), the agent falls back to showing an error modal asking the user to refresh the page.
Direct iframe
For direct iframe embeds, add a message event listener on your parent page:
const iframe = document.getElementById('dronahq-agent');

window.addEventListener('message', async (event) => {
  if (event.data?.type === 'DHQ_IDENTITY_TOKEN_REFRESH_NEEDED') {
    try {
      const res = await fetch('/api/dronahq-token');
      const { token } = await res.json();

      iframe.contentWindow.postMessage({
        type: 'DHQ_IDENTITY_TOKEN_REFRESHED',
        identityToken: token,
      }, '*');
    } catch (error) {
      console.error('Failed to refresh identity token:', error);
    }
  }
});
PostMessage Protocol
| Direction | Message Type | Payload |
|---|---|---|
| iframe → parent | DHQ_IDENTITY_TOKEN_REFRESH_NEEDED | (none) |
| parent → iframe | DHQ_IDENTITY_TOKEN_REFRESHED | { identityToken: string } |
How It Works Under the Hood
- DronaHQ verifies the JWT signature using your Identity Secret (
HS256) - The
user_emailclaim is extracted and used to scope conversations - Each unique
user_emailgets its own isolated conversation history - If no identity token is provided, users are anonymous (session-based)
- If a user is logged into DronaHQ and has an identity token, the identity token takes priority
Secret Rotation
If you need to rotate your Identity Secret:
- Click Rotate Secret in the Secure Embed section of the publish panel
- Copy the new secret to your backend environment
- Redeploy your backend
⚠️ Warning: Rotating the secret invalidates all previously signed tokens immediately. Users with old tokens will see an
"Authentication Failed"error until they receive a new token (via refresh or page reload).
Token Errors
| Error | Cause | Resolution |
|---|---|---|
Session Expired | JWT exp has passed | Handled automatically if token refresh is configured; otherwise the user must refresh the page |
Authentication Failed | Signature doesn't match (secret was rotated?) | Ensure your backend uses the current Identity Secret |
Invalid Identity Token | Missing user_email claim | Add the required claim to your JWT payload |
Identity Not Configured | No secret has been generated | Generate a secret in the publish panel |