Guide to SMTP Email Configuration with Popular Email Providers
For sending and receiving emails, Simple Mail Transfer Protocol (SMTP) plays a crucial role. SMTP is a set of rules governing the interaction between the sender's email client and the recipient's email server. In this guide, we'll delve into SMTP email configuration with popular email providers.
For a comprehensive step-by-step guide on SMTP configuration, please refer to this detailed article.
Configuring Gmail SMTP with DronaHQ System-Generated Emails
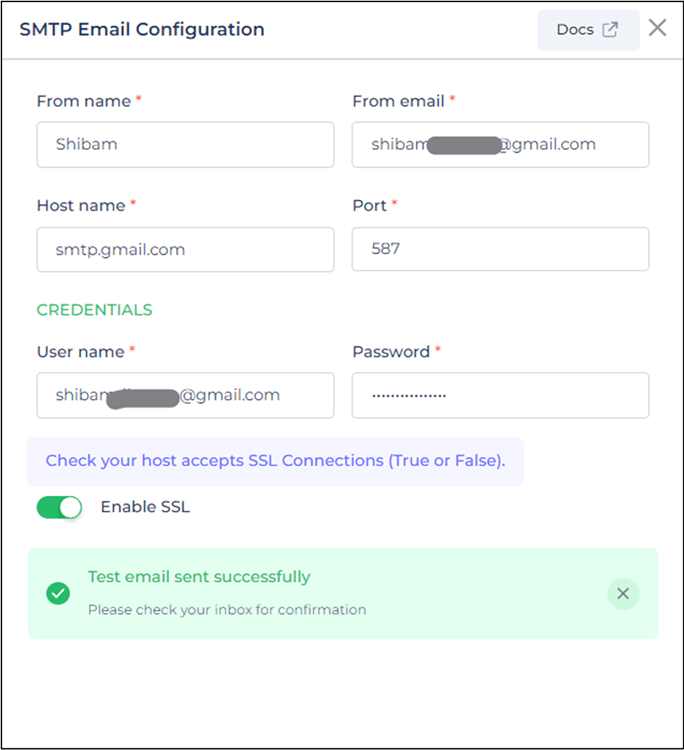
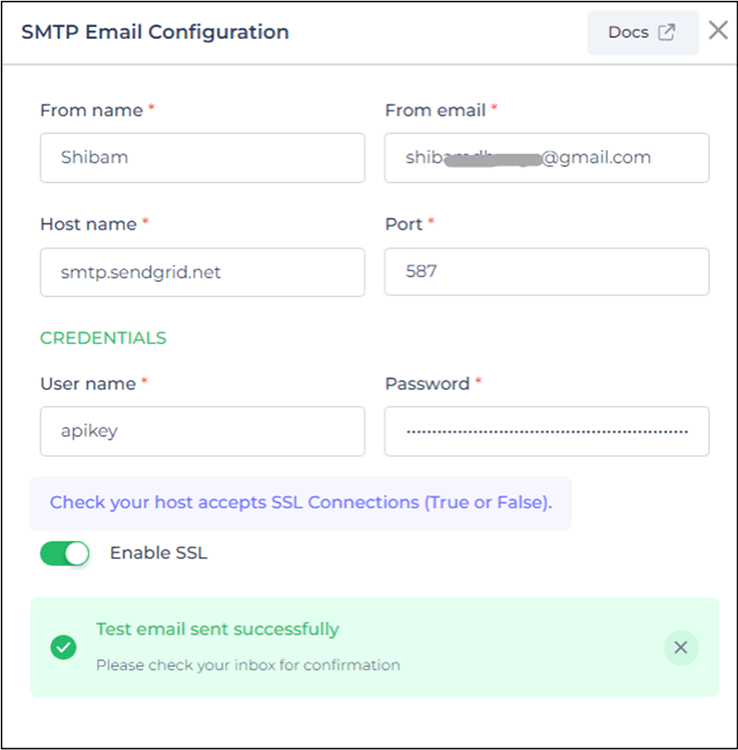
First, it is needed to set up SMTP in Gmail.
HOST NAME: Enter
smtp.gmail.com.PORT: Use
587as the port number.USER NAME: Provide the email address of the user who will be sending the emails.
PASSWORD: Use the same password that you used when creating the app on your Google Account.
ENABLE SSL: Ensure that this option is checked.
Proceed with the following steps:
Set-Up SMTP in Gmail
Navigate to your Google Account settings by going to
Manage Google Account.In the Google account dashboard, click on
Securityand then selectApp Passwords.
Ensure that 2-step verification is already enabled in your Google Account.
Under the drop-down menu for
Select app, chooseOther.Provide a name for the app (e.g., DronaHQ) and click
Generate.
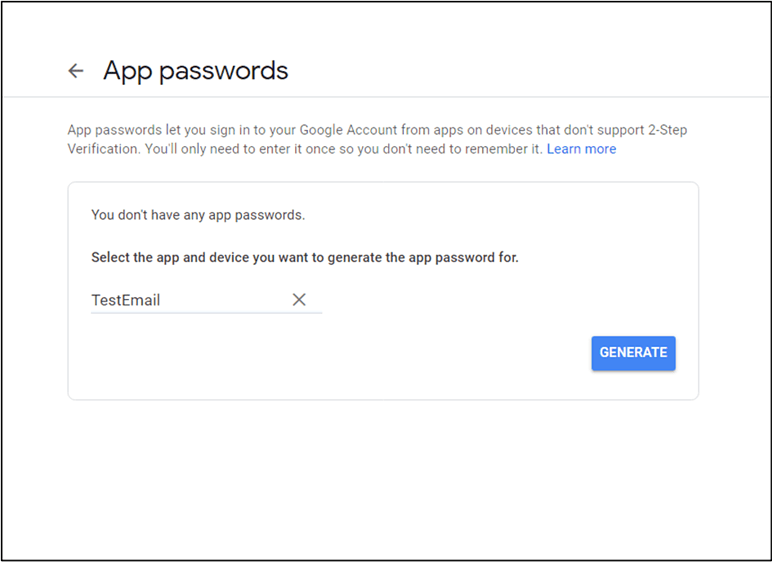
A password will be generated; make sure to copy it. You will use this password for email configuration. The user name will be the email address associated with your Google Account.
Configuring Amazon SES SMTP with DronaHQ System Generated Emails
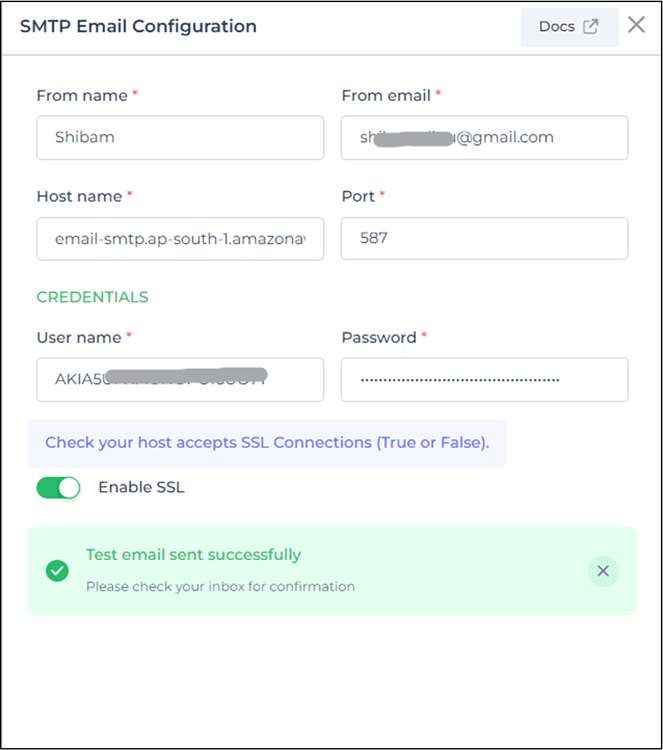
First, it is needed to configure SMTP in Amazon SES.
HOST NAME: Use
email-smtp.ap-south-1.amazonaws.com.PORT: Set the port to
587.USER NAME and PASSWORD: You can find these credentials on the AWS Console under Amazon SES > Account Dashboard > Create SMTP credentials.
ENABLE SSL: Ensure that this option is checked.
Proceed with the following steps:
Set-up SMTP in Amazon SES
To configure Amazon Web Services SES for the SMTP server, follow these steps:
Create an account on AWS and log in to the AWS console.
There are two steps required to integrate SES on AWS: Creating Identity and Creating SMTP details.
Creating Identity
Search for SES in the search bar and click on
Amazon Simple Email Service.This will open the dashboard. Proceed to create an identity.
Select
Email AddressorDomainbased on where the email is required to be sent.Verify the email address if
Email Addressis selected as the identity type.
Creating SMTP Details
On your Amazon SES dashboard, click on
Account Dashboardfrom the sidebar.Details related to the SMTP endpoint and port will be provided under
Simple Mail Transfer Protocol (SMTP) settings.Click on
Create SMTP credentials.
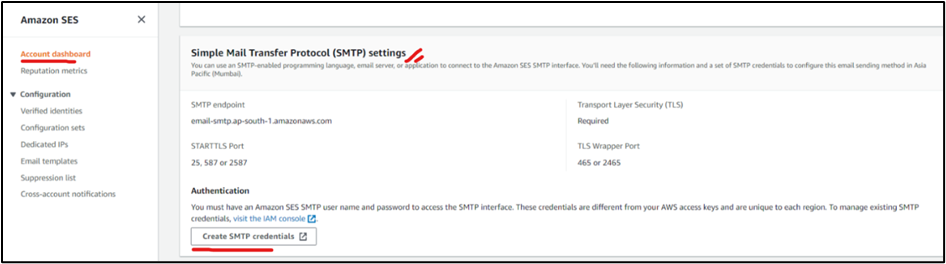
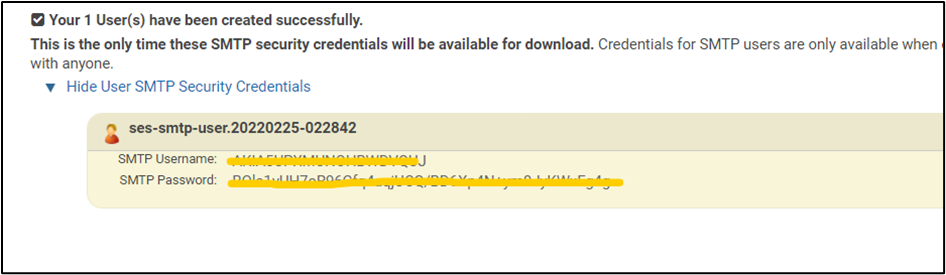
You will be directed to a new window of IAM Management Control. Provide an IAM User Name (or you can use the default too) and click "Create."
SMTP Username and SMTP Password will be generated, which will be used for email configuration.
Configuring SendGrid SMTP with DronaHQ System Generated Emails
First, it is needed to configure SMTP in SendGrid.
HOST NAME: Use
smtp.sendgrid.net.PORT: Set the port to
587.USER NAME and PASSWORD: These credentials will be the same as provided by SendGrid after creating identity and configuring SMTP relay for that identity.
ENABLE SSL: Ensure that this option is checked.
Proceed with the following steps:
Set-up SMTP in SendGrid
To configure SendGrid for the SMTP server, follow these steps:
Create an account on SendGrid and log in.
Complete two components for this: Setting up sender identity under sender authentication and Integrating SMTP relay.
Sender Identity
Create a sender identity from where the email would be sent. The sender identity details, like the email ID, need to be authenticated.
Proceed from the sidebar of the dashboard as
Settings > Sender Authentication > Create a Sender.Fill in the details, providing sender and receiver email addresses, and other necessary details.
Click on create. Next, verify the email address provided while creating a sender identity.
Integrating SMTP Relay
Click on
Email API > Integration Guide > SMTP Relay.In the next step, give the API a name and click
Create Keyto generate a new API key.
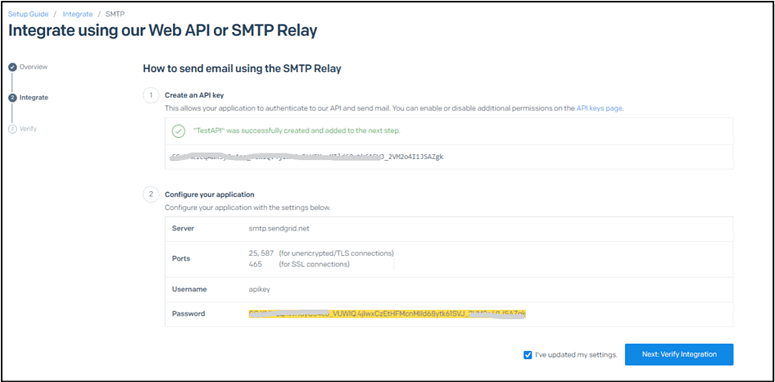
Details related to the server, ports, username, and password will be displayed, and these can be used for email configuration.