Screen Routing
We many times need to share the different home screens with varying user profiles, and to support this the DronaHQ presents you with the feature of Routing for your public apps.
Routing enables you to share the public link of the app with some additional parameters (known as LEVELS). So, for instance, if you want to share a screen of a micro app of form with various controls being selected by choice, you can do so with Routing.
Purpose of Routing
The purpose of routing is to provide a way to share a screen of a public app at any instance. This can be useful in terms of sharing apps with certain on-screen configurations. With routing, we can even adjust screen visibility and accessibility with respect to the users, conditions, and more with the help of variables.
This feature is only available in Public Apps which are published with routing handling.
Routing Essentials
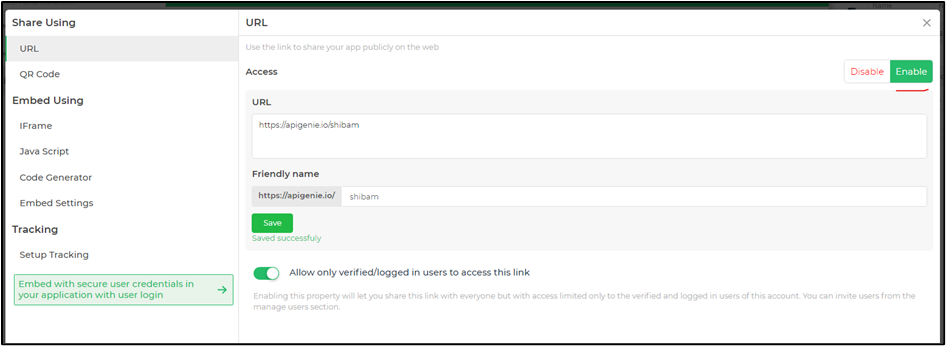
- Enable the link to share your app publicly on the web under the embed setting.
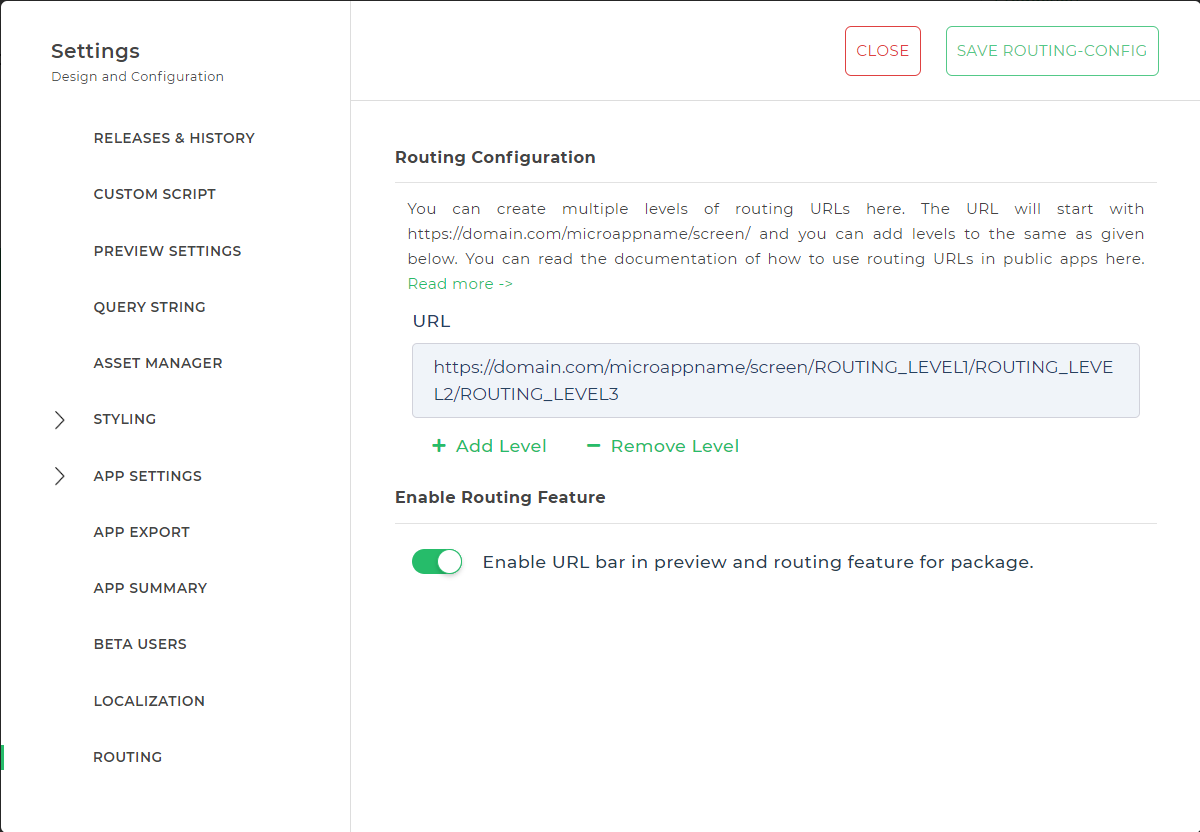
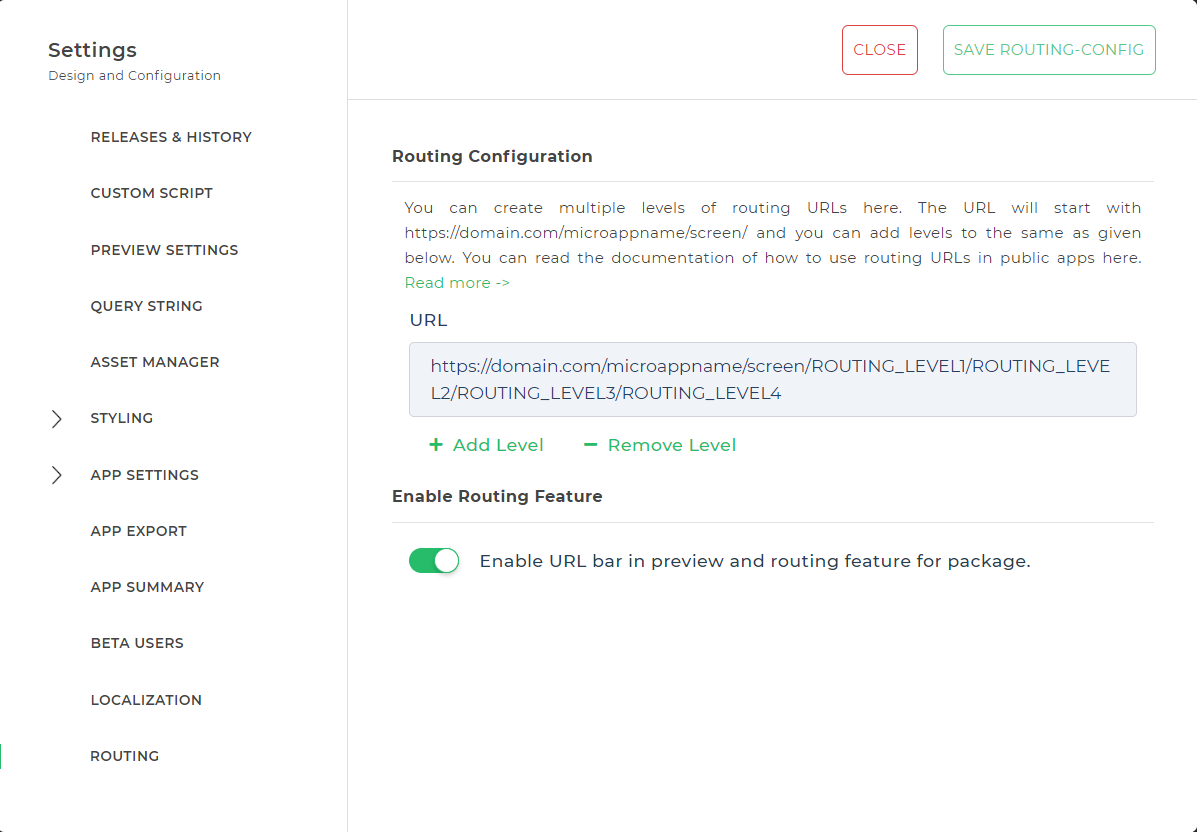
Configuring routing – Levels under
config -> routing. You can create multiple levels of routing URLs here. The URL will start withhttps://domain.com/microapp_name/screen_name/and you can add levels to the same as given below.+ Add Level– Click here to add a new level.- Remove Level– Click here to remove the recent level.
Enable Routing Feature - This toggle enables you to
EnableorDisablerouting feature and view how the URL will look like, on setting of routing levels, at the app preview level.
Preview the app. You will have the option to view the URL of the screen.
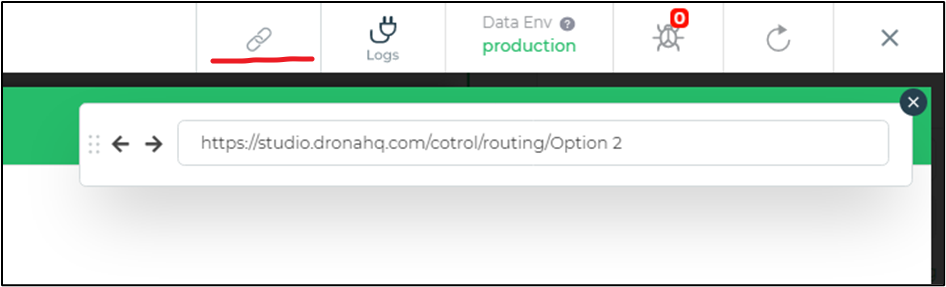
This URL on sharing won’t work as a public link, this is just for reference at the preview level of the app.
Routing URL
You can find the routing URL including the friendly name as well as the screen name, right on the screen properties.
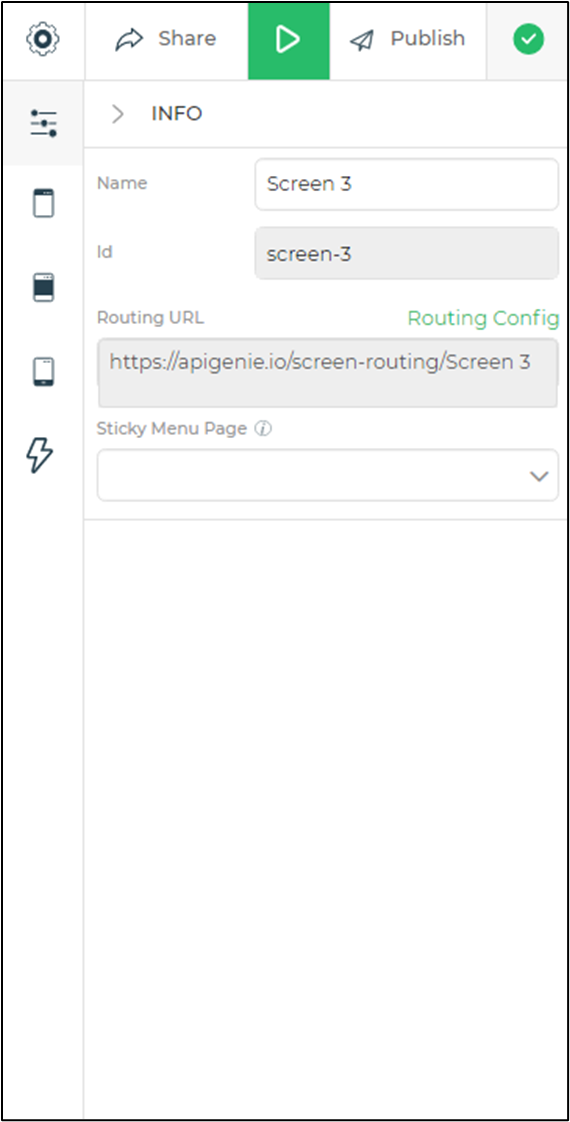
On the basis of the screen name present in the routing URL, the respective screen will open.
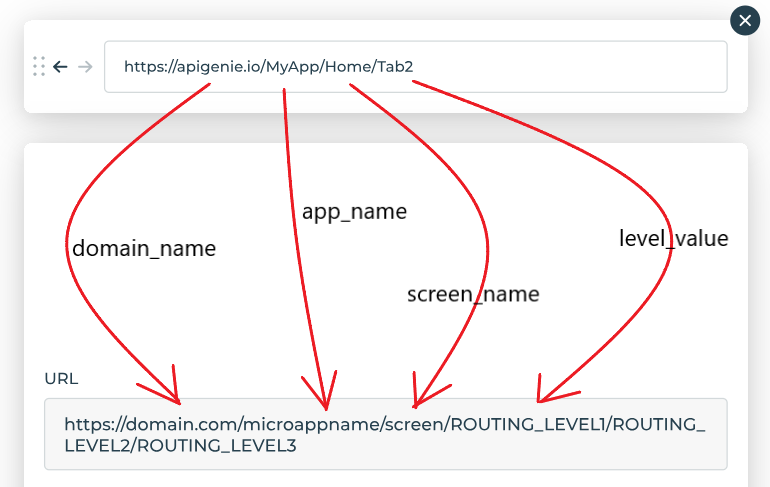
Routing URL explanation
Working with Routing Levels
Setting up Routing Level
Setting up routing levels means that with the help of the DronaHQ and our app, we generate a sharable URL which is the public URL of the screen. This URL gets added with the further value which is the routing level.
The idea behind setting up the routing level is to generate a shareable URL of the screen with added routing level values.
Routing URL with added level will have a structure like - https://domain.com/microappname/screen/ROUTING_LEVEL1
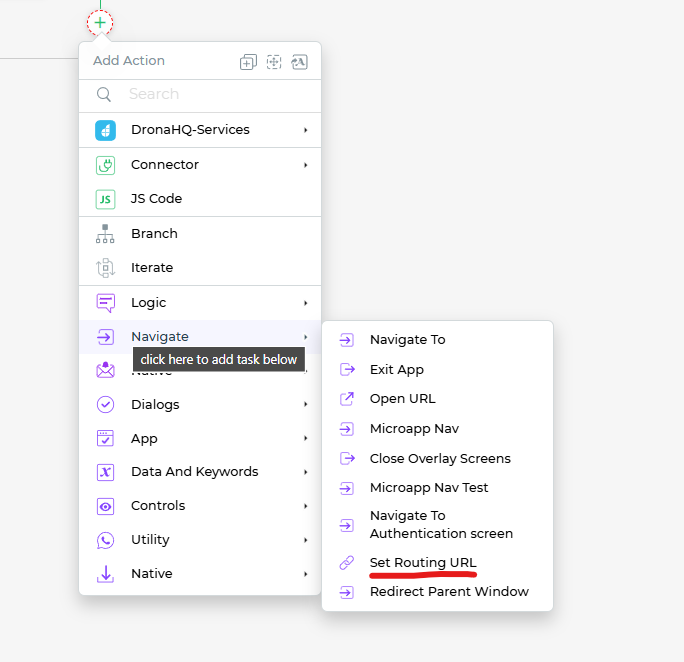
Now let us see, how to set up the routing level in our public URL. You can achieve this via using the On-Screen action of Set Routing URL.
Select the control, whose value you want to save in the routing level variable. Go to it’s events and add an On-Screen action of Set Routing URL.
Next, you will have configuration fields.
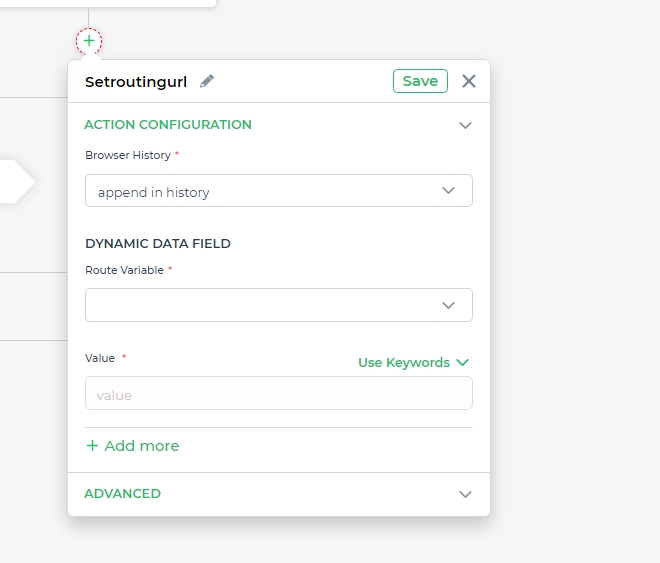
Browser History :– The browser stores everything in its history. The Browser History dropdown comes with two options, by virtue of which we can determine the push flow data being added to the URL as history.
- Append in history :– This option on select, helps you to navigate back and forward on the browser with respect to the levels of routing being added or pushed to the URL. Under this, you can go back and forward with each appended levels.
- Replace last history URL :– This option on select replaces the previous history URL with the very current URL with routing levels. So, when you click –back on your browser you won’t be able to backtrack with the levels instead will be redirected to the tab/URL before the app was opened.
Route Variable :– Select the routing level keyword, to which you want to bind the respective control’s value.
Value :– Select the value you want to save as a routing variable.
You can set multiple routing levels and when you do so you cannot skip routing levels. The routing in will work in a sequential manner of the number of levels. So, for example- you cannot move forward with only level 3, you have to set value for all the levels before it.
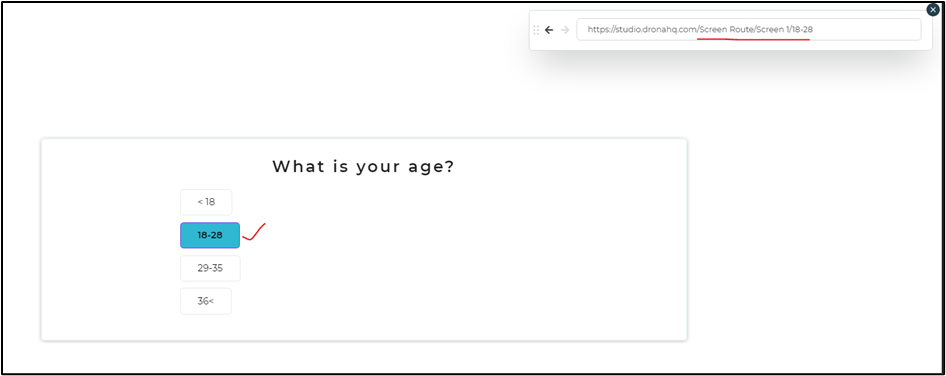
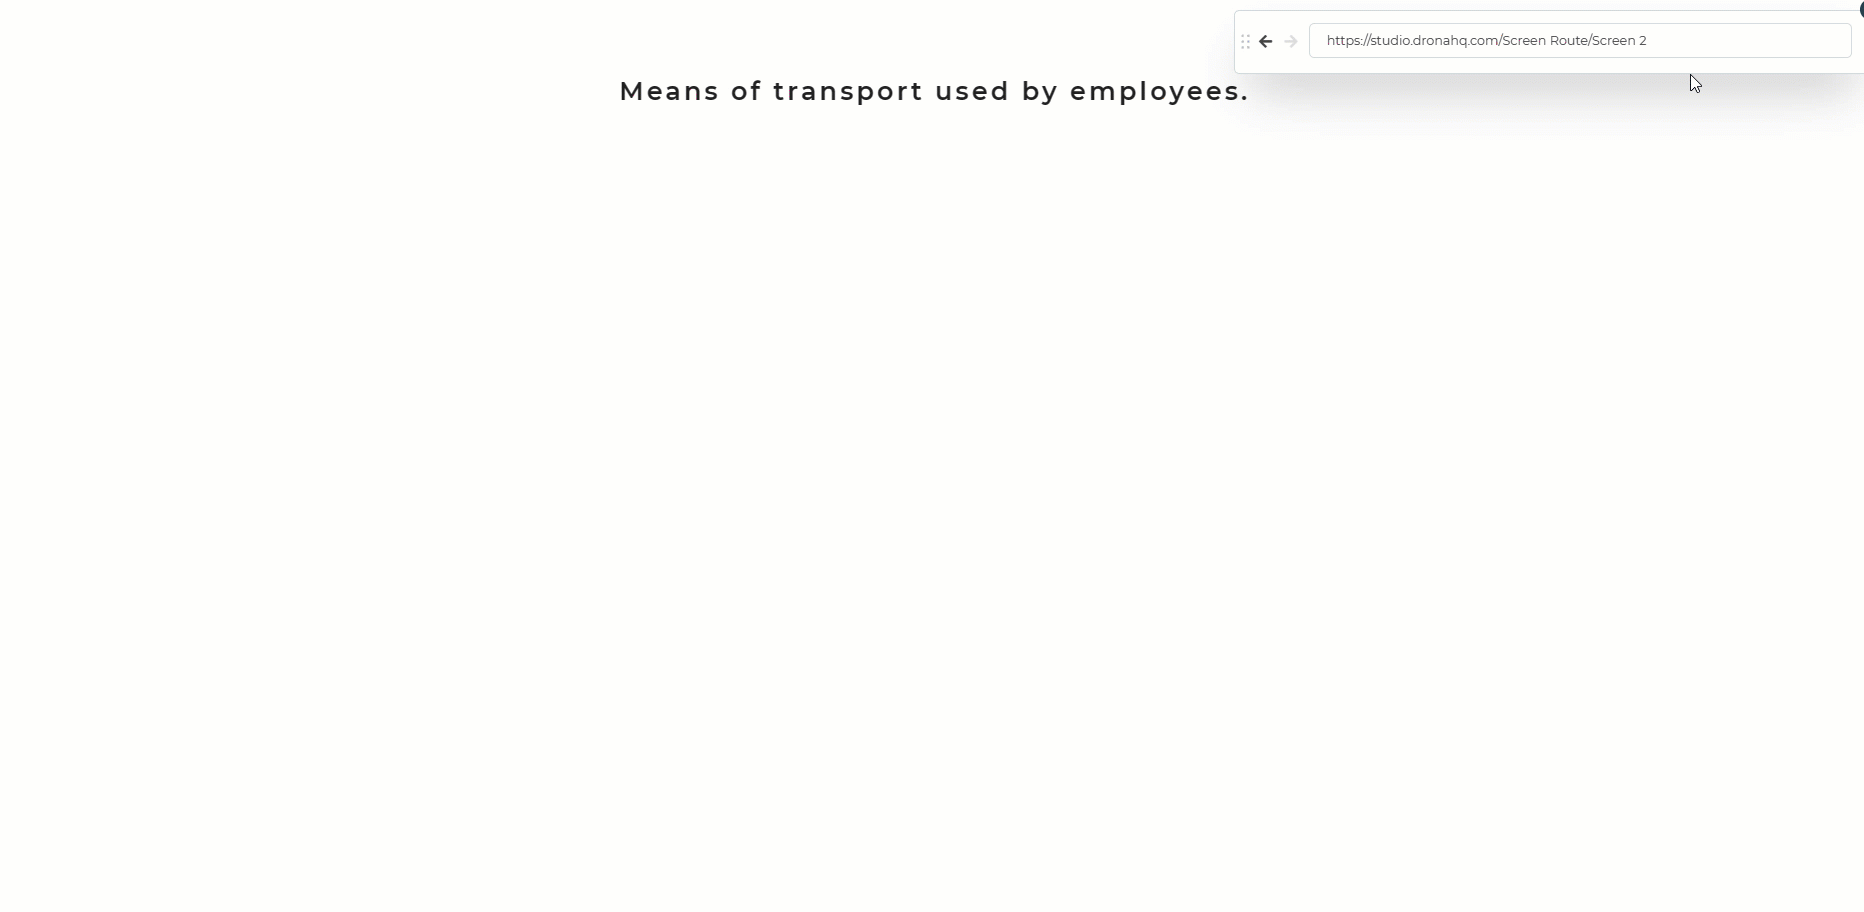
APP PREVIEW
Let’s now preview the app. Initially, you will see no added routing level value in the URL.
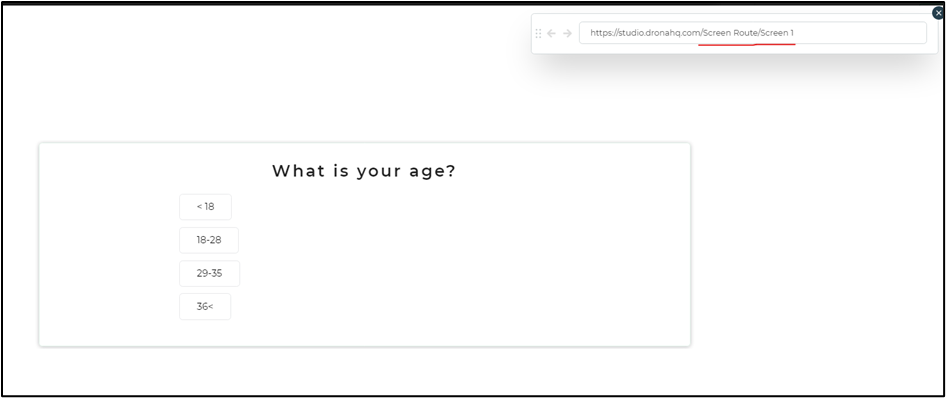
Now on select of an option from the control, it will fetch the control value and set it as routing level in the URL.
Utilizing Routing level
Utilizing of routing level(s) has a crucial role on sharing the public URL of the screen of an app. This focuses on, routing of the screen on load along with using the routing level(s) present in the URL.
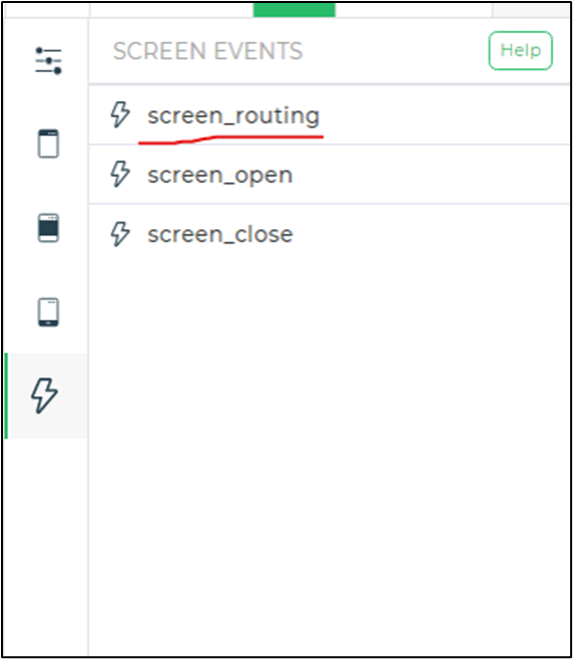
At Screen Routing
On our screen events, we have a specially designed event for routing called screen_routing. This event is useful when you want to use/implicate the routing level values. You can utilize the routing level on your app screen via screen_routing event to trigger actions.
By using the screen_routing action the app responds to the URL provided with a level of routing variables as well as the screen name. Depending on the information present in the URL, the app screen is made accessible and loaded while utilizing the routing level values.
The screen_routing action event gets triggered when there is a change in URL with backward and forward but doesn’t work with internal navigation.
Let’s see how to use the screen_routing action.
We have created a screen with hidden controls. The control will be shown on the basis of routing level values by using the screen_routing action.
Go to Events -> screen_routing.
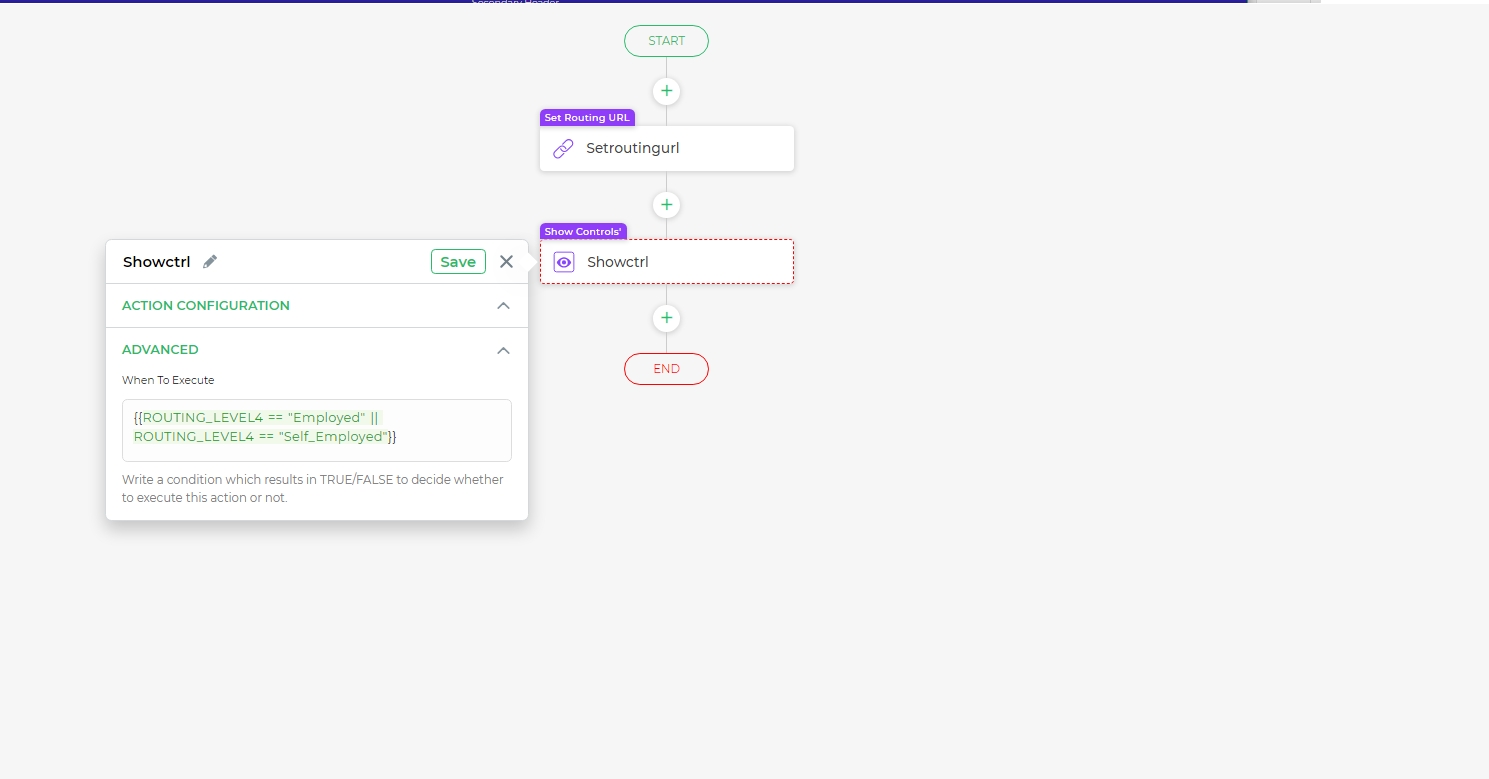
Add actions of show control with the added condition under When to execute.
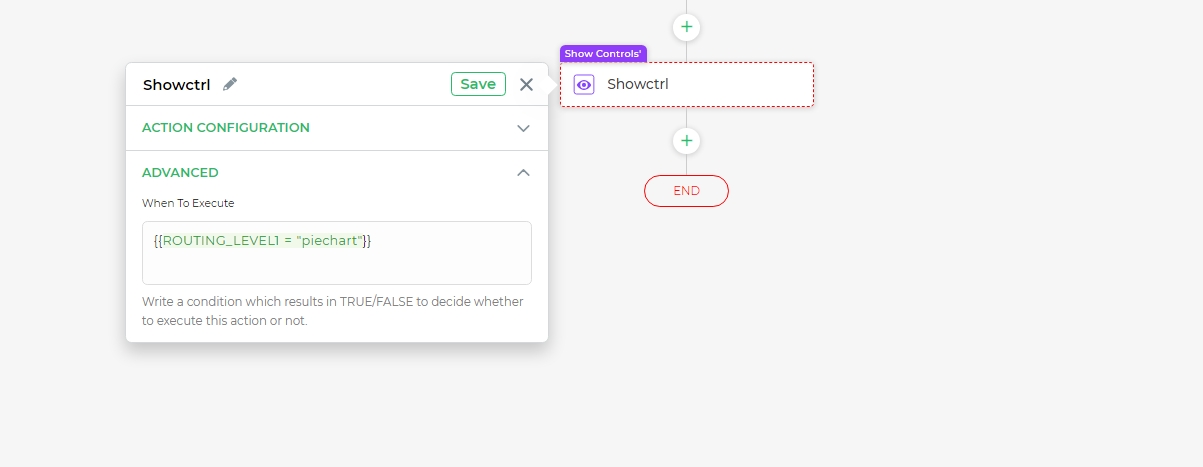
In the above image, you ca notice that the condition to show the control is when the routing level value is provided as piechart.
APP PREVIEW
In the above media you can see that, on changing of routing level values, we are able to trigger hide and display of the controls.
Routing levels behave differently for different screens. So, when you change the screen the data present in the routing variables with respect to the previous screen gets cleared and is prepared to receive new data as routing variables from the current screen.
At Data Bind section
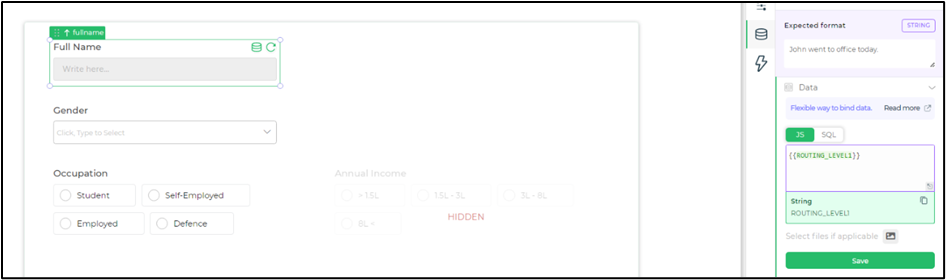
The accessibility of routing levels can be found at data bind section also. Earlier we have seen how to use the routing levels using screen_routing action, now we will understand how to make use of routing levels at data bind section. This is rather very simple, by just using the routing level keyword. Lets see how to implement. Select a control. Go to its data bind section. Use the keyword of routing level.
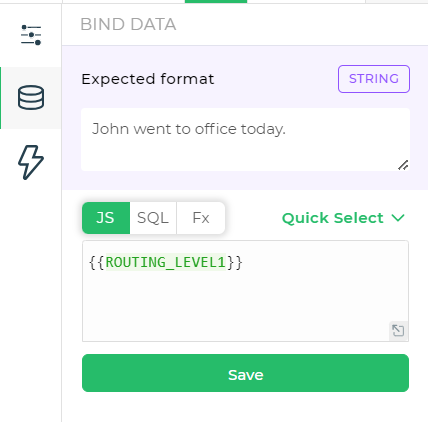
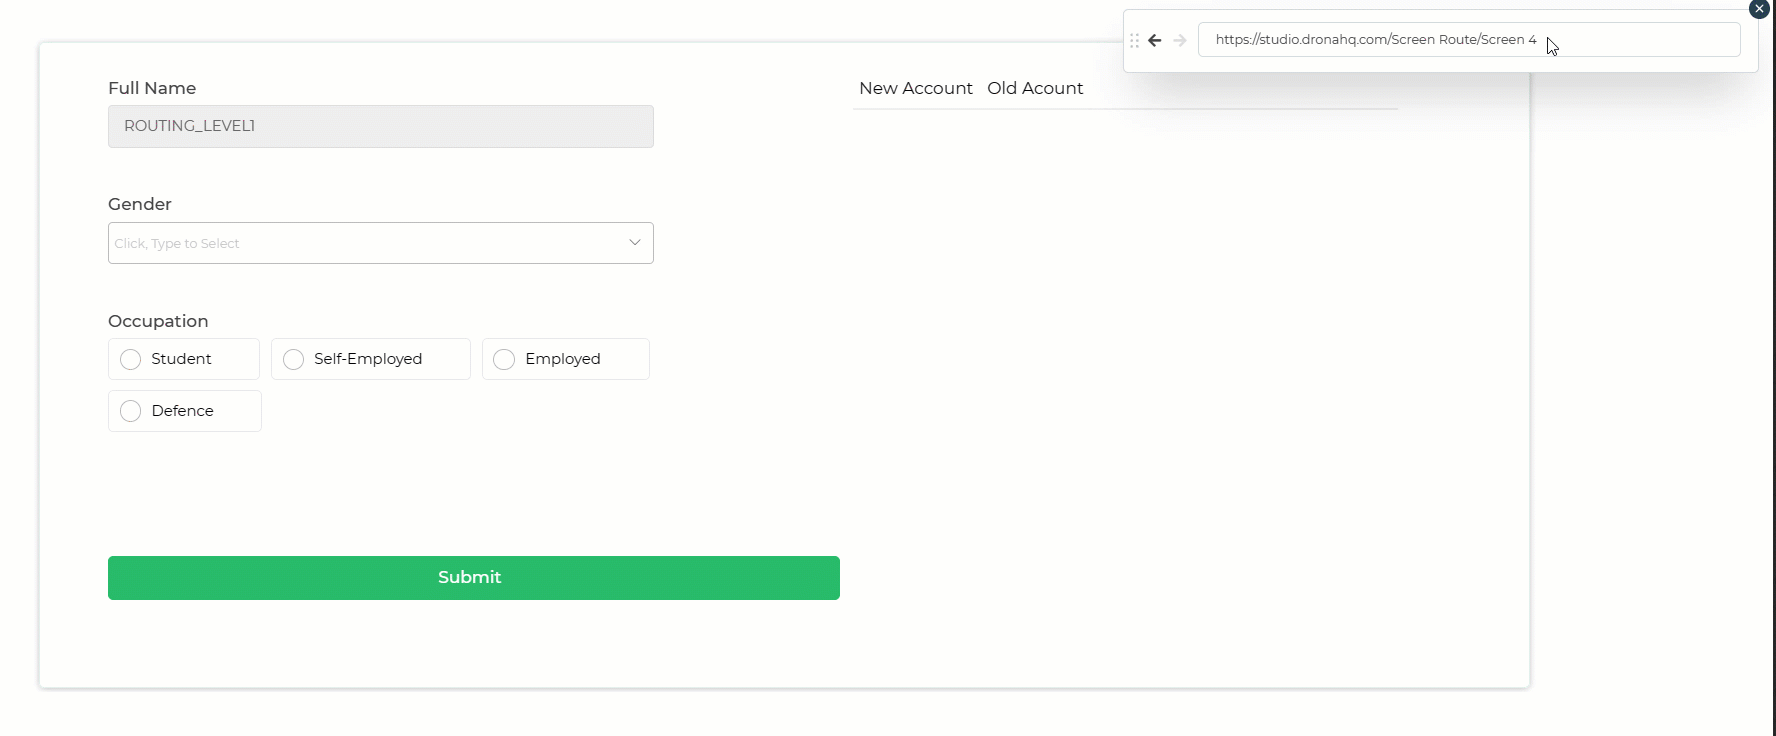
I am using TEXT INPUT control and kept the control read-only.
In the above image, although the text input control is read only still it is fetching the routing level data.
Working with multiple Routing Levels
Earlier we have seen examples and configuration of single routing level, but this can be done with multiple routing levels too. Along with using multiple routing levels, we can also implement setting up as well as using of levels on a single screen.
Lets see now how to execute this. First thing to do is to add routing levels from routing configuration.
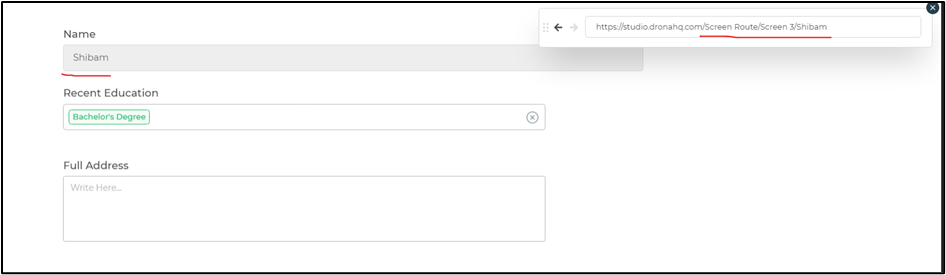
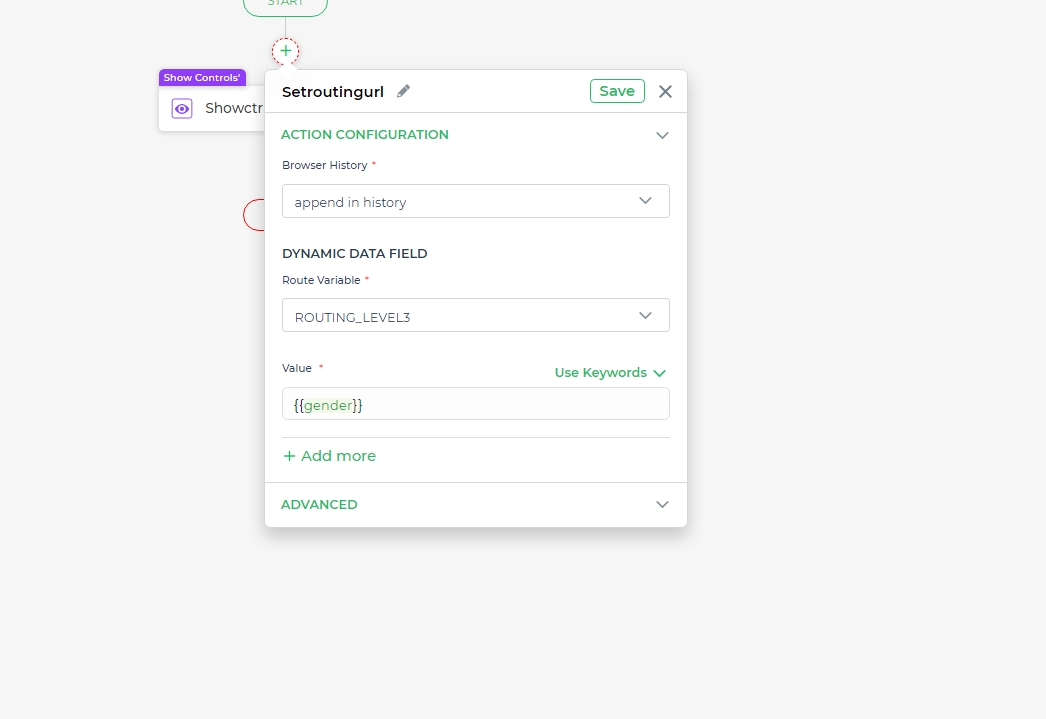
In the above image we have 4 levels of routing added. Next, create a template where you want to implement the routing levels.

Now configure the routing levels, this can be – setting up as well as using it via screen routing or data binding.
Using Routing Level (Level 1) – Data Binding
Using Routing Level (Level 2) - Screen Routing
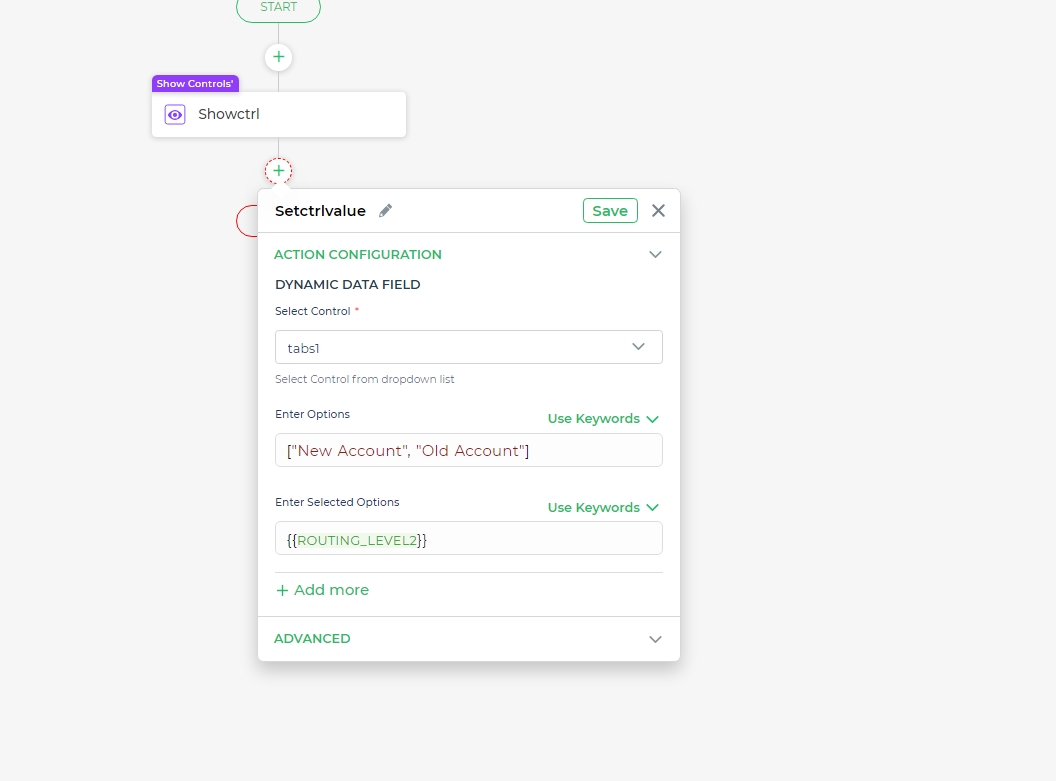
Setting Routing Level (Level 3 & Level 4)
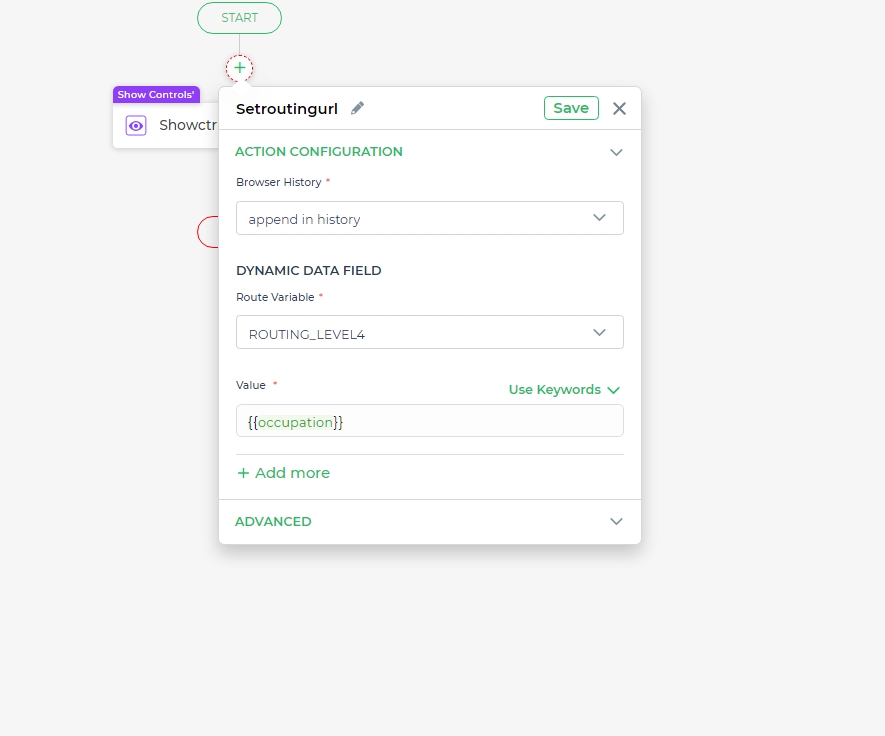
In the above image we have also added an action of show control depending upon the level 4 value. You can view below.
App Preview