Environment Variables
Overview
Environment variables allow you to configure and customize your Self-hosted DronaHQ deployment. These variables control key functionalities, override default settings, and enable optional features. Some features in DronaHQ require specific environment variables to be set for proper operation.
Best Practices
- Only set variables when necessary – Avoid modifying default settings unless required.
- Restart your instance after making changes for the variables to take effect.
- Secure sensitive values – Store credentials and tokens securely using a vault or secrets management tool.
- Use a
.envfile to manage environment variables systematically.
Configuration
You can define environment variables directly in your shell, within your Docker Compose file, or in a Kubernetes deployment manifest.
Setting Variables in Shell
export VARIABLE_NAME=value
Using a .env File
Create a .env file in your deployment directory:
VARIABLE_NAME=value
Defining Variables in Docker Compose
services:
  webapp:
    environment:
      - VARIABLE_NAME=value
Using Environment Variables in Kubernetes
spec:
  containers:
    - name: dronahq-webapp
      env:
        - name: VARIABLE_NAME
          value: "value"
For a full list of supported environment variables and their descriptions, refer to the official documentation.
By properly configuring environment variables, you can optimize the performance, security, and functionality of your Self-hosted DronaHQ instance.
General Environment Variables
These environment variables configure key aspects of DronaHQ Self-Hosted deployments.
BUILDER_URL (Recommended)
Defines the base URL for accessing the Creator Portal, End-User Portal, user invitations, password resets, and callback URLs for protected resources.
Example:
BUILDER_URL=https://dronahq.example.com
If unset, DronaHQ automatically determines the base URL from your machine's local configuration.
Default (Localhost Example):
BUILDER_URL=http://localhost:8080
Alternative Approach: You can use
DOMAINandSECURE_HTTPvariables instead ofBUILDER_URL.
DOMAIN (Alternative to BUILDER_URL)
Defines the domain name of your DronaHQ Self-Hosted instance. Use this when not specifying BUILDER_URL.
Example:
DOMAIN=dronahq.example.com
SECURE_HTTP (Alternative to BUILDER_URL)
Determines whether DronaHQ should use HTTPS. This setting is only required if BUILDER_URL is not used.
- If set to
true, DronaHQ uses HTTPS. - If set to
falseor unset, DronaHQ defaults to HTTP.
Example:
SECURE_HTTP=true
If you disable HTTPS (
SECURE_HTTP=false), some features requiring SSL may not function properly.
PATHNAME (Optional – Use for Sub-Path Deployments)
If DronaHQ is deployed on a sub-path rather than the root domain, specify the path using this variable.
Example Scenario:
Your instance is accessible at:
https://dronahq.example.com/studio
Set the PATHNAME as follows:
PATHNAME=/studio
Use this only if you are serving DronaHQ behind a custom web server that modifies the base path.
Licensing and Activation
LICENSE_KEY
This is a unique key assigned to you by DronaHQ for activating your self-hosted installation. You can retrieve your LICENSE_KEY by logging into the Self-Hosted Portal.
LICENSE_KEY=<your-unique-license-key>
DRONAHQ_LICENSE_URL (Optional)
For activation and licensing, your Self-Hosted DronaHQ instance needs to communicate with DronaHQ’s licensing server. The licensing server is hosted at license.dronahq.com, with a public IP address of 52.203.193.48.
- If your instance is running in a closed intranet environment, ensure that
license.dronahq.comis whitelisted for outbound traffic. - If direct access is restricted, you can set up a proxy server and configure this variable to point to your proxy’s URL.
DRONAHQ_LICENSE_URL=https://license.dronahq.com
Best Practice: If operating behind a corporate firewall or VPN, consult your network administrator to configure the appropriate firewall rules or proxy settings for uninterrupted licensing communication.
Connectivity to MySQL
Configure the database credentials for your DronaHQ Self-Hosted instance. This database stores essential metadata and resources required for application building.
MYSQL_HOST, MYSQL_PORT, MYSQL_USER, MYSQL_PASSWORD
If using a Docker container for MySQL, set the following variables:
MYSQL_HOST=dronahq-self-hosted-mysqldb
MYSQL_USER=<application-user>
MYSQL_PASSWORD=<password>
MYSQL_PORT=3306
If using AWS RDS or another managed MySQL service, set the values accordingly:
MYSQL_HOST=<your-rds-endpoint>
MYSQL_USER=<application-user>
MYSQL_PASSWORD=<password>
MYSQL_PORT=3306
Connectivity to MongoDB
Configure MongoDB settings for your DronaHQ Self-Hosted instance. MongoDB is used to store application data and configurations.
MONGODB_HOST, MONGODB_PORT, MONGODB_USER, MONGODB_PASSWORD
If using a Docker container for MongoDB, set the following variables:
MONGODB_HOST=dronahq-self-hosted-mongodb
MONGODB_USER=<application-user>
MONGODB_PASSWORD=<password>
MONGODB_PORT=27017
If using AWS DocumentDB or another managed MongoDB service, set the values accordingly:
MONGODB_HOST=<your-mongodb-endpoint>
MONGODB_USER=<application-user>
MONGODB_PASSWORD=<password>
MONGODB_PORT=27017
MONGODB_ENCODE_CREDENTIALS
If your MongoDB credentials contain special characters, enable credential encoding:
MONGODB_ENCODE_CREDENTIALS=true
MONGODB_PROTOCOL
Defines the MongoDB connection protocol:
- Use
mongodbfor standard installations (default). - Use
mongodb+srvfor clustered or replica set configurations.
MONGODB_PROTOCOL=mongodb
MONGODB_PARAMS
Additional MongoDB parameters can be specified using URL search parameter format. Example:
MONGODB_PARAMS=ssl=true&retryWrites=false
MONGODB_TLS
Enable TLS for a secure connection to MongoDB:
MONGODB_TLS=true
MONGODB_CA_CERT_DIR
If MongoDB uses TLS authentication, specify the certificate authority (CA) bundle path:
MONGODB_CA_CERT_DIR=global.bundle.pem
The .pem file must be placed in the root directory of the project (not inside any nested folders). For the MONGODB_CA_CERT_DIR environment variable, you should specify only the file name, not the full path.
MONGODB_CONNECTION_STRING
Instead of defining separate environment variables, you can provide a single connection string:
MONGODB_CONNECTION_STRING=mongodb://username:password@prod.mongodb.domain.com?ssl=true&retryWrites=false
File Repository
DronaHQ requires file storage to manage uploaded files from apps and store resources used in applications. Additionally, when an application is published, DronaHQ compresses the application files and serves them from the same repository.
DronaHQ supports multiple options for storing files:
repository: Uses the built-in local file repositoryaws: Uses AWS S3 for file storageazure: Uses Azure Storage Container for file storagegcloud: Uses Google Cloud Storage for file storage
If this variable is unset, the built-in local file repository (repository) will be used by default.
FILE_UPLOAD_TYPE=repository
Local File Repository Configurations
To use DronaHQ's managed file repository, set FILE_UPLOAD_TYPE to repository in your environment variables.
FILE_UPLOAD_TYPE=repository
FILEREPOSITORY_STORAGE_LOCATION
Defines the storage location for files. By default, this is set to the working directory of your installation. You can configure this location as needed.
FILEREPOSITORY_STORAGE_LOCATION=/path/to/storage/directory
FILEREPOSITORY_STORAGE_PREFIX
Specifies a prefix (folder name) that will be created inside the FILEREPOSITORY_STORAGE_LOCATION directory to organize stored files.
FILEREPOSITORY_STORAGE_PREFIX=files
Amazon Simple Storage Service (S3) Configuration
You can use Amazon S3 as a file storage solution with DronaHQ. DronaHQ will upload user-uploaded files and other resources to S3. Additionally, published applications will be served from AWS S3. Ensure that the required permissions and policies are set for your bucket so files can be accessed in the browser.
To enable Amazon S3 as the file storage provider, set the following environment variable:
FILE_UPLOAD_TYPE=aws
AWS_S3_BUCKET_NAME
Specifies the S3 bucket where files will be stored.
AWS_S3_REGION
Defines the AWS region where the S3 bucket is hosted or created.
AWS_S3_ACCESS_KEY_ID, AWS_S3_SECRET_ACCESS_KEY
These credentials (AccessKeyId and AccessKeySecret) are required for accessing your S3 bucket and the objects within it. It is recommended to grant full read/write access to this key pair for seamless file management.
AWS_IAM_ROLE_ACCESS
You can grant S3 bucket access to your instance by assigning an AWS IAM Role. This allows keyless access to your bucket from the instance without exposing credentials.
To enable IAM role-based access, set the following variable in your environment and ensure the correct IAM role is assigned to your instance:
AWS_IAM_ROLE_ACCESS=true
AWS_S3_ACL
By default, DronaHQ uses S3 buckets with ACL enabled. If you want to disable ACL, set this variable to false.
AWS_S3_ACL=false
AWS_S3_BUCKET_PROXY_URL
If you prefer to keep your S3 bucket private, you can set up an authentication middleware (e.g., AWS CloudFront) or another proxy service and provide its URL in this variable.
AWS_S3_BUCKET_PROXY_URL=https://dronahq.example-proxy.com
AWS_S3_ENDPOINT
Specifies a custom S3-compatible endpoint URL for AWS SDKs and tools. Set this when using third-party or self-hosted S3 storage solutions. Defaults to AWS's standard S3 endpoint if not set. Useful for private cloud deployments or local testing. When this variable is set, DronaHQ will internally enable s3ForcePathStyle. Ensure the endpoint is accessible and correctly configured.
Azure Storage Container Configuration
You can use an Azure Storage Container as a file storage solution with DronaHQ. DronaHQ will store uploaded files, application resources, and published applications in the container.
To use Azure Storage Container, set the following environment variable:
FILE_UPLOAD_TYPE=azure
AZURE_STORAGE_ACCOUNT_NAME
This is your Azure storage account name where your storage container is created.
AZURE_STORAGE_ACCOUNT_KEY
This is a secret key for your storage account. This key must have the necessary permissions to read and write inside your storage container.
AZURE_STORAGE_CONTAINER_NAME
This is the container where DronaHQ will upload application resources and user files. This container will also serve some resources for your applications.
Google Cloud Storage Configuration
You can use Google Cloud Storage as a file storage solution with DronaHQ. DronaHQ will store uploaded files, application resources, and published applications in the Google Cloud Storage bucket.
To use Google Cloud Storage, set the following environment variable:
FILE_UPLOAD_TYPE=gcloud
GCLOUD_STORAGE_PROJECT_ID
This is the ID of your Google Cloud project where your storage bucket is created.
GCLOUD_STORAGE_SERVICE_ACCOUNT_KEY_FILE_PATH
This is the file path (inside your container or mapped volume) of your Google Cloud service account key. This key must have the required permissions to read and write inside your storage bucket.
GCLOUD_STORAGE_BUCKET_NAME
This is the storage bucket where DronaHQ will upload application resources and user files. This bucket will also serve some resources for your applications.
GCLOUD_IAM_ROLE_ACCESS
Set to true to enable IAM role-based access control for Google Cloud services. When enabled, the application will use assigned IAM roles for authentication and authorization. Defaults to false if not set. This is useful for restricting access based on predefined roles. Ensure the necessary IAM roles are assigned to avoid permission issues.
Automation
AUTOMATION_LOGGING_CHARACTER_LIMIT
This variable allows you to set the character limit for automation's custom task logging. By default, the character limit is set to 300 characters. You can customize this limit as per your requirement. for unlimited characters, set it to 0.
AUTOMATION_LOGGING_CHARACTER_LIMIT=300
To streamline automation tasks on AWS, you'll be leveraging two core AWS services: Lambda and EventBridge. Before initiating any automation procedures, ensure the correct configuration of the following environment variables:
RUN_AUTOMATION_ON_AWS=true
To interact with Lambda and EventBridge seamlessly, you need to set up the appropriate credentials:
AWS_ACCESS_KEY_ID, AWS_ACCESS_KEY_SECRET
These are essential for accessing your Lambda functions and EventBridge scheduler. It's advisable to grant complete read/write access to the scheduler using these credentials..
AWS_REGION
Specify the AWS region where your Lambda functions and EventBridge scheduler are hosted or deployed.
AWS Lambda Configuration
Configure the following variables related to AWS Lambda:
AUTOMATION_AWS_LAMBDA_ACCESS_KEY_ID (optional)
You have the option to provide a specific AccessKeyId for Lambda, If not provided, the AWS_ACCESS_KEY_ID will be utilized.
AUTOMATION_AWS_LAMBDA_SECRET_ACCESS_KEY (optional)
You have the option to provide a specific SecretAccessKey for Lambda, If not provided, the AWS_ACCESS_KEY_SECRET will be utilized.
AUTOMATION_AWS_LAMBDA_REGION (optional)
You have the option to provide a specific Region for Lambda, If not provided, the AWS_REGION will be utilized.
AUTOMATION_AWS_LAMBDA_FUNCTION_NAME
This denotes the name of your Lambda function.
AUTOMATION_AWS_LAMBDA_FUNCTION_ARN
This represents the Amazon Resource Name (ARN) of your Lambda function, which is crucial for triggering automation tasks within Lambda.
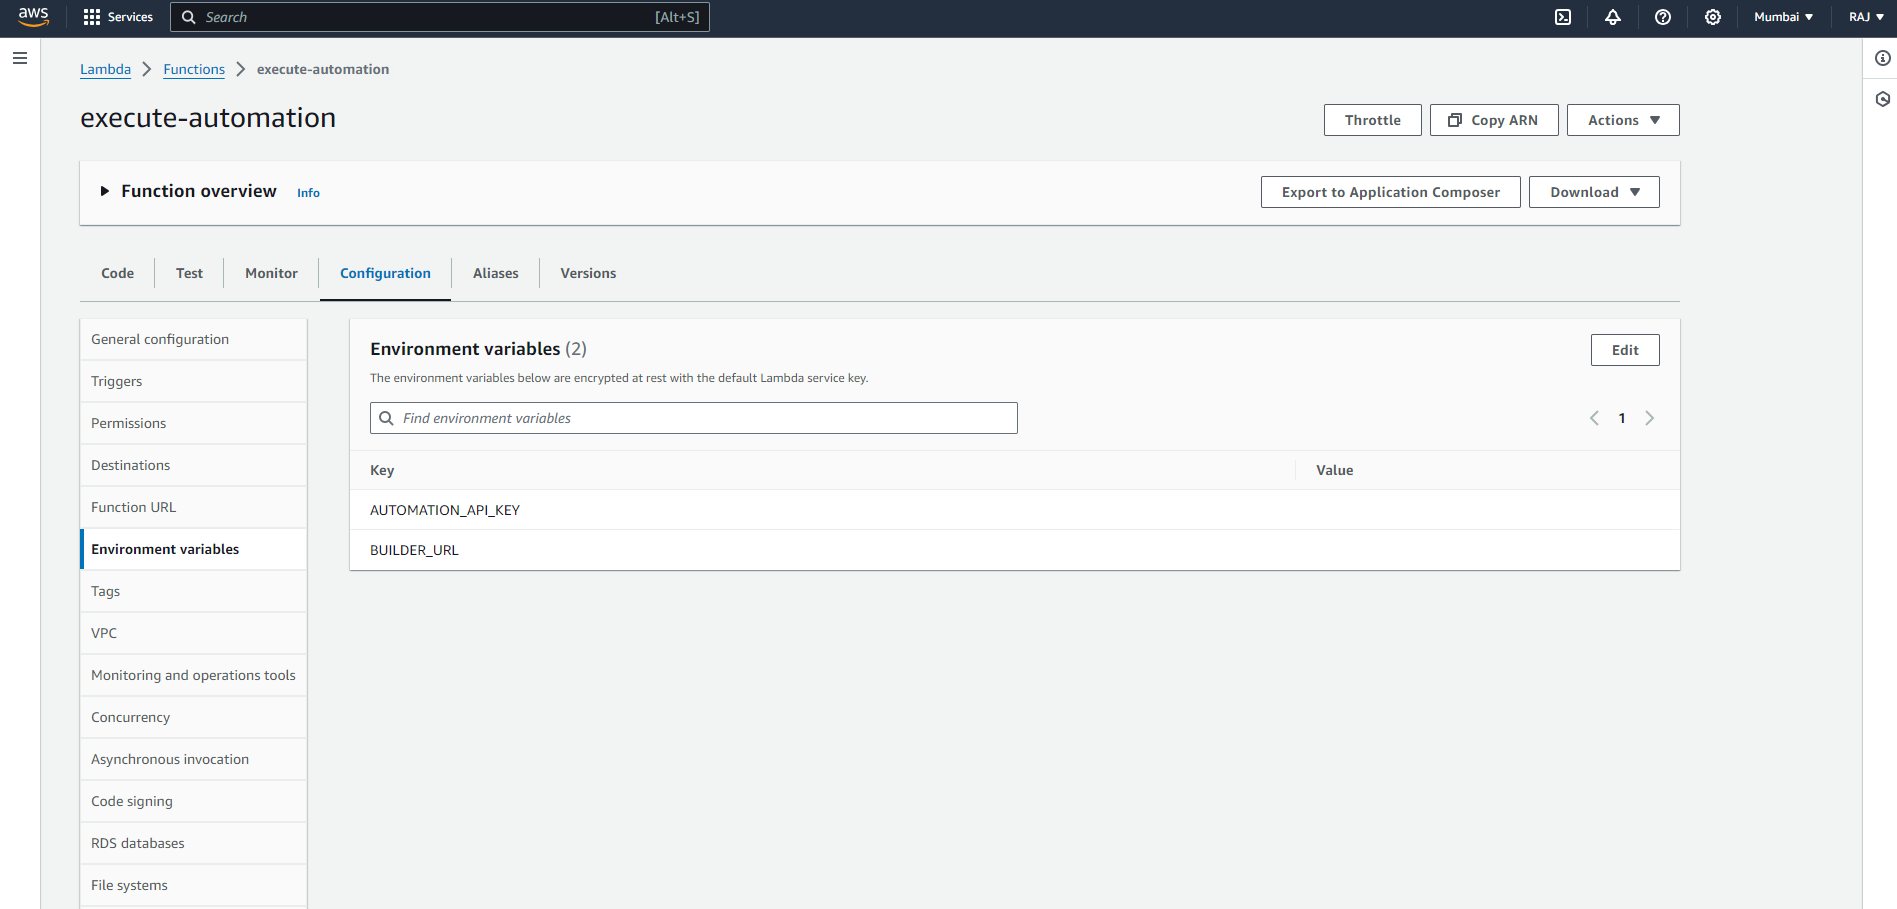
AUTOMATION_API_KEY
This API key facilitates communication between AWS Lambda and DronaHQ Automation. You can assign a custom secret to this variable. Ensure the same secret is provided in the AWS Lambda environment variables. To configure, navigate to AWS Lambda > Functions > <function_name> > Configuration > Environment variables. For detailed instructions, refer to the screenshot below (Figure: AWS Lambda Environment variable settings).
BUILDER_URL
This URL points to your DronaHQ Instances, facilitating communication between AWS Lambda and DronaHQ Automation. It should be added to the AWS Lambda environment variables. For setup guidance, refer to the screenshot below (Figure: AWS Lambda Environment variable settings).
AWS EventBridge (Scheduler) Configuration
Configure the following variable related to AWS EventBridge:
AUTOMATION_AWS_SCHEDULER_ACCESS_KEY_ID (optional)
You have the option to provide a specific AccessKeyId for EventBridge, If not provided, the AWS_ACCESS_KEY_ID will be utilized.
AUTOMATION_AWS_SCHEDULER_SECRET_ACCESS_KEY (optional)
You have the option to provide a specific SecretAccessKey for EventBridge, If not provided, the AWS_ACCESS_KEY_SECRET will be utilized.
AUTOMATION_AWS_SCHEDULER_REGION (optional)
You have the option to provide a specific Region for EventBridge, If not provided, the AWS_REGION will be utilized.
AUTOMATION_AWS_SCHEDULER_LAMBDA_EXECUTE_ROLE_ARN
This denotes the Role ARN of your Lambda function, utilized by EventBridge to trigger automation tasks. Ensure appropriate permissions are granted to this role for seamless execution.
MYSQL Container
When you start the mysql image, you can adjust the configuration of the MySQL instance by passing one or more environment variables on the docker run command line. Do note that none of the variables below will have any effect if you start the container with a data directory that already contains a database: any pre-existing database will always be left untouched on container startup.
See also https://dev.mysql.com/doc/refman/5.7/en/environment-variables.html for documentation of environment variables which MySQL itself respects (especially variables like MYSQL_HOST, which is known to cause issues when used with this image).
MYSQL_ROOT_PASSWORD
This variable is mandatory and specifies the password that will be set for the MySQL root superuser account. In the above example, it was set to my-secret-pw.
MYSQL_DATABASE
This variable is optional and allows you to specify the name of a database to be created on image startup. If a user/password was supplied (see below) then that user will be granted superuser access (corresponding to GRANT ALL) to this database.
MYSQL_USER, MYSQL_PASSWORD
These variables are optional, used in conjunction to create a new user and to set that user's password. This user will be granted superuser permissions (see above) for the database specified by the MYSQL_DATABASE variable. Both variables are required for a user to be created.
Do note that there is no need to use this mechanism to create the root superuser, that user gets created by default with the password specified by the MYSQL_ROOT_PASSWORD variable.
MYSQL_ALLOW_EMPTY_PASSWORD
This is an optional variable. Set to a non-empty value, like yes, to allow the container to be started with a blank password for the root user. NOTE: Setting this variable to yes is not recommended unless you really know what you are doing, since this will leave your MySQL instance completely unprotected, allowing anyone to gain complete superuser access.
MYSQL_RANDOM_ROOT_PASSWORD
This is an optional variable. Set to a non-empty value, like yes, to generate a random initial password for the root user (using pwgen). The generated root password will be printed to stdout (GENERATED ROOT PASSWORD: .....).
MYSQL_ONETIME_PASSWORD
Sets root (not the user specified in MYSQL_USER!) user as expired once init is complete, forcing a password change on first login. Any non-empty value will activate this setting. NOTE: This feature is supported on MySQL 5.6+ only. Using this option on MySQL 5.5 will throw an appropriate error during initialization.
MYSQL_INITDB_SKIP_TZINFO
By default, the entrypoint script automatically loads the timezone data needed for the CONVERT_TZ() function. If it is not needed, any non-empty value disables timezone loading.
MongoDB Container
When you start the mongo image, you can adjust the initialization of the MongoDB instance by passing one or more environment variables on the docker run command line. Do note that none of the variables below will have any effect if you start the container with a data directory that already contains a database: any pre-existing database will always be left untouched on container startup.
MONGO_INITDB_ROOT_USERNAME, MONGO_INITDB_ROOT_PASSWORD
These variables, used in conjunction, create a new user and set that user's password. This user is created in the admin authentication database and given the role of root, which is a "superuser" role.
The following is an example of using these two variables to create a MongoDB instance and then using the mongosh cli (use mongo with 4.x versions) to connect against the admin authentication database.
    $ docker run -d --network some-network --name some-mongo \
        -e MONGO_INITDB_ROOT_USERNAME=mongoadmin \
        -e MONGO_INITDB_ROOT_PASSWORD=secret \
        mongo

    $ docker run -it --rm --network some-network mongo \
        mongosh --host some-mongo \
            -u mongoadmin \
            -p secret \
            --authenticationDatabase admin \
            some-db
    > db.getName();
    some-db
Both variables are required for a user to be created. If both are present then MongoDB will start with authentication enabled (mongod --auth).
Authentication in MongoDB is fairly complex, so more complex user setup is explicitly left to the user via /docker-entrypoint-initdb.d/ (see the Initializing a fresh instance and Authentication sections below for more details).
MONGO_INITDB_DATABASE
This variable allows you to specify the name of a database to be used for creation scripts in /docker-entrypoint-initdb.d/*.js (see Initializing a fresh instance below). MongoDB is fundamentally designed for "create on first use", so if you do not insert data with your JavaScript files, then no database is created.
MONGO_INITDB_USER, MONGO_INITDB_PWD
These are custom variables added by DronaHQ. This will create application user in your database while initializing MongoDB container. DronaHQ runs following script while initializing container to create application users and and assign read/write access to them.
    db.createUser({
        user: '$MONGO_INITDB_USER',
        pwd: '$MONGO_INITDB_PWD',
        roles: [{
            role: "userAdminAnyDatabase",
            db: "admin"
        }, {
            role: 'readWrite',
            db: '<% database name %>'
        }]
    })
Global GIT Sync configuration
Below are the environment variables to be configured when you want to enable Git Sync globally.
GIT_SYNC_IS_GLOBAL
This variable specifies if you want to enable Global Git Sync feature.
By default it is set to false, GIT Sync Global feature is disabled
If set true, GIT Sync Global feature is enabled and you need to configure git repo and other configuration variables listed below
GIT_SYNC_IS_GLOBAL=true
GIT_SYNC_SSH_REPO_URL
SSH Url of the Git Repo which you want all your apps to be checked into. Mandatory if GIT_SYNC_IS_GLOBAL is set to true.
GIT_SYNC_SSH_REPO_URL=git@github.com:UserName/RepoName.git
GIT_SYNC_BRANCH_NAME
Branch name of the above repo url which this instance should be synced with. For production instance, ideally use main branch. For development instance, you can create dev branch and so on. Mandatory if GIT_SYNC_IS_GLOBAL is set to true.
GIT_SYNC_BRANCH_NAME=main
GIT_SYNC_AUTH_SSH_KEY_FRIENDLY_NAME
Friendly Key name you have used for creating SSH key from SSH Key management. The public key of this friendly key should be added in your GIT repo with read/write rights to above GIT Sync repo. Mandatory if GIT_SYNC_IS_GLOBAL is set to true.
GIT_SYNC_AUTH_SSH_KEY_FRIENDLY_NAME=MyGitSyncKey
GIT_SYNC_IS_AUTO_SAVE
Enable this to automatically save your app changes to your GIT repo.
GIT_SYNC_IS_AUTO_SAVE=true
GIT_SYNC_IS_LOCK_APP_EDIT
Enable this to disable editing of you app that is added to GIT. Ideally, you should set to true for your production instance and set it to false for your development instance.
GIT_SYNC_IS_LOCK_APP_EDIT=false
GIT_SYNC_CREATE_REPO_ON_APP_ADD
Enable this to automatically add new apps to git. Ideally, you should set to true for your development instance if you want all apps to be automatically added to git and set it to false for your production instance. By default, it is set to false.
GIT_SYNC_CREATE_REPO_ON_APP_ADD=true
Secret keys
To enhance security for dronahq self-hosted deployments, secret keys are automatically generated on every server restart. This prevents long-lived secrets from being exposed or misused, reducing security risks.
Auto-Generated Secret Keys
By default, the following secret keys are automatically generated on every server restart:
SESSION_KEY_SECRET- Used for self-hosted logged-in sessions.AUTOMATION_API_KEY- Used for automation's internal calls, such as run log entry.JWT_SECRET_KEY- Used for automation internal session validation.SECRET_API_TOKEN_KEY- Used for studio and all other module internal calls.BUILDER_LICENSE_TOKEN- Used for internal authentication between the builder and add-ons (automation, database, file storage).
Persisting Secret Keys
If you want to persist these secret values across server restarts, set the corresponding environment variables in the environment file:
SESSION_KEY_SECRET=your_session_key_secret
AUTOMATION_API_KEY=your_automation_api_key
JWT_SECRET_KEY=your_jwt_secret_key
SECRET_API_TOKEN_KEY=your_secret_api_token_key
EMBED_APP_JWT_SECRET_KEY=your_embed_app_jwt_secret_key
BUILDER_LICENSE_TOKEN=your_builder_license_token
By setting these environment variables, the secret keys will remain constant across server restarts, ensuring consistent authentication and security behavior.
Persisting secret keys can introduce security risks, including:
- Long-Lived Secrets: Static secret keys remain valid indefinitely, making them a target for exploitation if leaked.
- Configuration Management Risks: Improper handling of environment files (such as committing them to version control or using insecure storage) can expose secret values.
To mitigate these risks, ensure that environment files are securely stored, access is restricted, and keys are rotated periodically.
Other optional variables
ENCRYPTION_KEY
By default, DronaHQ user its own encryption key to encrypt credentials and secret information flows in system. You can configure your own encryption key for added security. Also make sure to keep backup of your key at secure location.
ENCRYPTION_KEY=some-random-secret-key
SESSION_KEY_NAME
By default, DronaHQ user its own session key and secret key. You can configure your own if you want to customize.
SESSION_KEY_NAME=cookie-name
SENDGRID_API_KEY
DronaHQ uses sendgrid as a mailing client. Configure your sendgrid key for activating activity mails.
SENDGRID_API_KEY=sendgrid api key
MAILER_EMAIL, MAILER_NAME
This is sender mailer name and email id for all the mails shoot from dronahq. You can configure your own mailer options as per your sendgrid account.
MAILER_EMAIL=no-reply@dronahq.com
MAILER_NAME=DronaHQ
REST_PROXY_WHITELISTED_DOMAINS
Use this variable to whitelist API domains for the Data Query -> REST API feature. Specify a comma-separated list of hostnames that are allowed. For example:
REST_PROXY_WHITELISTED_DOMAINS=dronahq.com,google.com,api.example.com
FILE_UPLOAD_RESTRICTED_EXTENSIONS
This variable allows you to restrict specific file extensions for file uploads in DronaHQ.
By default, the following extensions are restricted: .exe, .dll, .bat, .sh, .cmd, .vbs.
If the FILE_UPLOAD_RESTRICTED_EXTENSIONS variable is configured, it will override the default restrictions. Add comma-separated file extensions to this variable to customize the restrictions. For example:
FILE_UPLOAD_RESTRICTED_EXTENSIONS=.exe,.dll,.bat,.sh,.cmd,.vbs
IGNORE_CALLBACK_MESSAGES
If set to true, This variable allows you to ignore error messages from authentication callback request and show static error message on screen.
IGNORE_CALLBACK_MESSAGES=true