Overview
The self-hosted DronaHQ solution ensures that all access to your data remains within your own cloud environment, giving you complete control over security and compliance. It offers the flexibility to configure DronaHQ according to your infrastructure needs, including logging, scaling, and access management. Additionally, it supports custom SAML SSO integration with providers such as Okta and Active Directory, enhancing authentication and security.
Learn about deploying DronaHQ on your own infrastructure.
Deploying the self-hosted DronaHQ on your infrastructure enables you to build applications while keeping your data within your virtual private cloud (VPC) or behind your virtual private network (VPN). Organizations with strict data compliance requirements often choose self-hosted DronaHQ to maintain regulatory adherence and full control over their data.
DronaHQ can be deployed locally or on various cloud platforms, including AWS, GCP, Azure, and Kubernetes (K8s) clusters. Explore the deployment options overview for a comprehensive list of installation methods and setup instructions.
Looking for an Enterprise Solution?
If you're considering DronaHQ for a large-scale production deployment or require features from our Enterprise plan, we’d love to help. Schedule a demo to explore how DronaHQ can meet your needs.
DronaHQ Self-Hosted Quickstart
Prerequisites
Before proceeding, ensure that your system meets the minimum requirements listed here.
TL;DR: DronaHQ Self-Hosted Installation Steps
Sign up for DronaHQ Self-Hosted
Register for a self-hosted version of DronaHQ here.Retrieve Your License Key
Log in to the Self-Hosted Portal and locate your license key.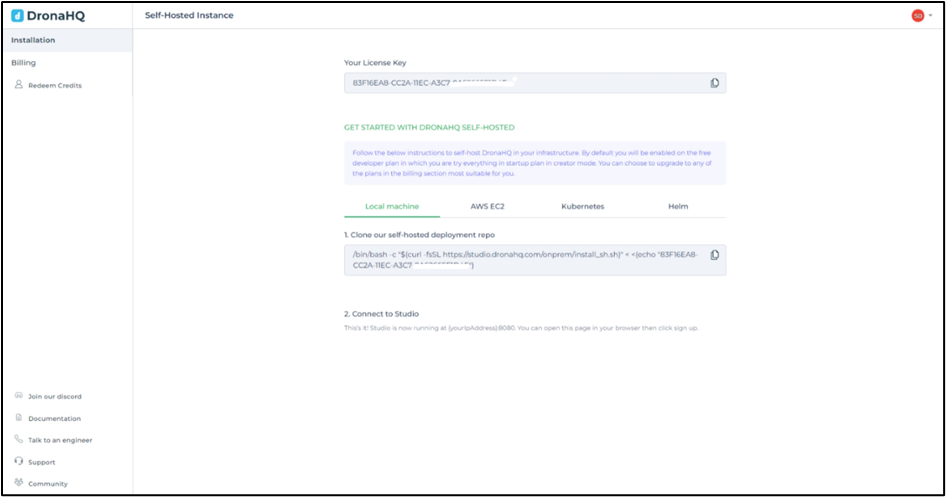
Install DronaHQ on Your System
Follow the installation guide for Linux or macOS.Allow Communication with License Server
Ensure that your server can communicate withlicense.dronahq.com. If required, whitelist this endpoint.Start Your Self-Hosted Instance
Once installed, your self-hosted DronaHQ instance will be accessible athttp://localhost:8080.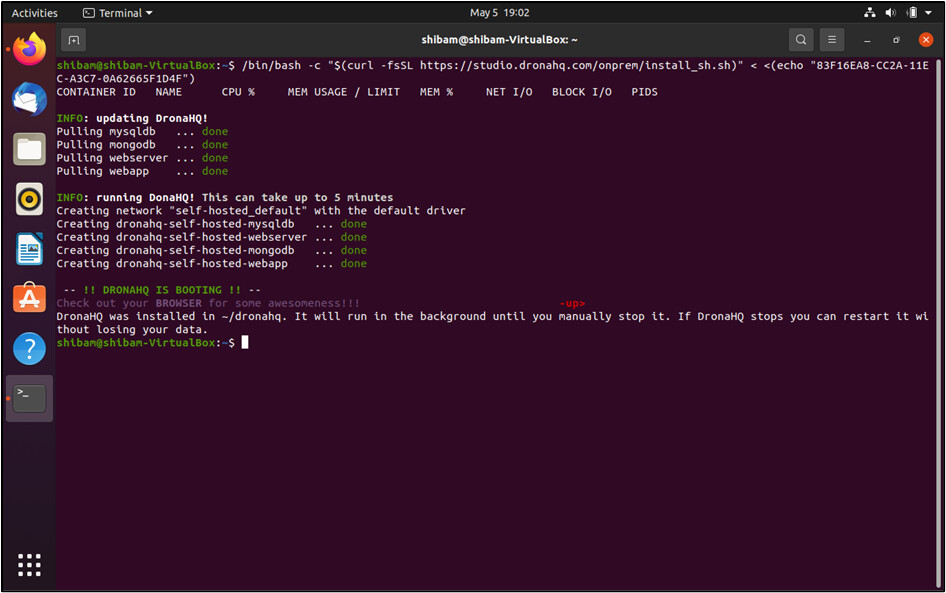 caution
It may take 3-5 minutes for the initialization to complete. If the UI doesn’t load automatically, manually navigate to
http://localhost:8080.Activate Your Installation
When prompted, enter your username, email, and password to activate your DronaHQ instance. Ensure that the email matches your signup email.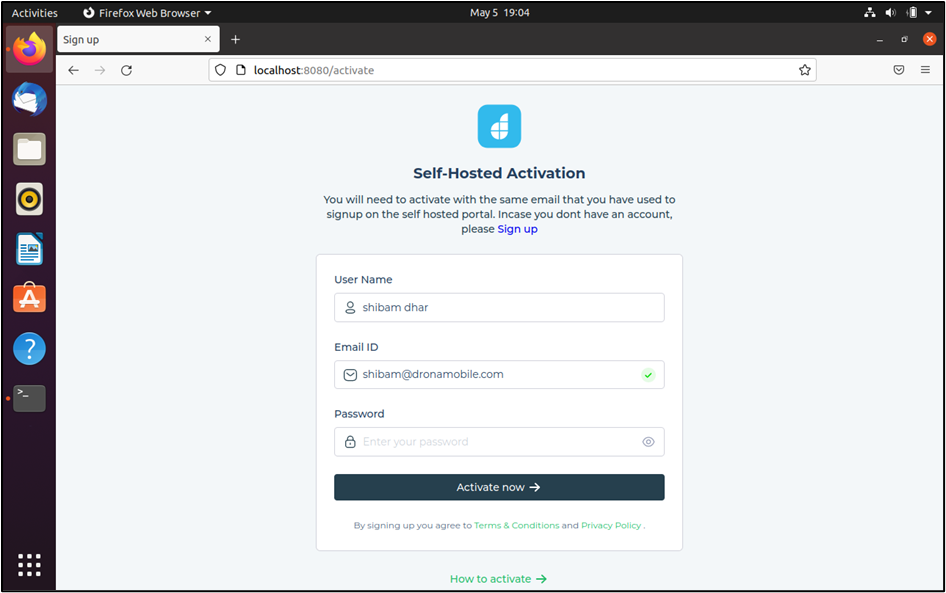
Click Activate Now to complete the setup. You will be redirected to the DronaHQ homepage running on your local system.
Updating the IP Address (If Needed)
If you are accessing DronaHQ via an IP address instead of localhost, update your .env file:
Open the
dronahq.envfile in your installation directory.Locate the following line:
BUILDER_URL= http://localhost:8080Update it with your server’s IP address:
BUILDER_URL= http://your-ip-address:8080Save the file and restart the web application:
sudo docker compose restart webapp
Related Topics
- Minimum requirements
- Deployment Options
- Configure SSL and CA certificates
- Configure External Databases
- Environment Variables
- Horizontal Scaling
- Update DronaHQ to Latest version
- Concepts