Upload Files to database
We can still create datasets, charts, and dashboards from CSV files before connecting databases.
Connect a Database and Enable Uploads
In order for the database to accept the CSV, you need to enable data uploads. Data uploads will be enabled by default. If data uploading is disabled, follow the below steps.
- Start by navigating to the
Connectors. - Then select the Edit pencil icon for your database.
- The "Edit database" panel appears. Select the Advanced tab and then expand the Security panel.
- In the Schemas Allowed for CSV Upload field, enter the name(s) of any schemas in your database that should be available for CSV data uploads. If more than one, separate each by a comma.
- In the Allow data upload field, select the checkbox.
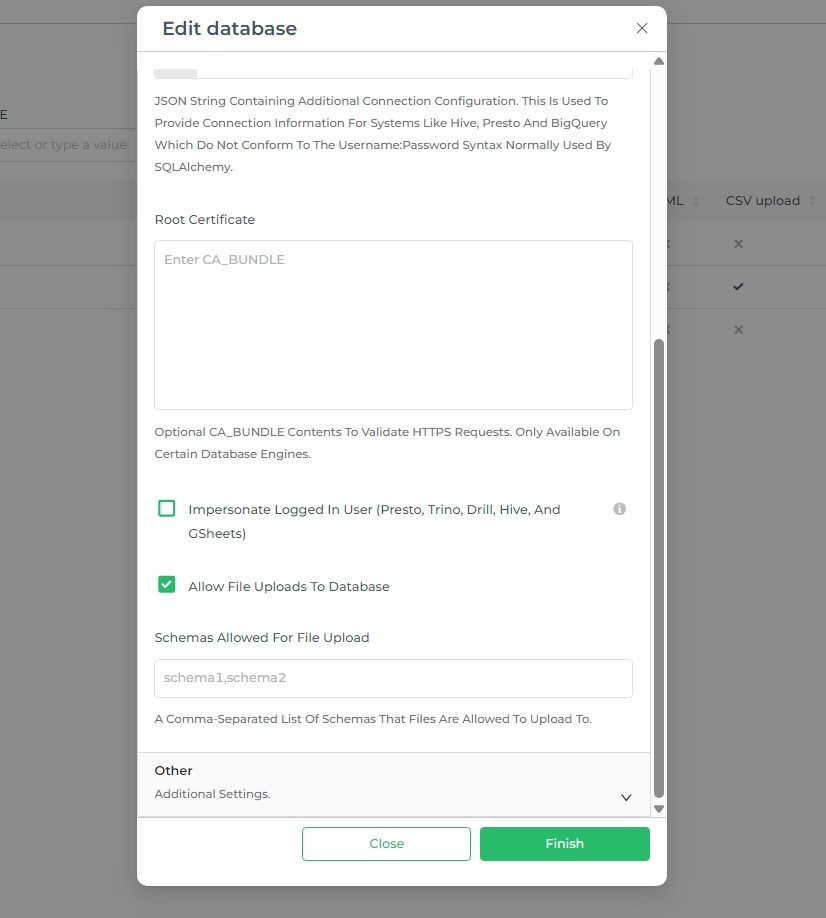
- If there are specific schemas to house the CSV upload, specify those schemas in the text box shown.
- Lastly, select
Finish.
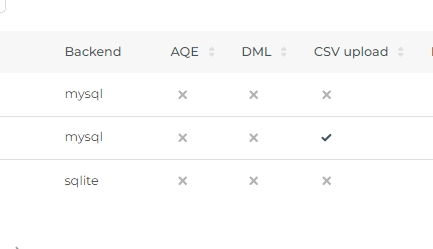
To confirm, in the Databases screen under the "CSV upload" column header, ensure that a checkmark is displayed for your database row entry.
Different File upload Options
Navigate to the Connectors section, where you'll see the option Upload files to database at the top. Click on it to reveal a dropdown menu with the following options:
- Upload CSV : Select this option to upload a CSV (Comma-Separated Values) file, which is commonly used for storing and transferring data in a tabular format. This option is ideal for simple text-based data files.
- Upload Columnar File : Choose this option to upload a columnar file, which stores data in columns rather than rows. This format is typically used for large datasets and is optimized for analytical queries, improving performance in data processing.
- Upload Excel File : Use this option to upload an Excel file (.xls or .xlsx), a widely-used spreadsheet format that supports complex data structures, formulas, and multiple sheets within a single file. This is suitable for data that requires organization beyond simple text or numerical values.
Upload CSV
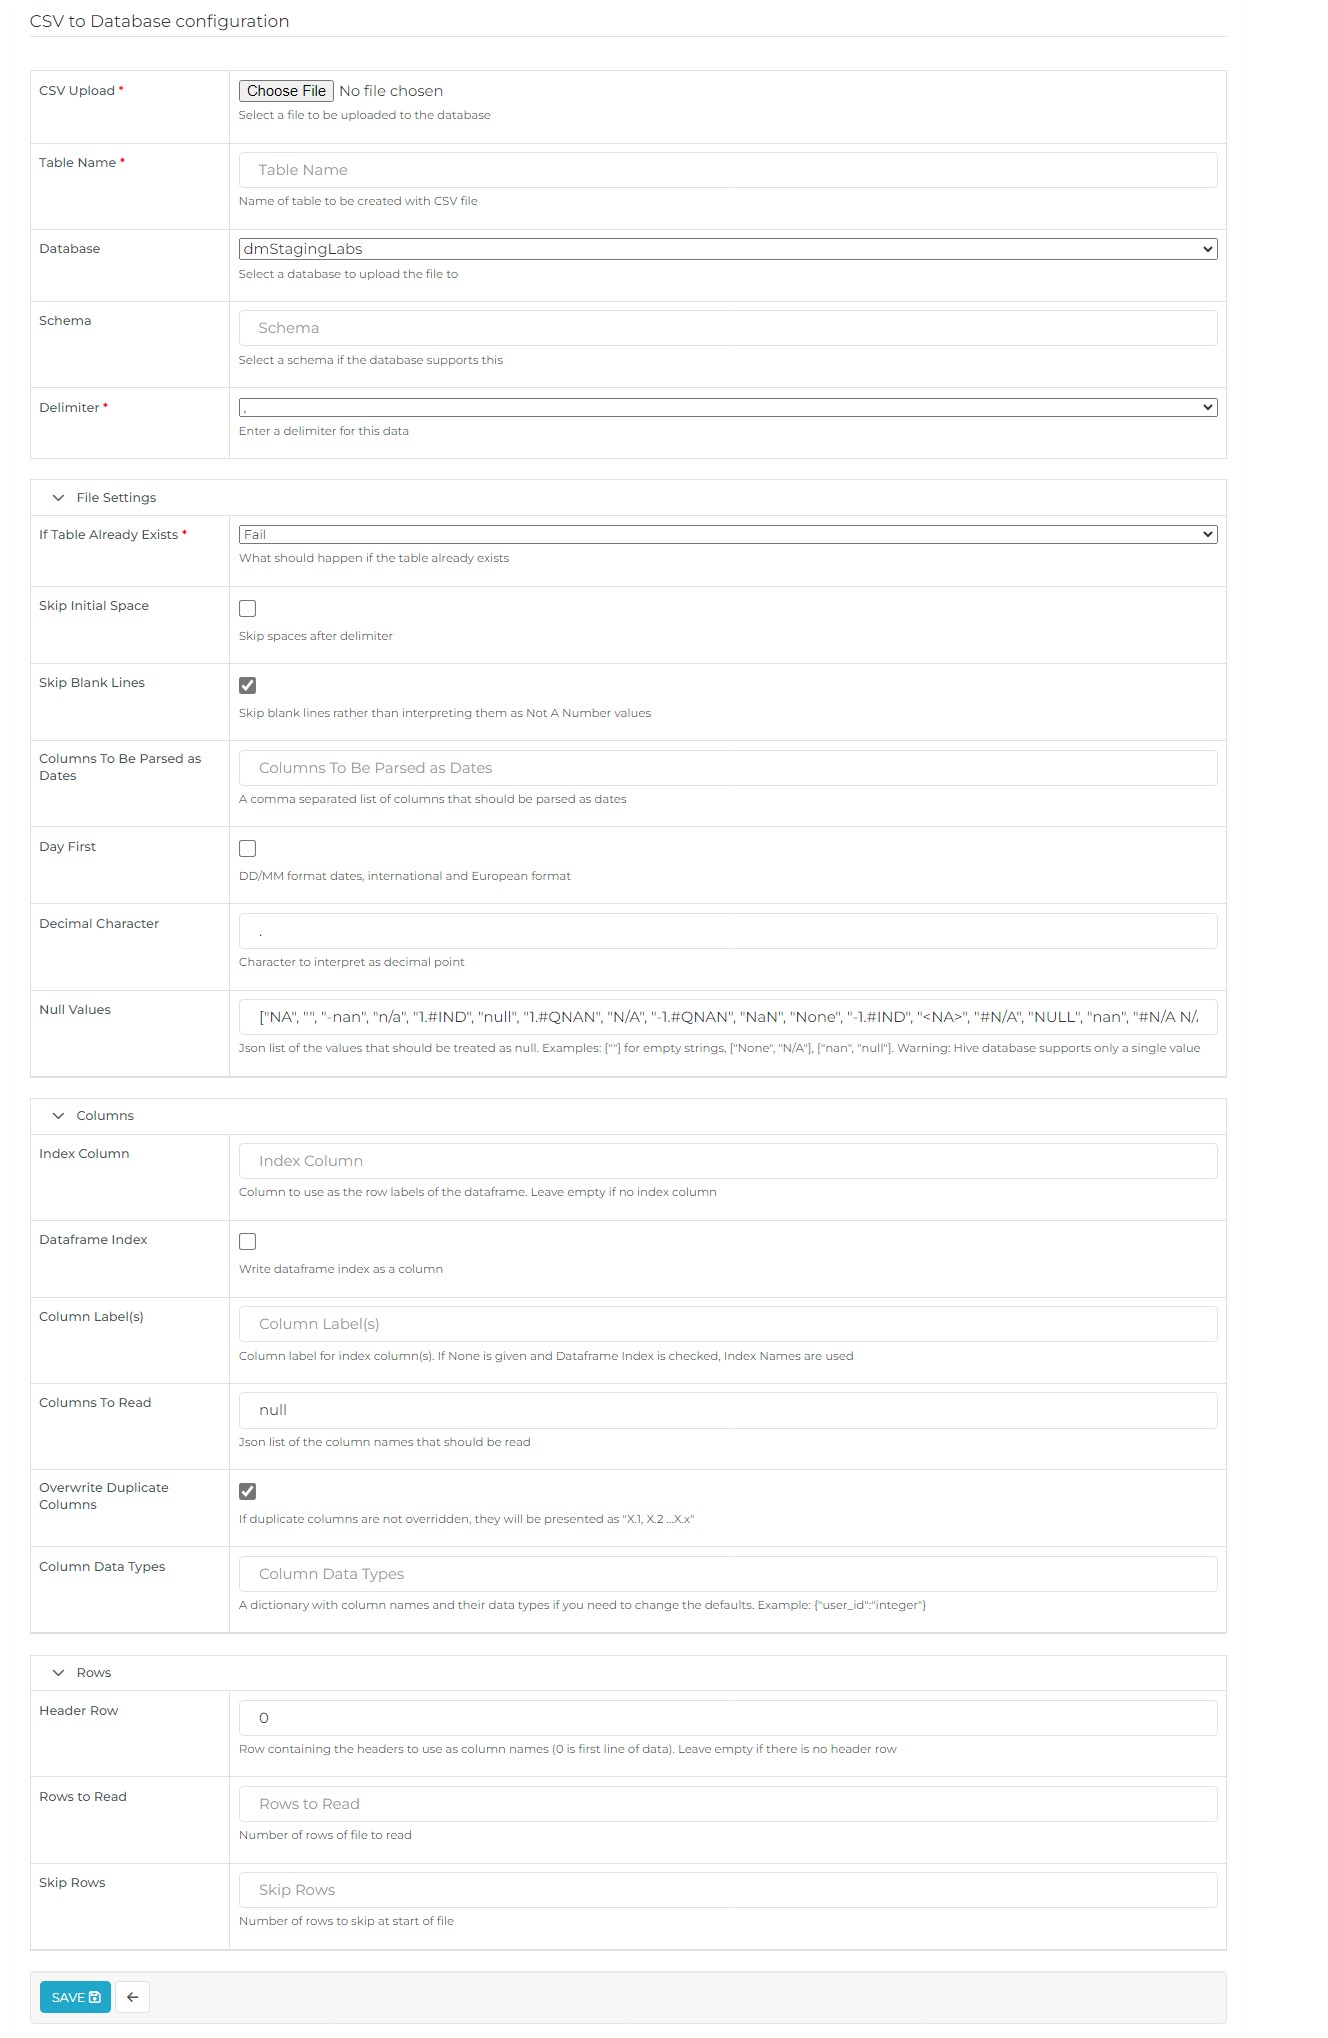
CSV to Database Configuration
| Property | Description |
|---|---|
| CSV Upload | Select the CSV file from your local or network system by clicking "Choose File". |
| Table Name | Enter a meaningful name for the table that will be created from the CSV data. |
| Database | Choose the database where the CSV data will be stored. |
| Schema | Select the schema associated with the chosen database. |
| Delimiter | Specify the symbol used to separate data fields in the CSV file. Use \s+ for whitespace delimiters. |
Additional CSV Configurations
| Property | Description |
|---|---|
| Table Already Exists | Determine the action if the table already exists: Fail: Take no action. Replace: Drop and recreate the table. Append: Insert data into the existing table. |
| Skip Initial Space | Enable this option to ignore spaces following the delimiter. |
| Skip Blank Lines | Enable this option to skip blank lines in the CSV file, preventing them from being treated as NaN values. |
| Columns to be Parsed as Dates | List the columns that should be parsed as dates, separated by commas. |
| Interpret Datetime Format Automatically | Enable this option to allow Pandas to automatically interpret datetime formats. |
| Decimal Character | Specify the character to be used as the decimal point in the CSV data. |
| Index Column | Define a column to be used as the row index for the data frame. Leave it empty if no index column is required. |
| Mangle Duplicate Columns | Enable this option to rename duplicate columns automatically as "X.0, X.1", etc. |
| Null Values | Provide a list of values in JSON format that should be treated as null. |
Column Settings
| Property | Description |
|---|---|
| Dataframe Index | Choose whether to write the dataframe index as a separate column. |
| Column Label(s) | Specify labels for index columns. If left blank and Dataframe Index is enabled, the index names will be used as labels. |
Row Settings
| Property | Description |
|---|---|
| Header Row | Enter 0 if your CSV file includes a header row. Leave it empty if there is no header row. |
| Rows to Read | Specify the number of rows to read from the CSV file. |
| Skip Rows | Indicate the number of rows to skip at the beginning of the file. |
Once you have configured all the settings, click Save.
Upload Columnar File
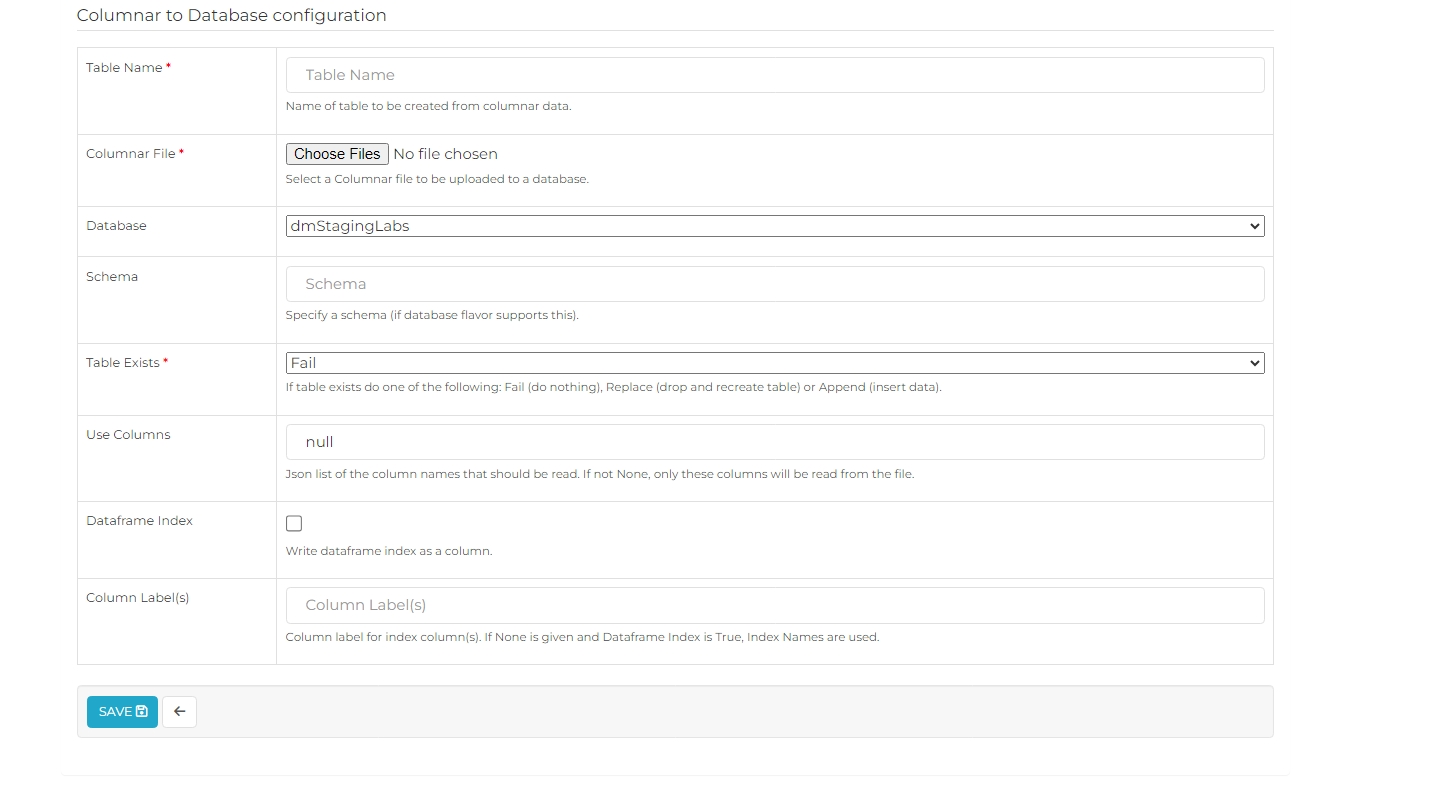
| Property | Description |
|---|---|
| Table Name | Enter a name for the table to be created from the columnar data. This name should be unique and memorable. |
| Columnar File | Click "Choose Files" to upload one or more columnar files from your local or network system. These files will be used to populate the table in the database. |
| Database | Select the database where the table will be created and the columnar data will be stored. |
| Schema | Choose the schema associated with the selected database, if applicable. Schemas help organize and separate database objects such as tables. |
| Table Exists | Decide what to do if the table already exists: Fail: Take no action if the table exists. Replace: Drop and recreate the table. Append: Add data to the existing table. |
| Use Columns | Enter a JSON list of the specific column names that should be read from the file. If left as null, all columns will be read. |
| Dataframe Index | Check this box to write the dataframe index as a separate column in the table. This is useful if the index needs to be preserved as part of the data. |
| Column Label(s) | Provide a label for the index column(s). If Dataframe Index is enabled and no label is provided, the index names will be used as labels. |
After configuring these settings, click Save to create the table and upload the columnar data to the selected database.
Upload Excel file
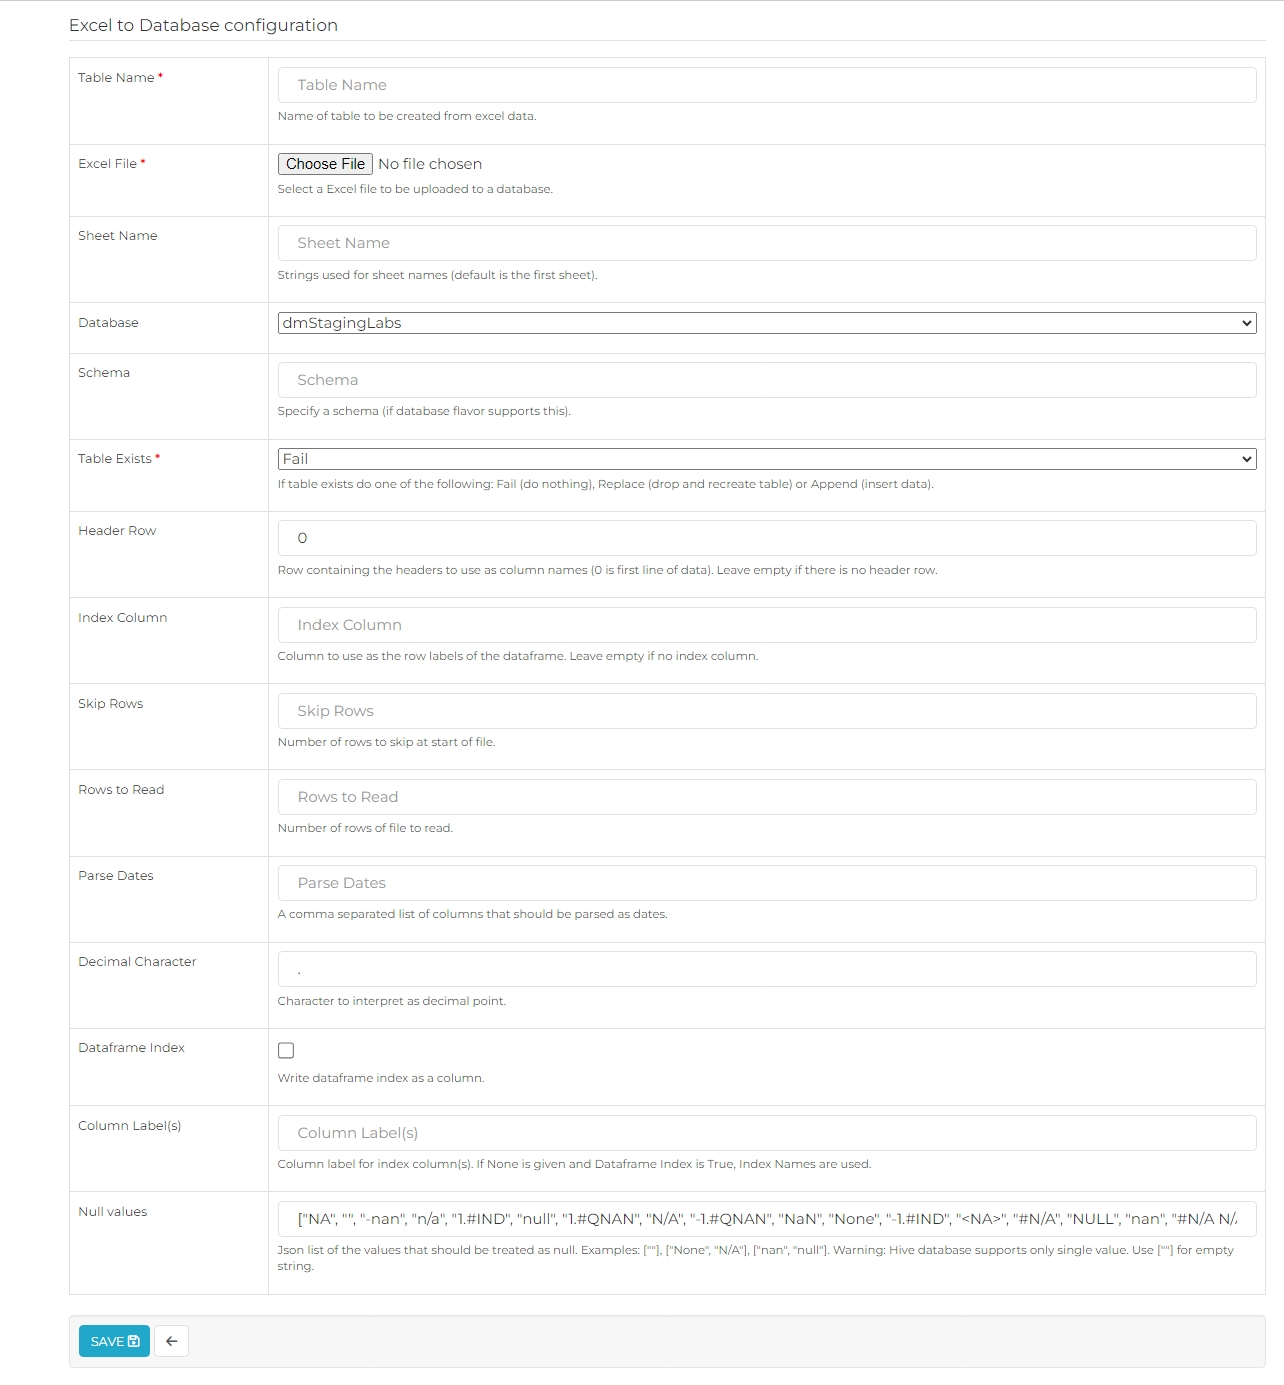
| Property | Description |
|---|---|
| Table Name | Enter a name for the table to be created from the Excel data. This name should be unique and descriptive. |
| Excel File | Click "Choose File" to upload the Excel file from your local or network system. This file will be used to populate the table in the database. |
| Sheet Name | Specify the name of the sheet from which data will be imported. If left empty, the first sheet in the Excel file will be used by default. |
| Database | Select the database where the table will be created and the Excel data will be stored. |
| Schema | Choose the schema associated with the selected database, if applicable. Schemas help organize and separate database objects such as tables. |
| Table Exists | Decide what to do if the table already exists: Fail: Take no action if the table exists. Replace: Drop and recreate the table. Append: Add data to the existing table. |
| Header Row | Enter 0 if your Excel file includes a header row. If there is no header row, leave this field empty. |
| Index Column | Specify a column to be used as the row index for the data frame. Leave it empty if no index column is needed. |
| Skip Rows | Indicate the number of rows to skip at the start of the file. |
| Rows to Read | Specify the number of rows to read from the Excel file. |
| Parse Dates | Enter a comma-separated list of columns that should be parsed as dates. |
| Decimal Character | Specify the character to be used as the decimal point in the Excel data. |
| Dataframe Index | Check this box to write the dataframe index as a separate column in the table. This is useful if the index needs to be preserved as part of the data. |
| Column Label(s) | Provide a label for the index column(s). If Dataframe Index is enabled and no label is provided, the index names will be used as labels. |
| Null Values | Enter a JSON list of values that should be treated as null. For example, ["", "None", "NaN"]. Hive databases only support a single null value, so use [""] for empty strings. |
After configuring these settings, click Save to create the table and upload the Excel data to the selected database.