Google Sheets
Google Sheets and DronaHQ integration is an easy and assured go-to solution to build user interfaces over the structured data storage that is the power of Google sheets.
Configuring API Connector in DronaHQ
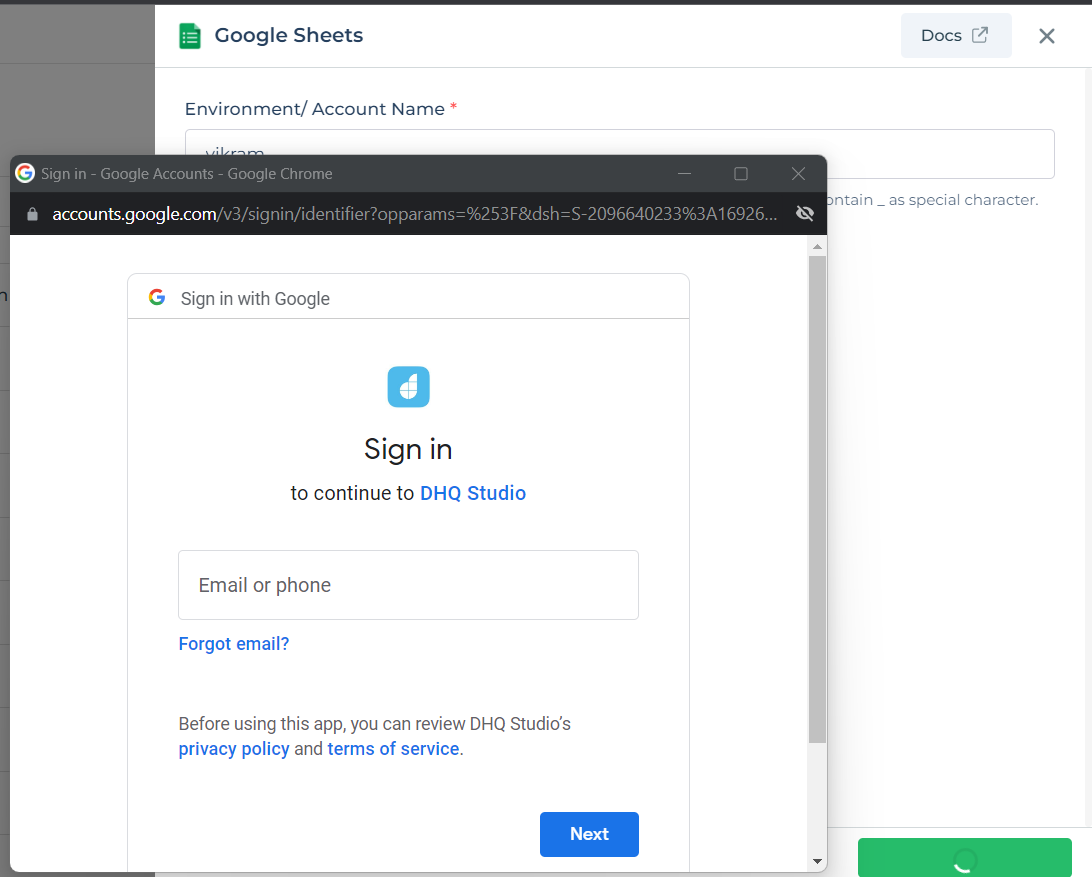
Add a Account name. Then click Save, it will open a pop-up window asking you to sign-in into your Google account.
Continue with the steps and give access to DronaHQ to connect with your Google for its Sheets ID and information.
After successfully configuring and saving the connector settings, you can easily access your newly connected account by
navigating to the connected accounts list. You can find this option from the Connector -> Manage Account section.
This centralized location allows you to conveniently monitor and manage your connected accounts.
Supported API endpoints
| Action | Description |
|---|---|
| GetAllRowsV2 | Retrieve all rows from a specific sheet in a Google Sheets document. |
| FindRowsV2 | Search and retrieve rows from a specific sheet based on specified criteria. |
| GetSheetDetails | Retrieve details and properties of a specific sheet. |
| CreateSheet | Create a new sheet within a Google Sheets document. |
| GetAllRows | Retrieve all rows from a specific sheet in a Google Sheets document. |
| AddRows | Add new rows to a specific sheet in a Google Sheets document. |
| Find Rows | Search and retrieve rows from a specific sheet based on specified criteria. |
| UpdateRow | Update the content of a specific row in a Google Sheets document. |
| Clear Row | Clear the content of a specific row in a Google Sheets document. |
| Find a Row | Search and retrieve rows from a specific sheet based on specified criteria. |
| AddMultipleRows | Add multiple rows to a specific sheet in a Google Sheets document. |
| GetSingleRow | Retrieve a single row from a specific sheet based on row number. |
| ClearMultipleRows | Clear content from multiple rows in a Google Sheets document. |
| UpdateMultipleRows | Update content in multiple rows within a Google Sheets document. |
| GetAllSheets | Deprecated. Get a list of all sheets within a Google Sheets document. |
| FindDriveFiles | Deprecated. Search and retrieve Google Drive files related to Google Sheets. |
It is important to remember that when you are updating any row and you do not want to update some of the columns then in that case you should Use Keywords as
{{NULL}}. This ensures that the column is not overwritten. The original value is retained. Only the column/s with specified inputs are updated.You can query several columns at a time (A:AZ). Once you configure a connector on DronaHQ and you add Column to your Google Sheet, then your existing configured Google Sheet connector will have to be updated/refreshed in order to reflect the new column added in your Google Sheet.
Using Google Sheets Connector
Get all rows
To fetch all rows from a specific spreadsheet, you can use the GetAllRows subcategory of the Google Sheet API connector in DronaHQ. This subcategory allows you to retrieve data from an entire sheet or a specified range of rows and columns. Here’s how you can configure it:
Inputs You Can Provide:
- Spreadsheet Name: The name of the spreadsheet from which you want to fetch data.
- Sheet Name: The specific sheet within the spreadsheet (useful when the spreadsheet - contains multiple sheets).
- Column Range: Define a range of columns to limit the data fetched (e.g., A:D for columns A through D).
- Start Row: Specify the starting row number from which data retrieval should begin.
- End Row: (Optional) Specify the last row number to limit the data retrieved.
Get Single Row
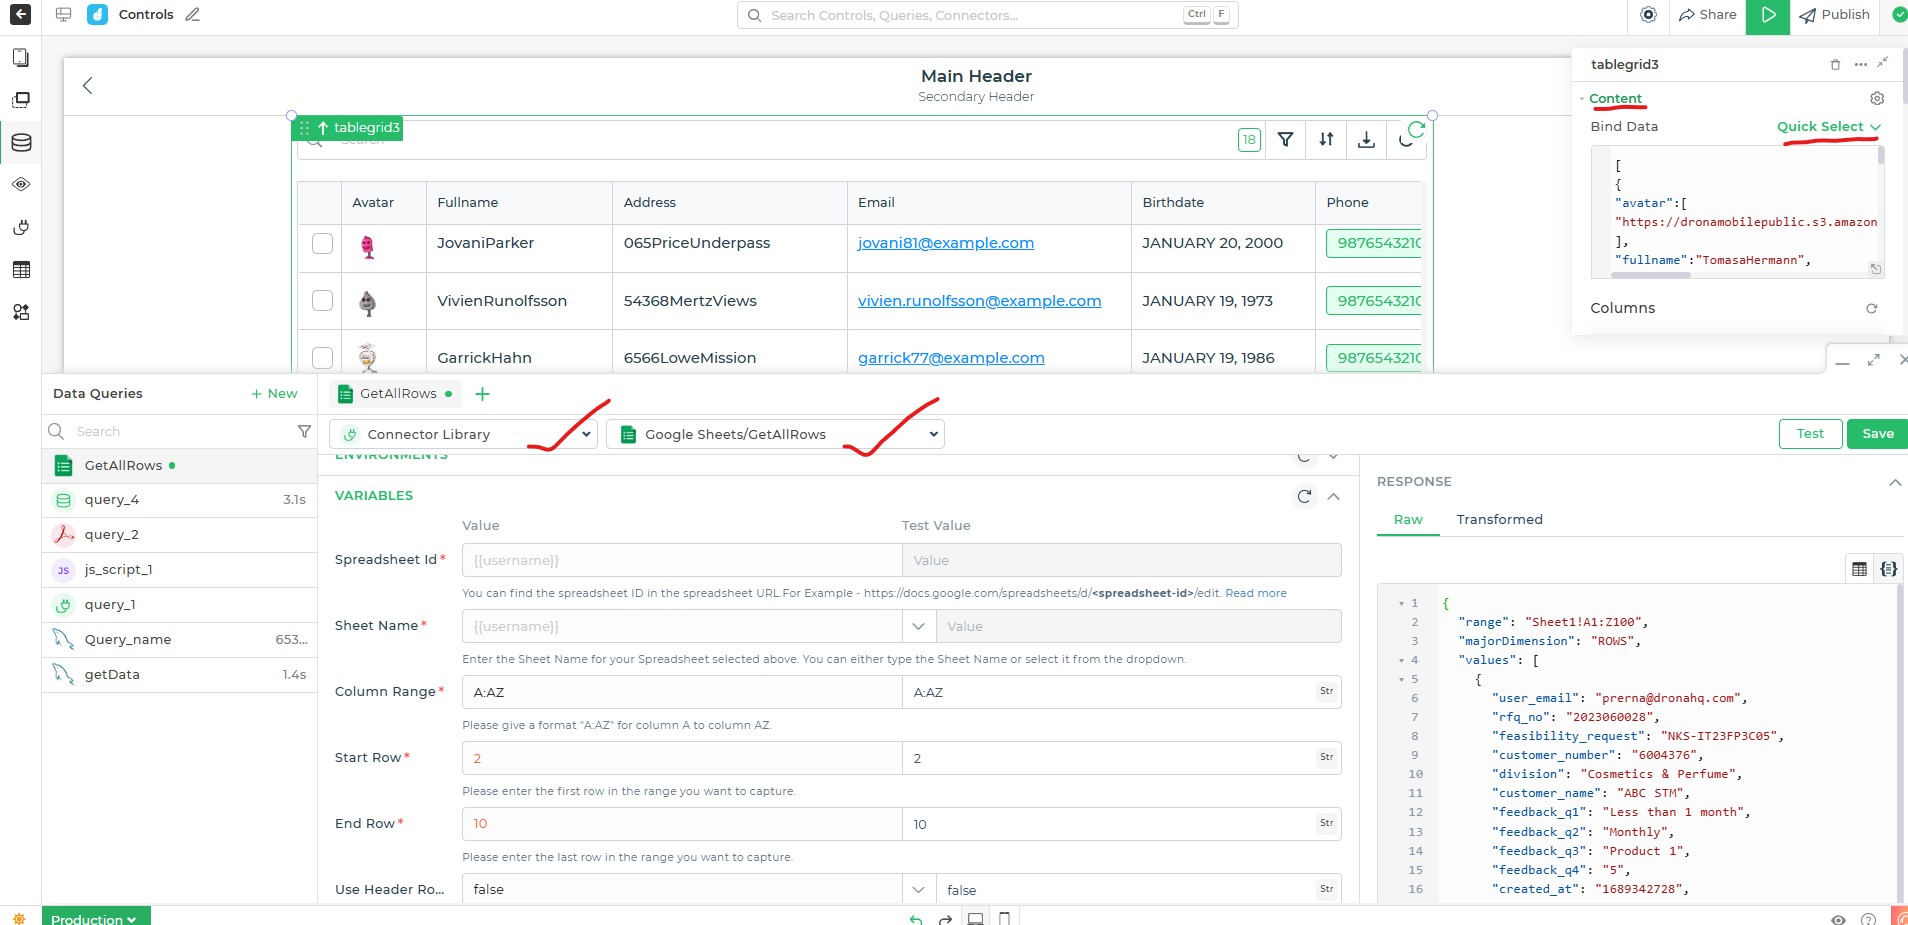
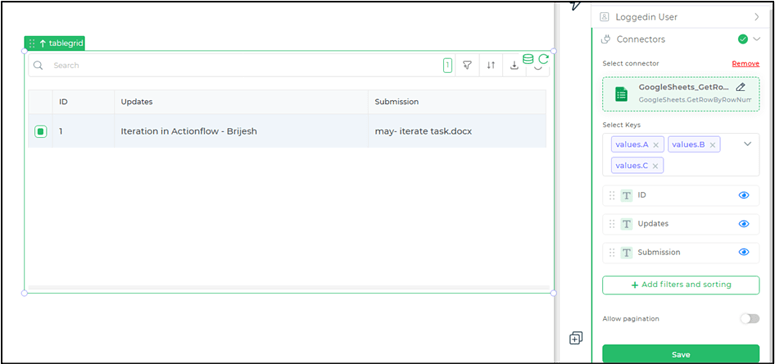
To fetch the row details of a specific row number provided by the user can be done by using the GetSingleRow subcategory of the Google Sheet API connector. You just have to select the subcategory and provide the sheet details such as the spreadsheet name and sheet ID along with the row number. These details will be used to fetch the row details of a specific row number from a certain spreadsheet.
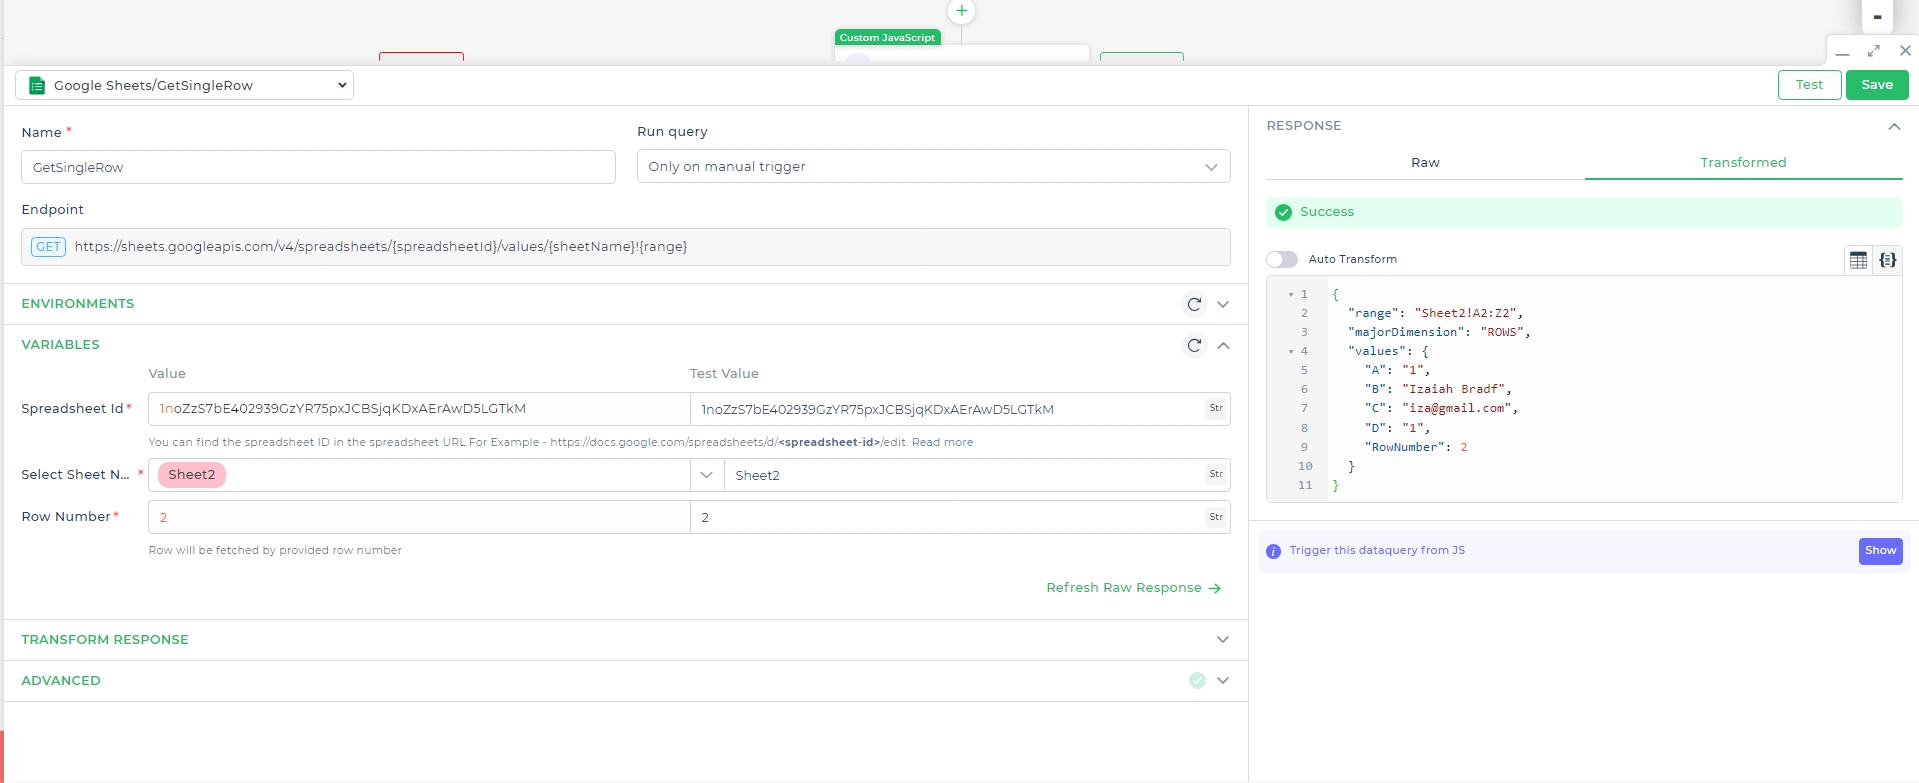
You can add this connector in the data bind section or action of any control. Select the columns to bind in the control as keys. We will be using table grid control to view the data received by the API subcategory.
Clearing multiple rows
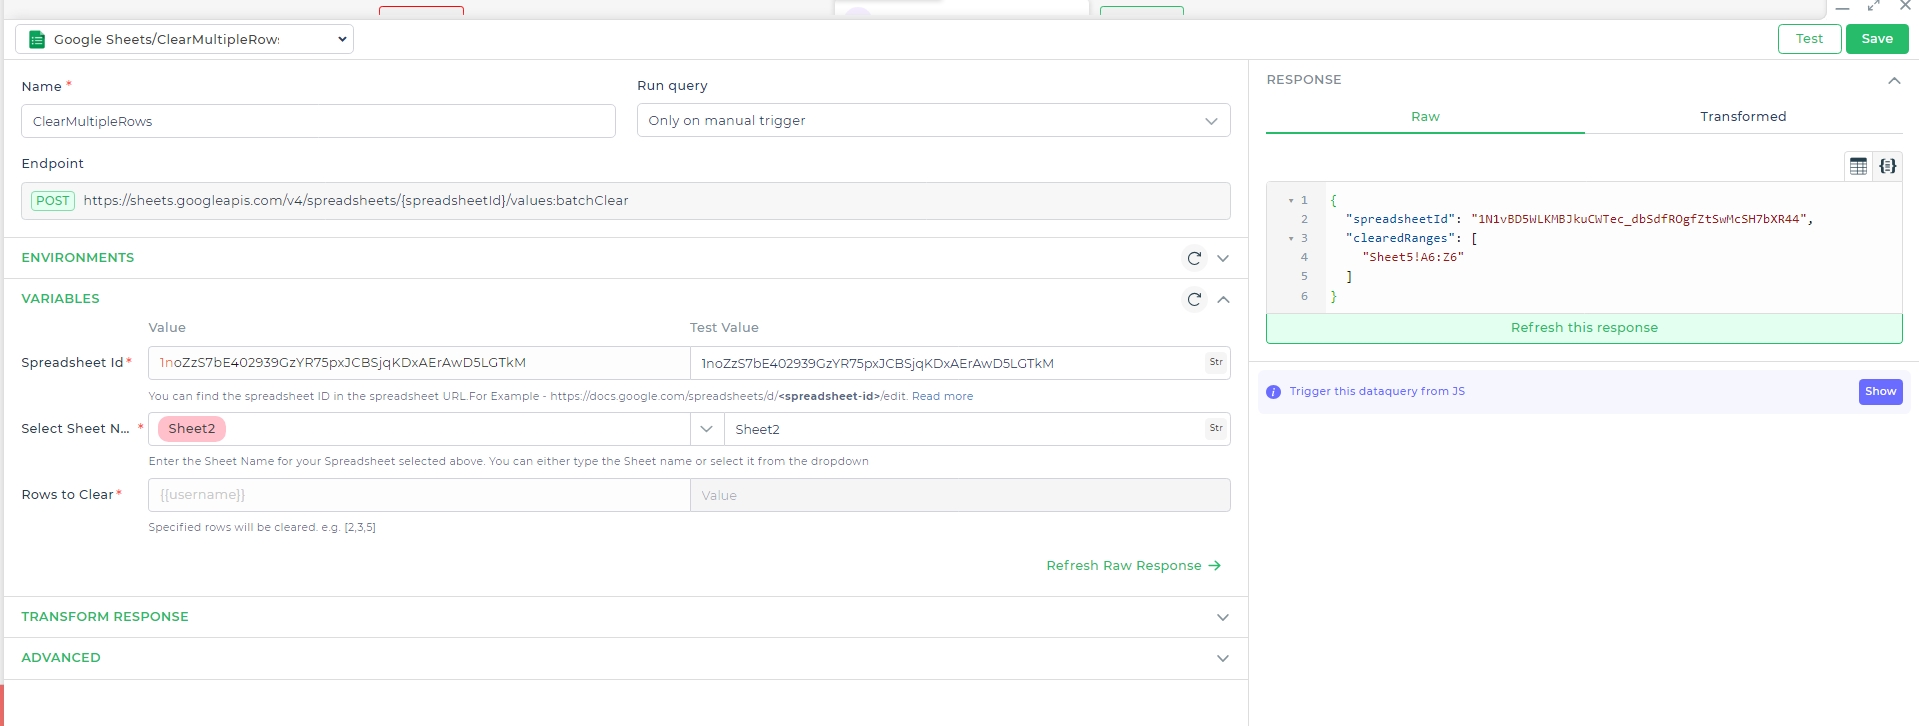
The Clear multiple rows option comes to help when you want to clear multiple rows to Google Sheets. You can use data from tablegrid control for instance to clear data to your google sheet.
Pass an array of rows’ numbers in the method along with the spreadsheet name and its sheet name.
Add Rows
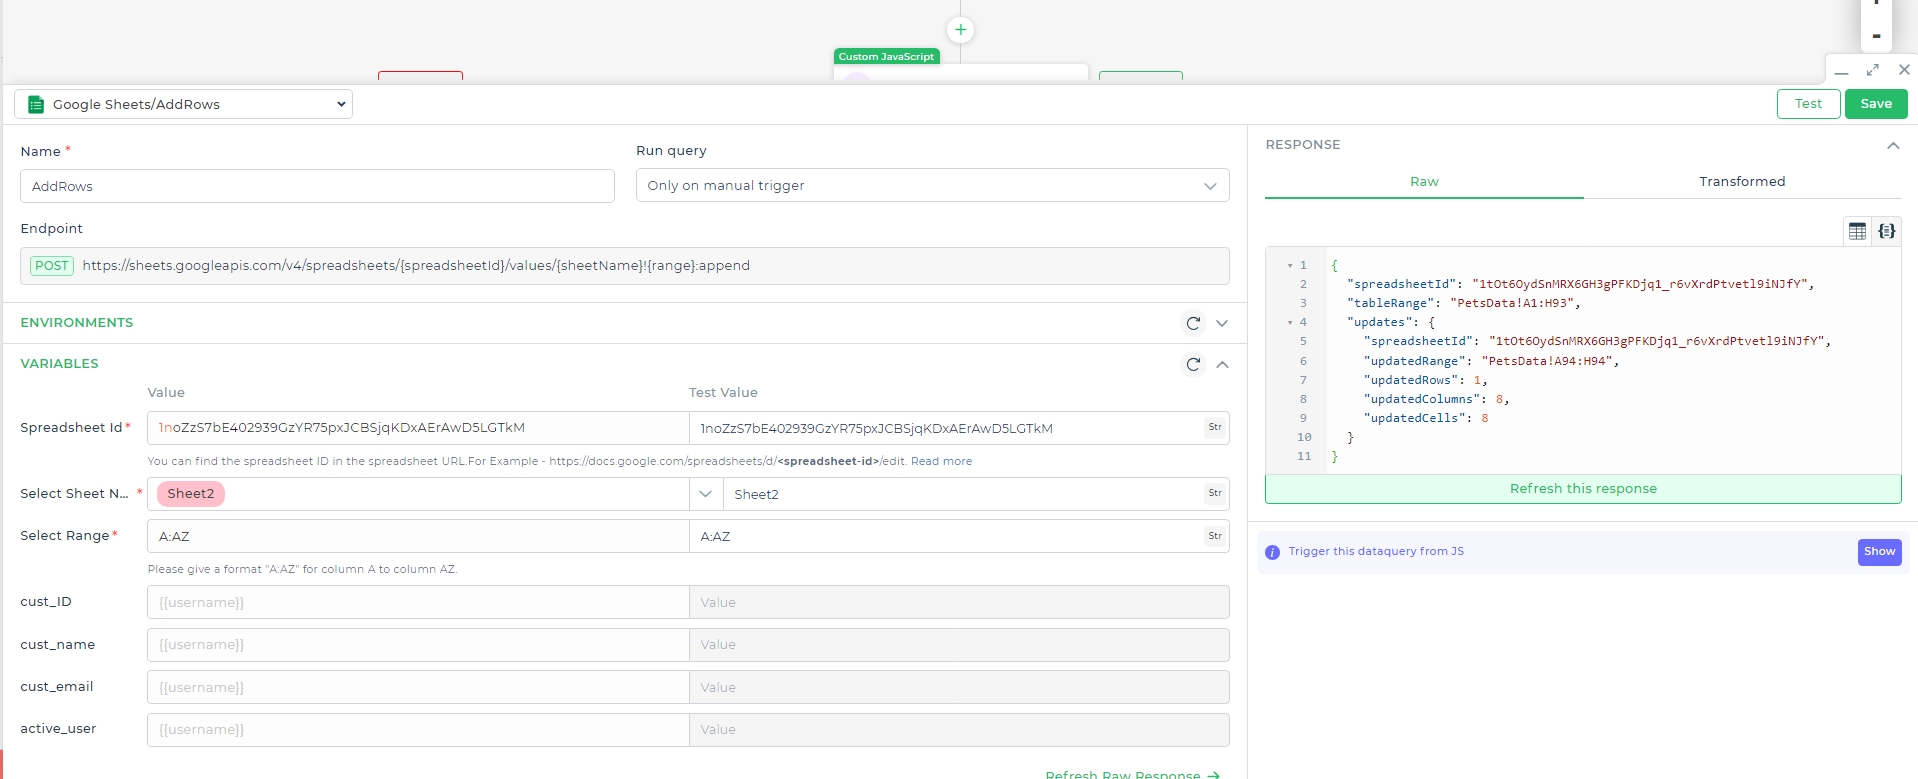
To add rows to your Google Sheets, you can use the AddRows connector. To configure fields, you can provide dynamic values using keywords. Several output values are returned, which can be used as required.
In the example shown below, rows are added to the specified range in the Google Sheets.
Ensure that the range matches exactly with the one present in your Google Sheets column names. This is crucial for the data to be appended correctly.
Here’s the process and the response you can expect:
For more details, refer to the Google Sheets API documentation.
Update Multiple Rows
The Update Multiple Rows option is designed for updating several rows simultaneously in Google Sheets. For instance, you can utilize data from the table grid control to insert information in your Google Sheet.
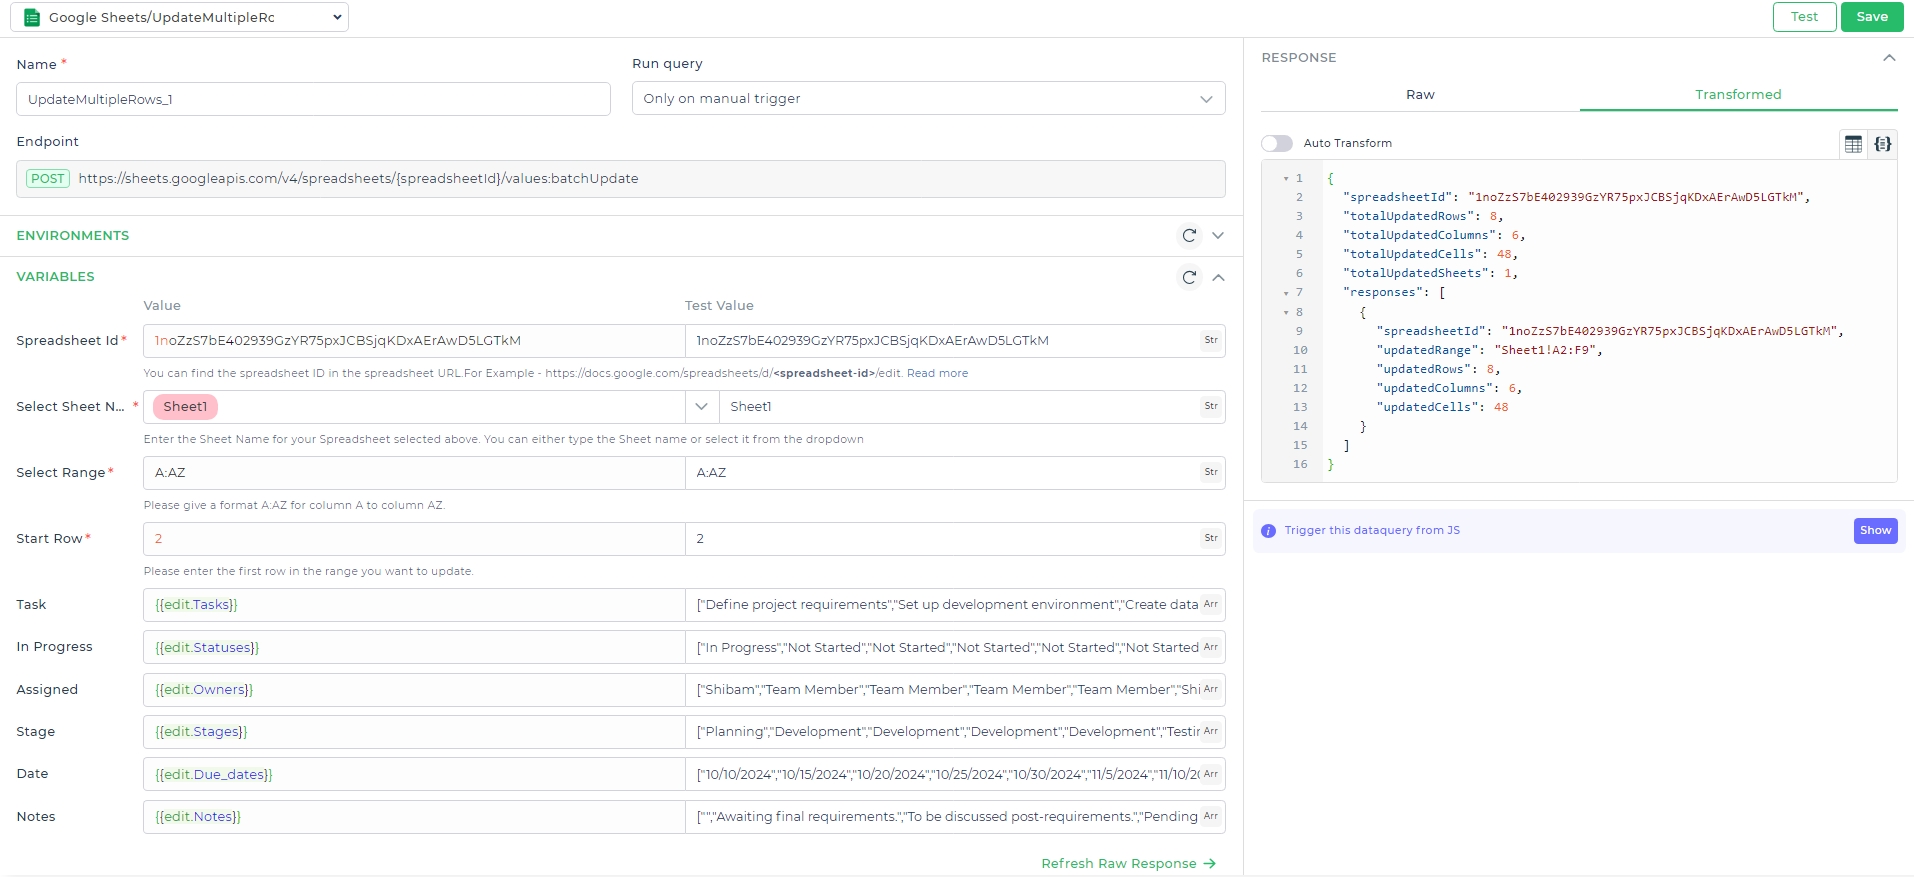
As shown in the image above, you can provide multiple data entries for different row numbers. The start row number is considered, and the number of rows updated corresponds to the size of the array.
If you wish to update a row but retain certain column values, use NULL as a keyword. This prevents those columns from being overwritten, ensuring the original values remain intact. Only the columns with specified inputs will be updated. You can read more about updating multiple rows using Table Grid from this guide.
Locating Spreadsheet ID
A Google Sheets spreadsheet ID is a unique identifier used by Google Sheets to distinguish each spreadsheet. This ID is part of the URL of the spreadsheet when you open it in your web browser.
For example, in the URL:
https://docs.google.com/spreadsheets/d/23ASDS1A2B3CWEM4N5O6P7Q8R9S0T1U2V/edit
the spreadsheet ID is the string of characters between /d/ and /edit, which in this case is:
23ASDS1A2B3CWEM4N5O6P7Q8R9S0T1U2V
This ID is used in various Google Sheets API requests to specify which spreadsheet you want to access or modify.
Follow the steps below to find your spreadsheet ID in Google Sheets:
1. Open the Google Sheets Spreadsheet and View the URL
Open your Google Sheets spreadsheet and identify the browser’s address bar where the URL of the spreadsheet is displayed.

2. Locate the Unique Spreadsheet ID Within the URL
Find the spreadsheet ID in the URL. It is the long sequence of characters located between "/d/" and "/edit".

3. Highlight and Copy the Spreadsheet ID from the URL
Highlight and copy the ID portion from the URL. Use shortcuts like Ctrl+C (Windows) or Cmd+C (Mac) to copy.

4. Use the Copied Spreadsheet ID for Your Required Purpose
With the spreadsheet ID copied, you can now use it for various purposes, such as accessing the spreadsheet through the Google Sheets API on DronaHQ.
Self-Hosted Installation for Google Sheets
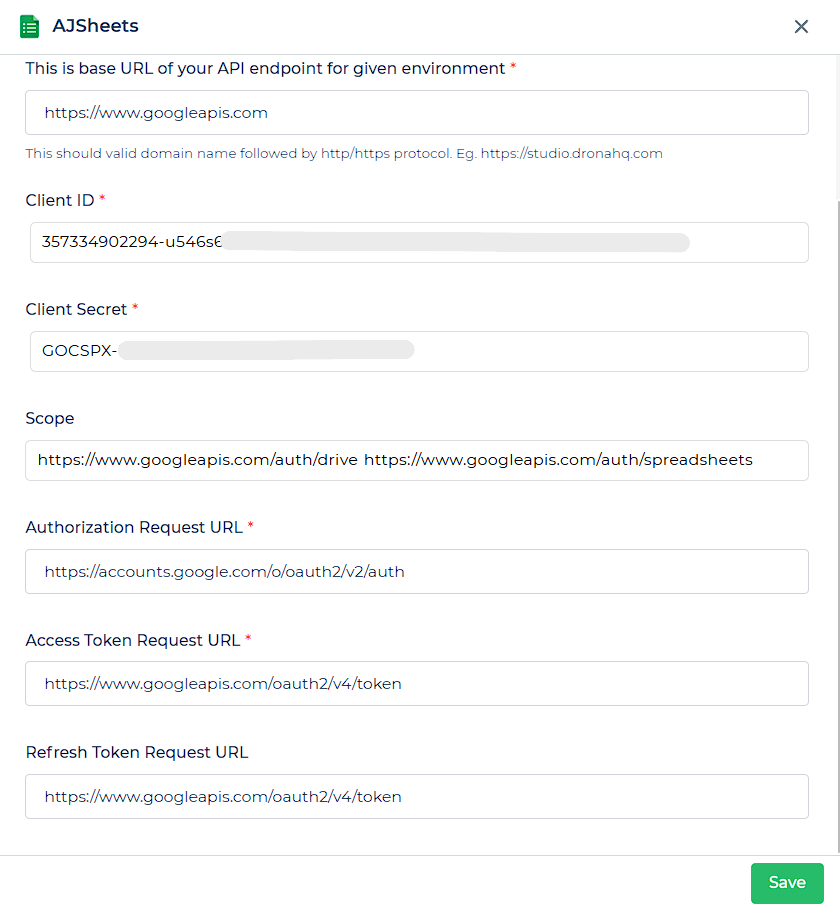
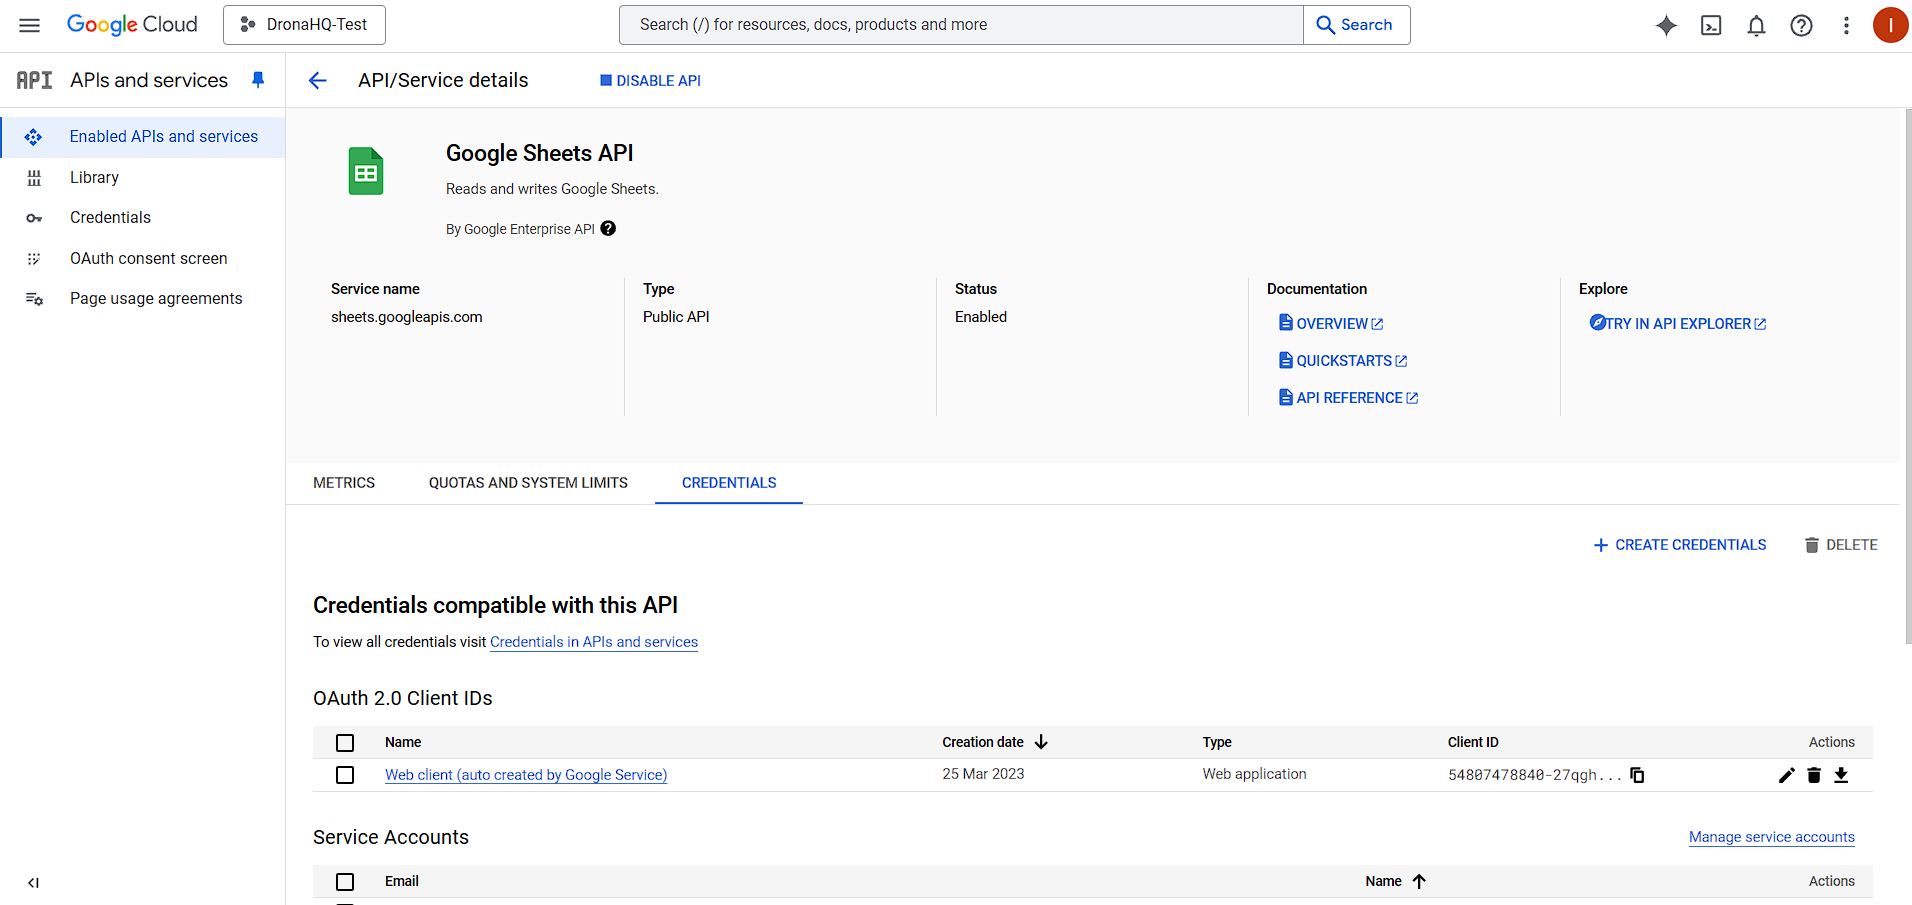
To start, go to the Google Cloud Console > APIs & Services > Google Sheets API and enable it. Once done, head over to the Credentials tab to create OAuth credentials.
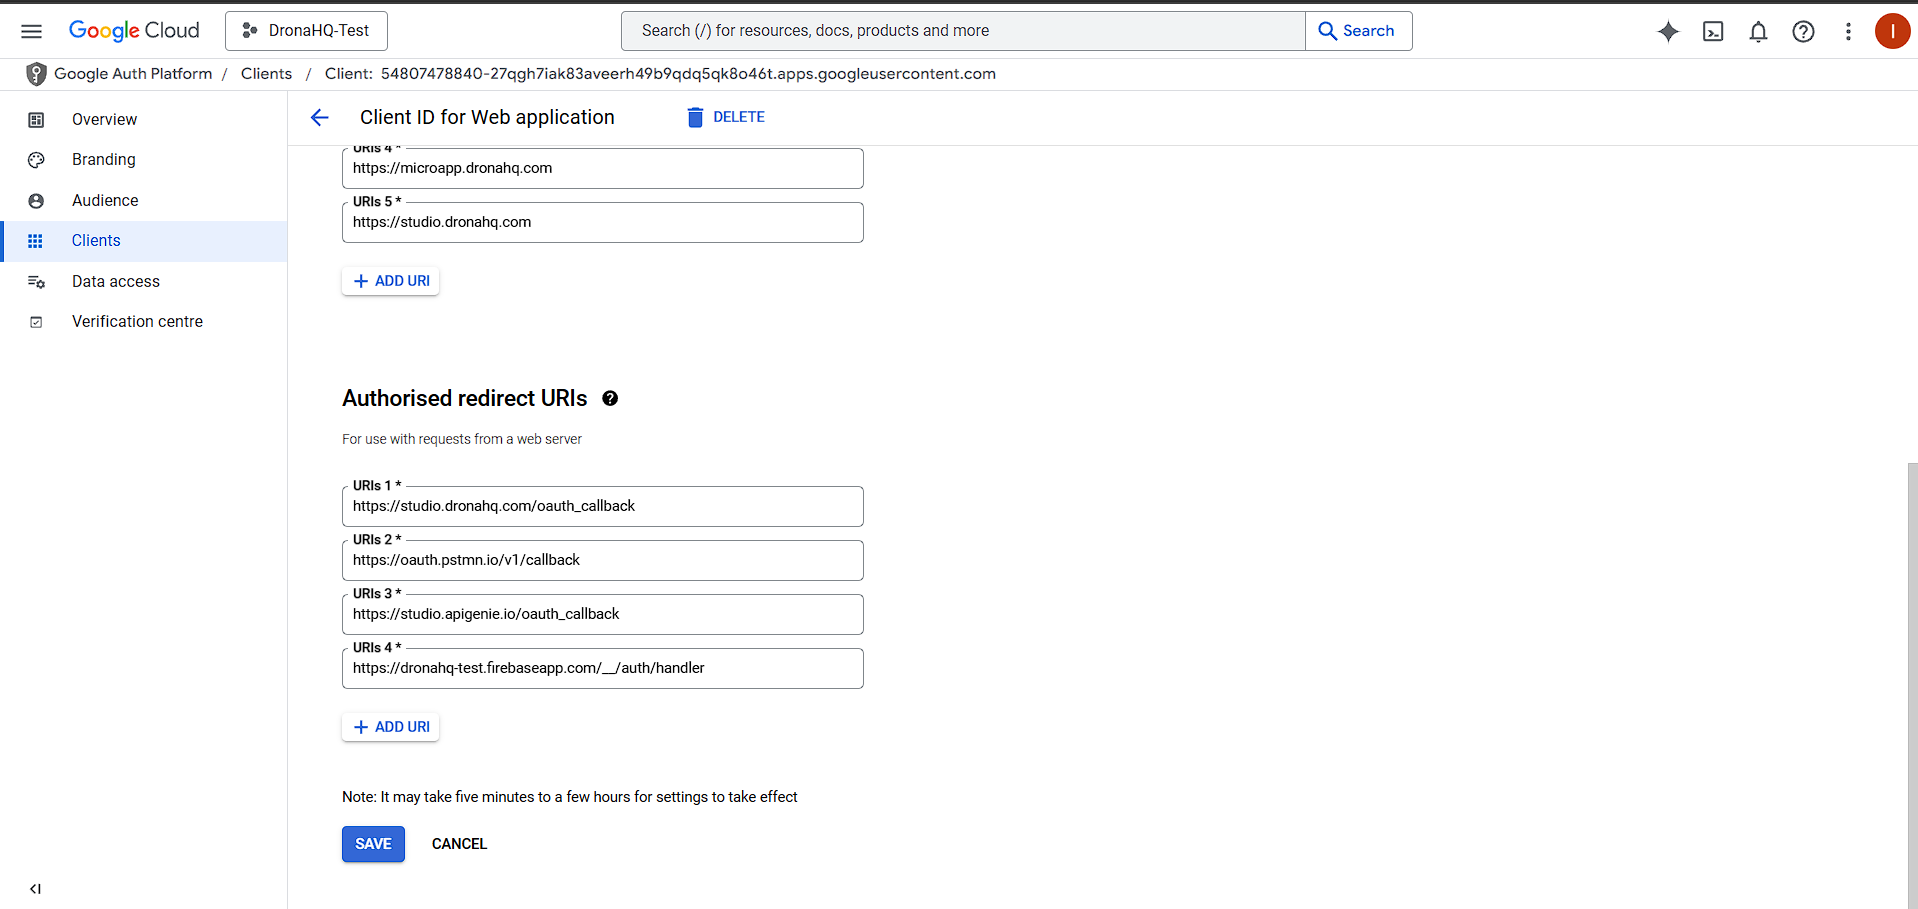
Select OAuth 2.0 Client ID and configured the OAuth consent screen. After completing this step, return to the
Credentials tab and create a new OAuth Client ID. Choose Web Application as the application type and add the
necessary callback URLs in the Authorized Redirect URIs section.
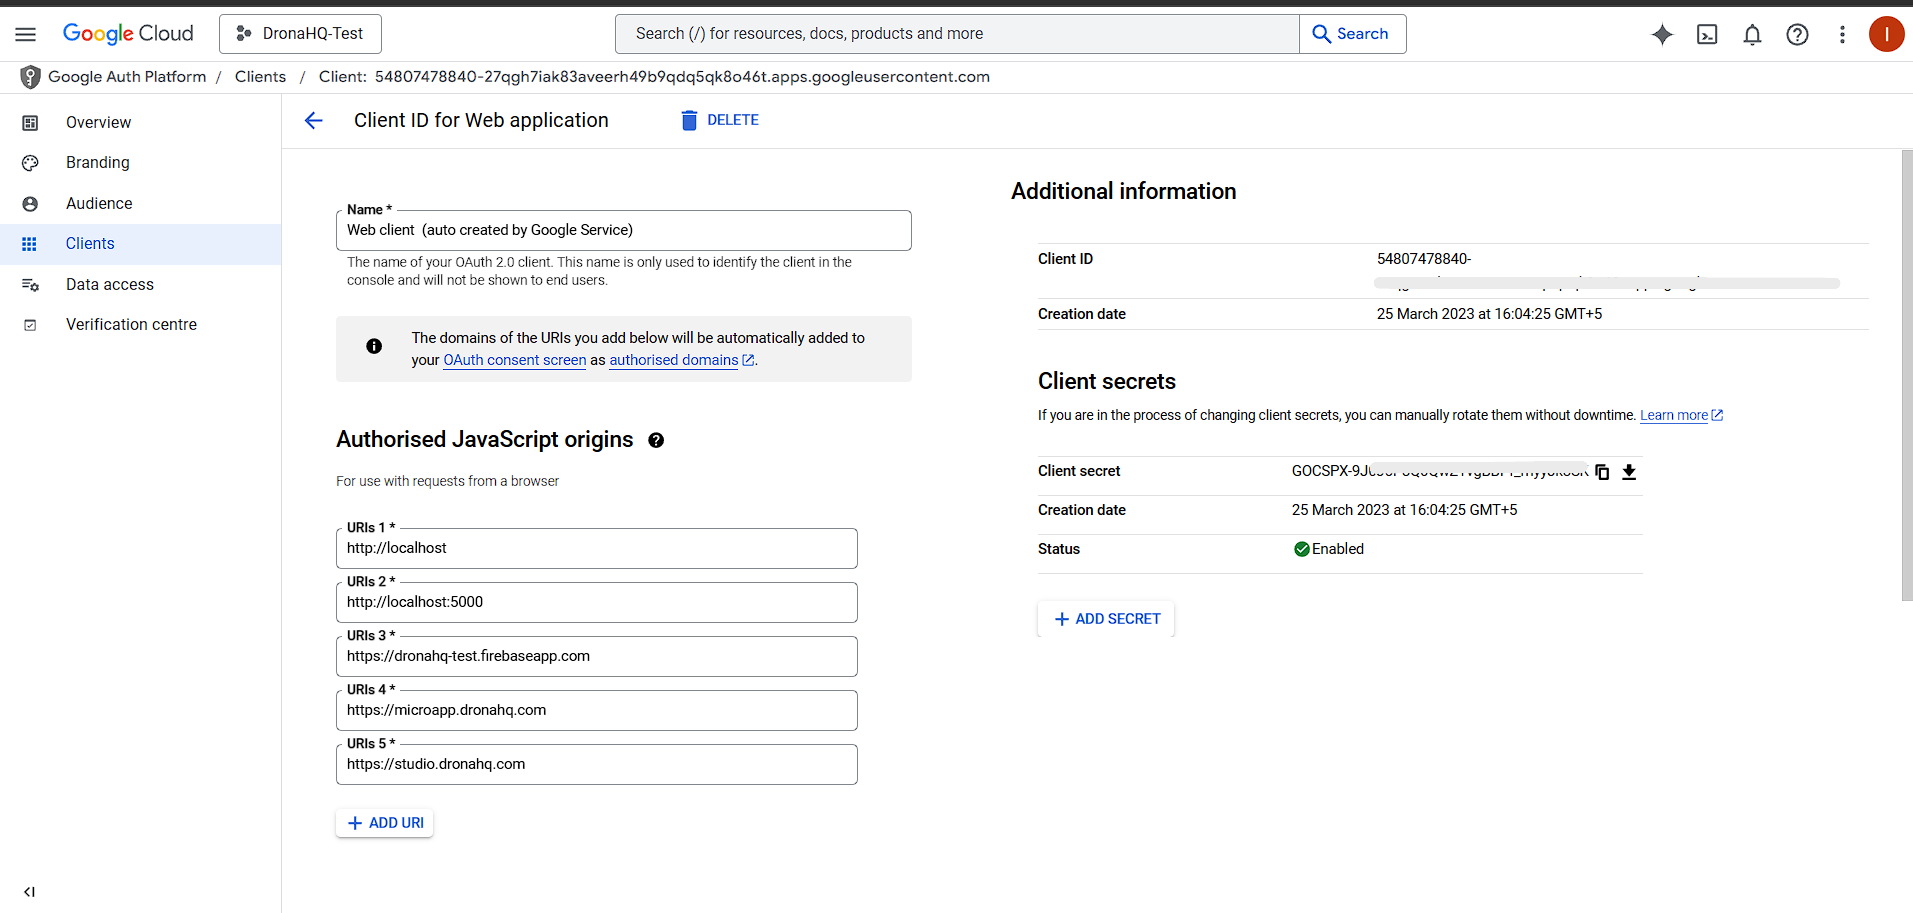
Once the OAuth Client ID is generated, Google will provide you with the Client ID and Client Secret. These details
need to be configured inside DronaHQ. In your self-hosted DronaHQ instance, navigate to the
Google Sheets Integration section and enter the following values:
- Base URL:
https://www.googleapis.com - Client ID: (Enter the Client ID obtained earlier)
- Client Secret: (Enter the Client Secret obtained earlier)
- Scopes:
https://www.googleapis.com/auth/drive
https://www.googleapis.com/auth/spreadsheets - Authorization Request URL:
https://accounts.google.com/o/oauth2/v2/auth - Access Token Request URL:
https://www.googleapis.com/oauth2/v4/token - Refresh Token Request URL:
https://www.googleapis.com/oauth2/v4/token
After entering the required details, save the configuration and test the authentication.
