Supabase Database
Supabase is an open-source Firebase alternative that adds real-time and RESTful APIs to the PostgreSQL database without a single line of code.
DronaHQ enables you to connect and build over your Supabase databases. Let us understand how to configure your Supabase
Connection. As Supabase uses a Postgres Database we will make use of the Postgres Connector to connect to the Supabase
Database.
Getting Started with Supabase Hosting
To begin your journey with Supabase hosting, visit app.supabase.io and sign up using your GitHub ID if you haven't already.
Once logged in, you'll notice that an organization has been automatically created for you using your GitHub ID.
- Click on
New Projectand either select an existing organization or create a new one. For this example, we'll use the default organization.
Enter a Project Name and a Database Password, choose the desired Region, and then click on Create New Project.
Once you click on Create New Project, Supabase starts provisioning the necessary database and API endpoints.
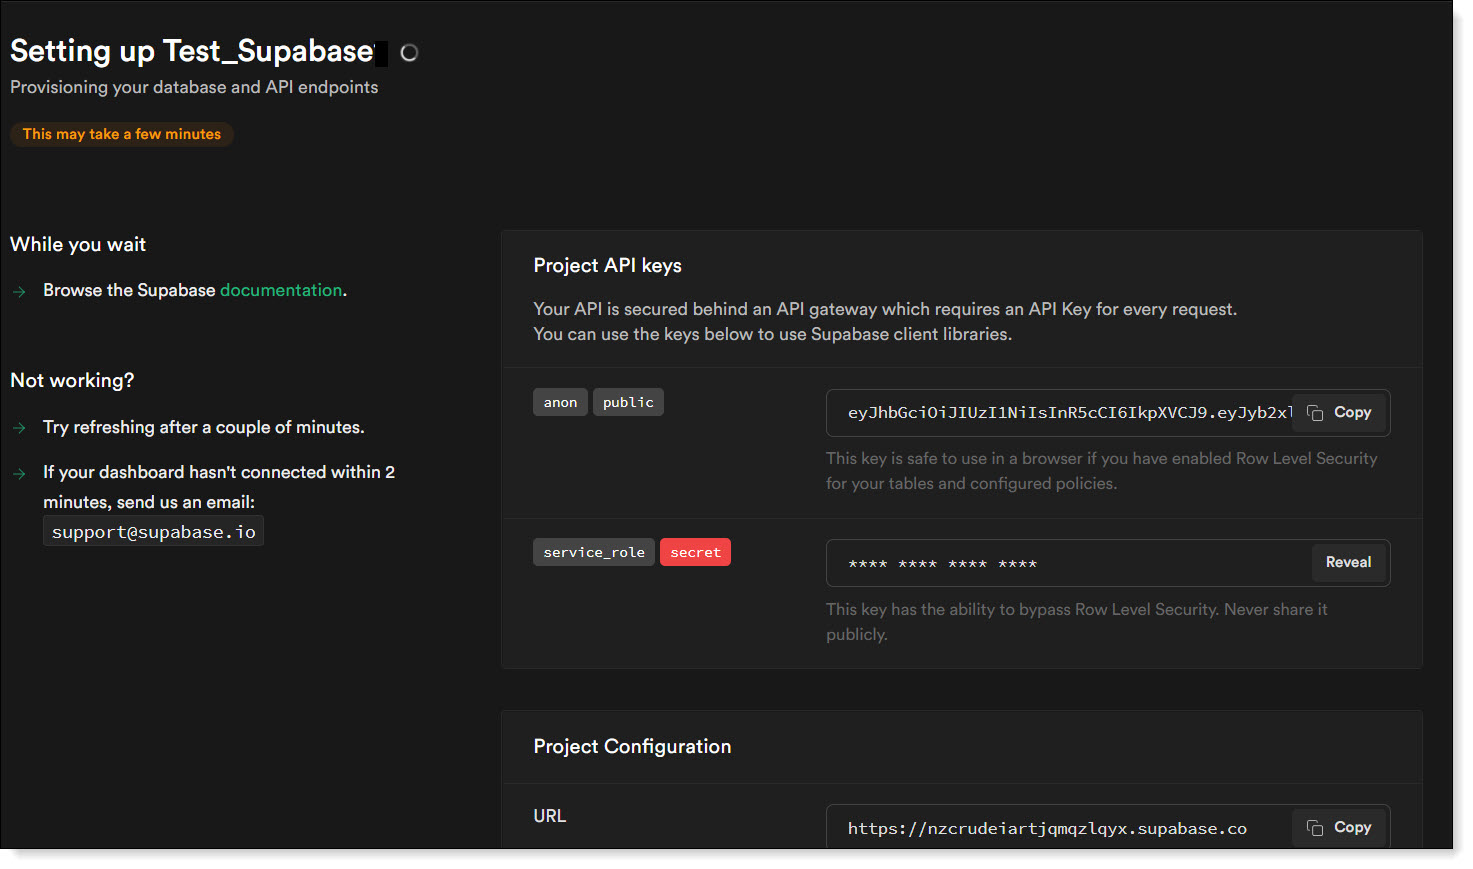
Project API keys. Your new Supabase project is now deployed and comes with its own URL and API. You'll have access to features like Database for managing tables, Auth for user authentication, and Storage for storing large files.
Supabase ensures security with its API Gateway, requiring an API key for each request. Your Project API keys are generated and ready to use with Supabase client libraries.
Database Connectivity and Table Management
In this section, we'll explore how to effectively connect to Supabase databases and manage tables with ease.
Obtaining the Connection String
To establish a connection between your DronaHQ App and Supabase, you'll first need to obtain the Connection String. Follow these steps:
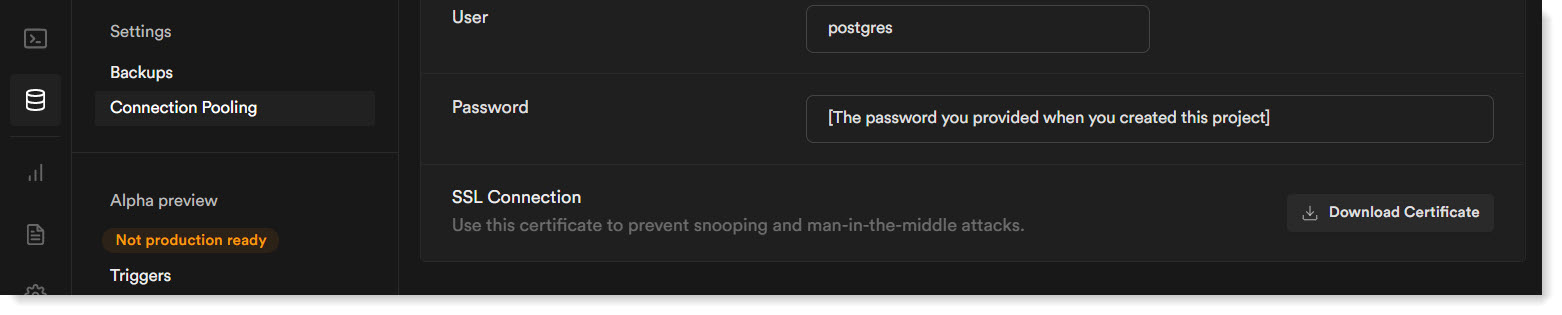
Head to any of your Supabase databases. On the left sidebar, locate and click on the
Databaseoption.Within the Database section, you'll find the
Configuration and Connection info. Click on it to access vital details required for establishing the connection.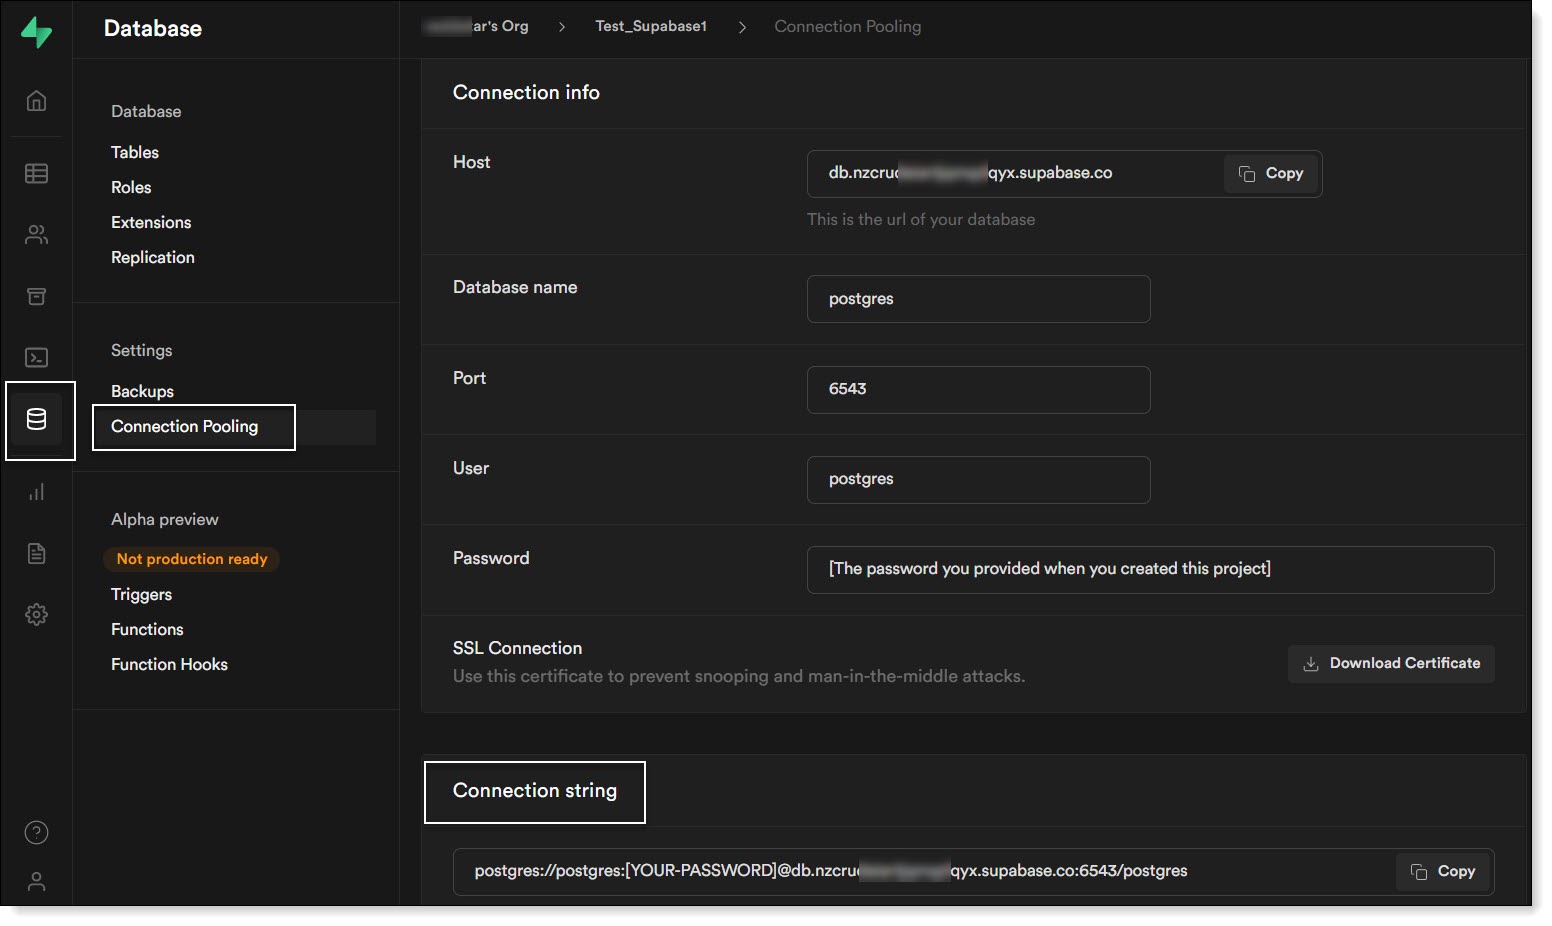
Configuration Info Here, you can copy either the connection string or specific parameters needed for your application's configuration.
Table Management Using the Table Editor
Supabase provides a convenient Table Editor tool for seamless table management. Follow these steps to utilize it effectively:
On the left sidebar, navigate to the
Homesection and locate theTable Editor.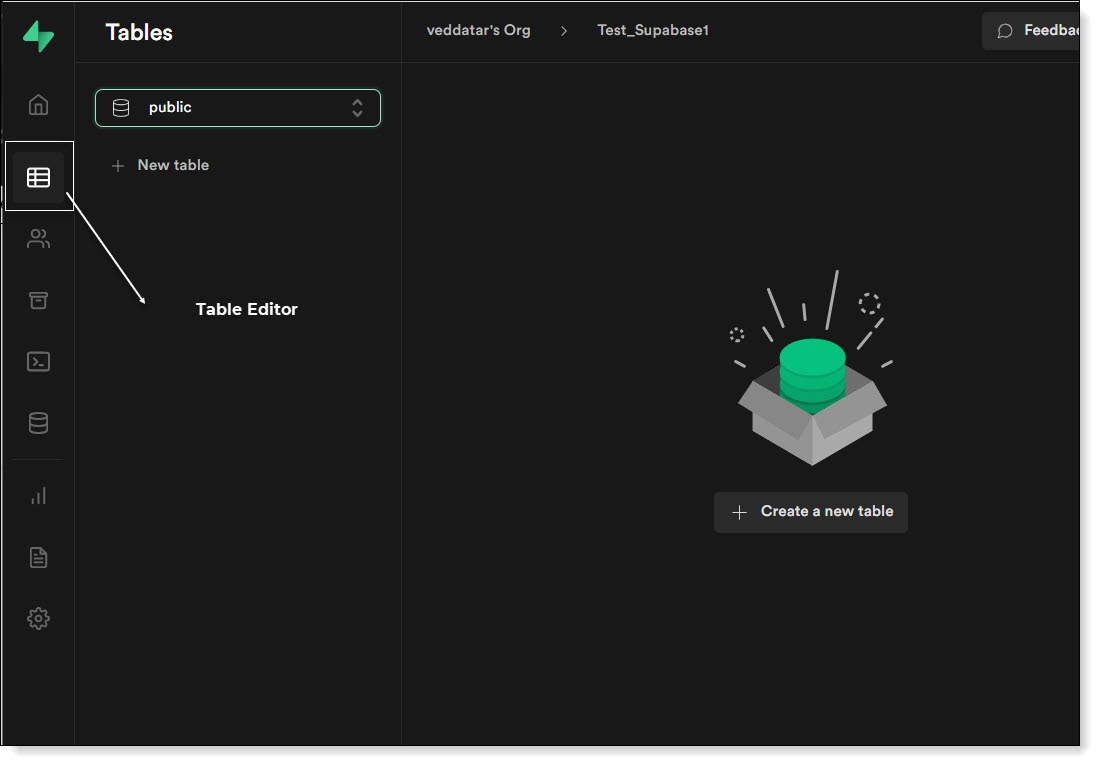
Table Editor Click on
Create a New Tableto initiate the table creation process.Enter the table name, along with an optional description. Add columns as needed, and consider enabling Row Level Security (RLS) for enhanced access control.
Once you've configured the table to your requirements, simply click
Saveto finalize the setup.
Configuring Connector in DronaHQ
Configure your database category by providing below details. Choose between User and Password or AWS IAM
Authentication. Validate the connection with Test connection and Save settings for secure and efficient database
setup.
DronaHQ can Auto fill crucial connection values like host, name, password, and more from the connector's connection string or from a AWS IAM credentials using AWS Import.

Using CA Certification
To enhance security and protect against potential threats like snooping and man-in-the-middle attacks, Supabase offers the option to use CA Certificate authentication in addition to basic authentication using a Username and Password.
When configuring your Connector, simply toggle the switch to enable the "Use a self-signed certificate" option. You can then paste the required Certificate Authority content for self-signing.
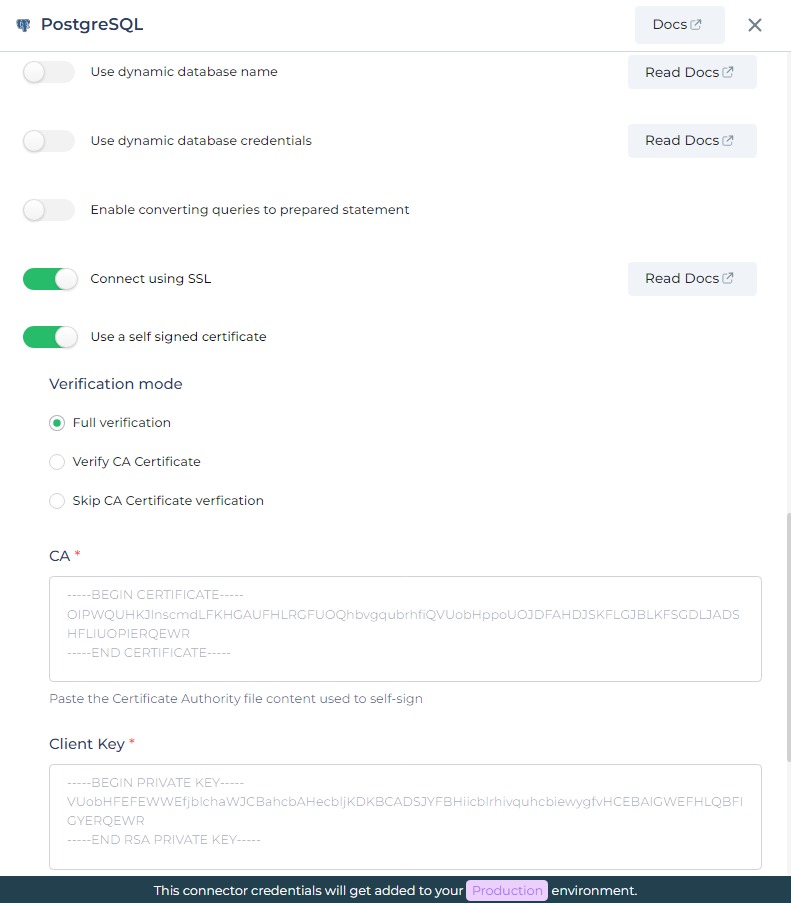
By implementing this additional security measure, you'll strengthen the connection to Supabase and safeguard the data being accessed. Feel free to utilize your queries to retrieve data and develop applications according to your specific requirements.
Using Supabase Connector
Read/Display Data Query
After configuring the connector, add a query to fetch data from the Supabase database.
Query used:
select ` from industry_role
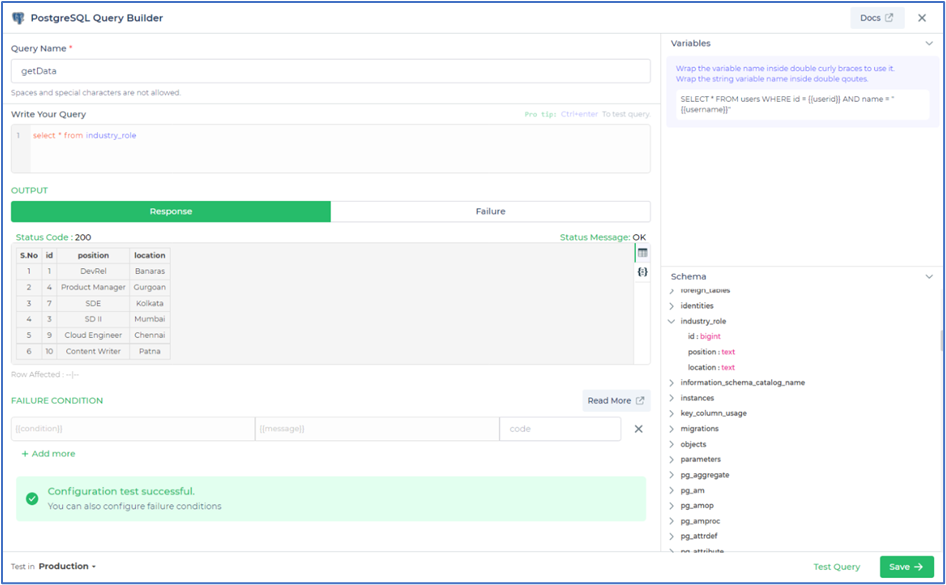
Query explanation:
In the above query, we are selecting all the details from our industry_role schema which has a table of details.
Save the query after testing with a configuration test successful message.
To display the data, drag and drop the Table grid Control from the sidebar to the created app.
Bind data by selecting the PostgreSQL connector from
Data Bind Options -> Quick Select -> Data Queries . Choose the relevant query for displaying data and bind the
Delete Data Query
Now to delete data we will create another query for our PostgreSQL. This query will have a logic to delete all the details related to the selected data from the table.
Query used:
DELETE from industry_role WHERE id = {{id}};
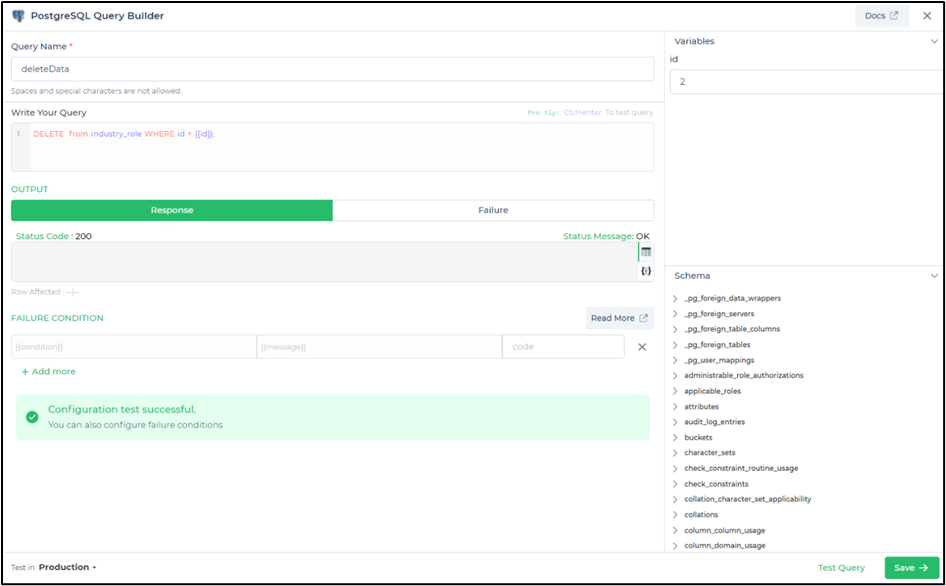
Query explanation:
In the above query, we are operating delete on the industry_role to delete the details of the id selected by the user, which is a primary key. Here the id is made dynamic by creating variable inside double curly braces.
Save the query after testing with a configuration test successful message.
Next is to put the query into the action flow of the table grid. Go to the
Actionsof the table grid and selectdelete_click.Action flow will open, add tasks. The first task of
Confirmwill give a pop-up to the user to confirm their action of delete.Next, add the task of
Connector - Library, select the query of delete data along with binding theid connector key. This will enable us to get the selected row id from the table grid row usingtablegrid.result.rows.id, which can be found under theUse Keywordsoption.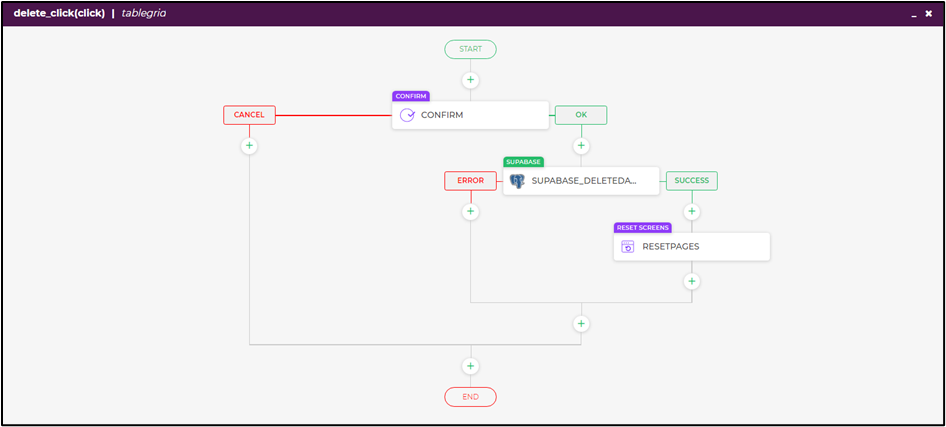
Update Data Query
To perform updating of existing data, we will create a query and this will first select the details based on id (primary key) and then change the existing data.
Query used
UPDATE industry_role

SET position = '{{pos}}', location = '{{loc}}' where id = {{id}}
Query explanation
In the above query, we are selecting details on the basis of the selected id side and changing the values of position and location from details updated in pos and loc variables respectively, in the industry_role schema. Updating that particular row of the selected id.
When we fill the dynamic value inside {{}} it acts as a variable in the query which gets saved to their respective column.
I have created a Tray where text fields will get data from the user and on click of the button, it will update the details of the selected Id.
Here binding of data of the selected id from the table grid to the input text is made by going to the Bind section and selecting controls.
Select the screen from where the data is located, then select the component that is tablegrid, from where we will bind the data, and then select the field name, of which data is needed.
Go to Actions of the button and select button_click action. Add a task of Connector > Library with selecting the query created to update the data.
Bind the key connectors properly.
Make sure to navigate to Tray by adding action to table grid on click of edit button by Actions > update_click and add task of Navigate.
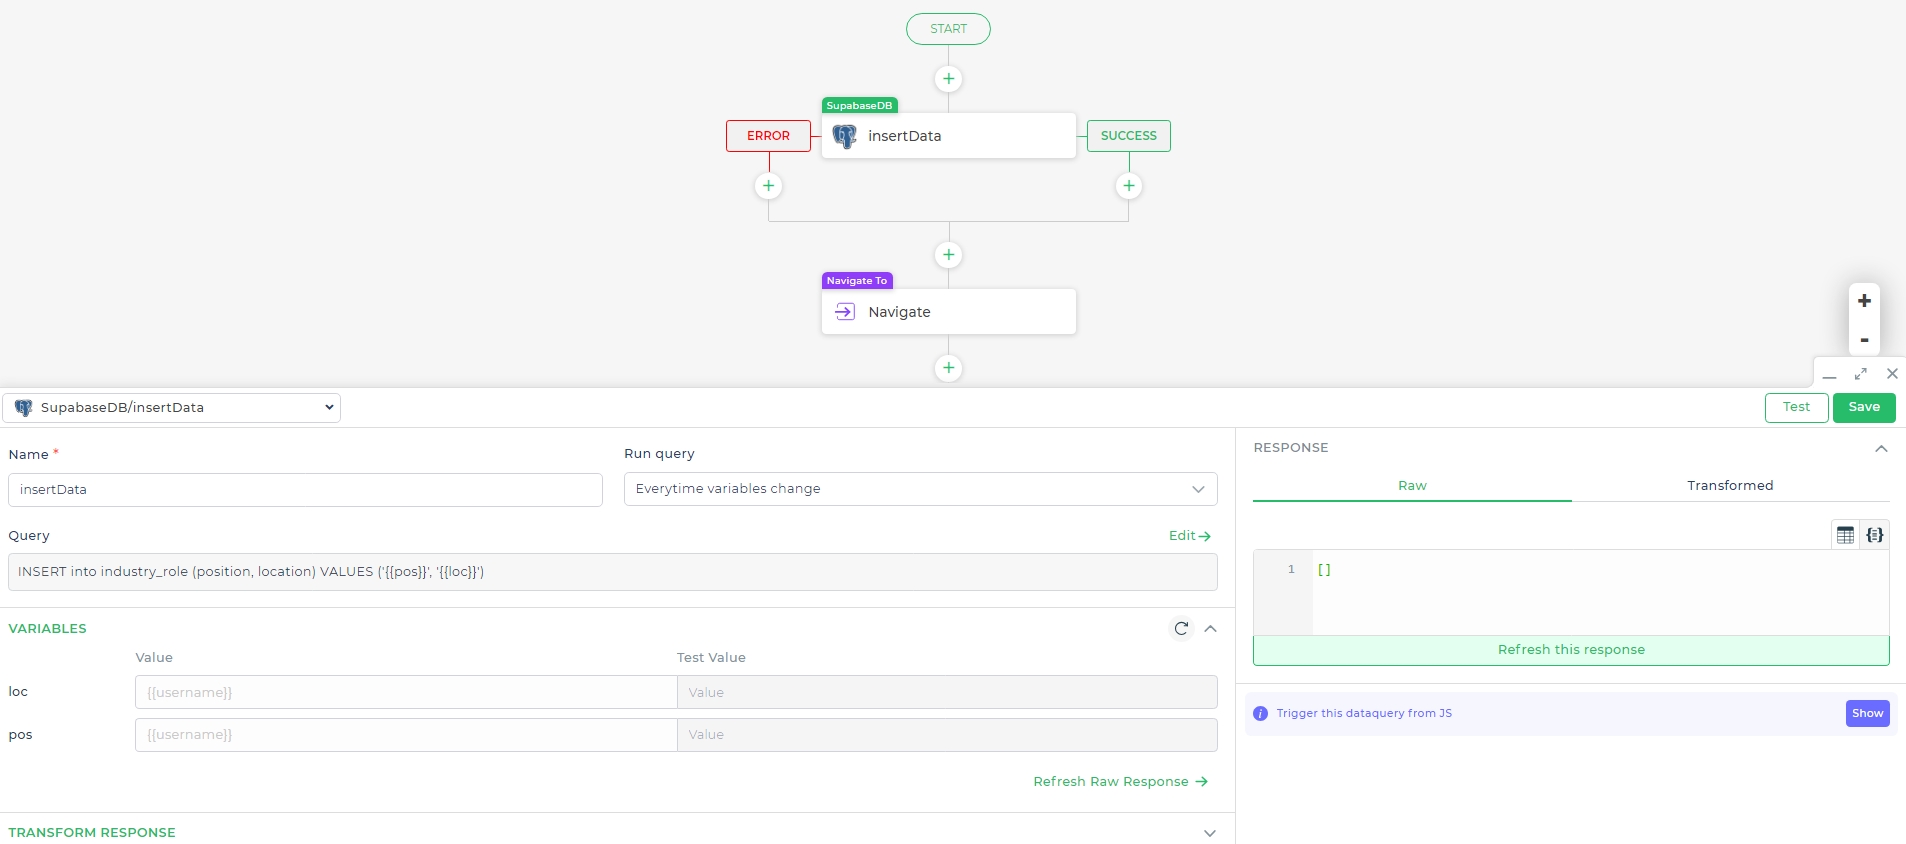
Insert Data Query
Now we will insert data from the user into the database. For this, we will write a query that will take values from the user and save it to our database.
Query used:
INSERT into industry_role (position, location)
VALUES ('{{pos}}', '{{loc}}')
Query explanation:
In the above query, we are taking values of position and location in pos and loc variables respectively, and inserting them into industry_role. The insertion sequence of the values will be the same as the sequence of the column name provided along with the table name in ()
Save the query after testing with a configuration test successful message.
To insert the values, we have to get it first from the user as input. For this I have created another tray with input texts and a button of insert.
Go to Actions of the button and select button_click action. Add a task of Connector > Library with selecting the query created to insert the data.
Bind the key connectors properly.
Make sure to navigate to Tray by adding action to table grid on click of Add button