Firebase
Firebase is a highly durable database that can scale automatically to handle your application’s load. This article provides a comprehensive guide on how to configure and use Firebase services, including Firebase Auth (User Management), Firebase Realtime Database, and Firestore, using DronaHQ.
Prerequisite
Firebase Configuration Details: Obtain the necessary configuration details from the Firebase console. Navigate to your Project settings and select the Service accounts tab. Click on the Firebase Admin SDK icon, and generate a new private key. This action will result in the download of a JSON file. Extract the Private key from the downloaded JSON file, as you will need it for configuring the Firebase Connector.
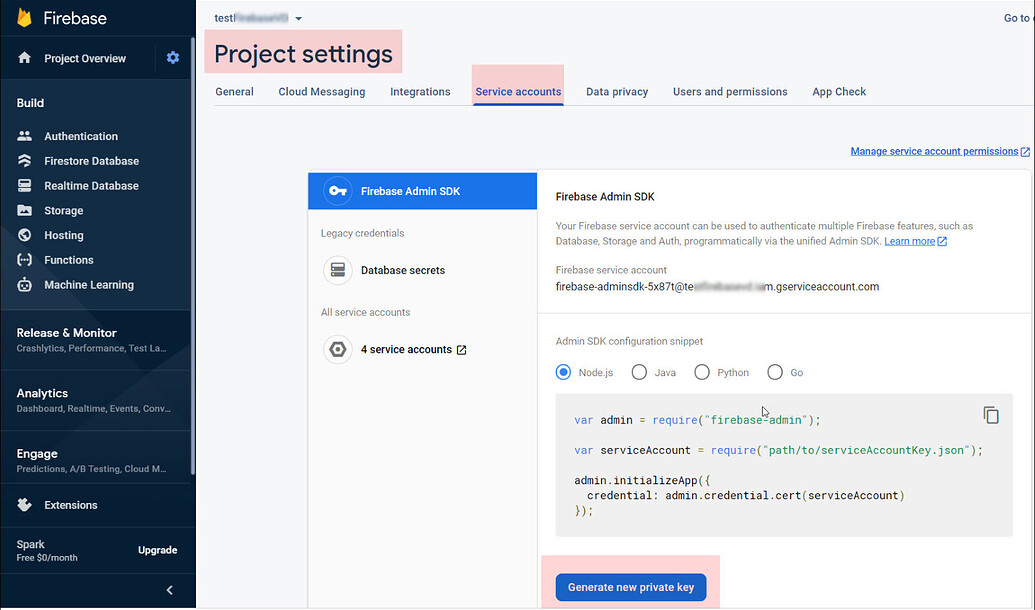
Obtaining details from Firebase Console Optionally, Google Cloud Platform Account Key: If preferred, you can create an account key from your Google Cloud Platform (GCP) console. Follow these steps:
- Select a project in your GCP console.
- Click on "Create Service Account" and assign the role of "Firebase Admin."
- Opt for a JSON Key type and proceed to download the generated file. Ensure to keep this file accessible, as it will be required for configuring the connector.
Configuring Connector in DronaHQ
Configure your database category using the provided details. Validate connection with Test connection and Save
settings for secure database setup.
General
| Field | Description |
|---|---|
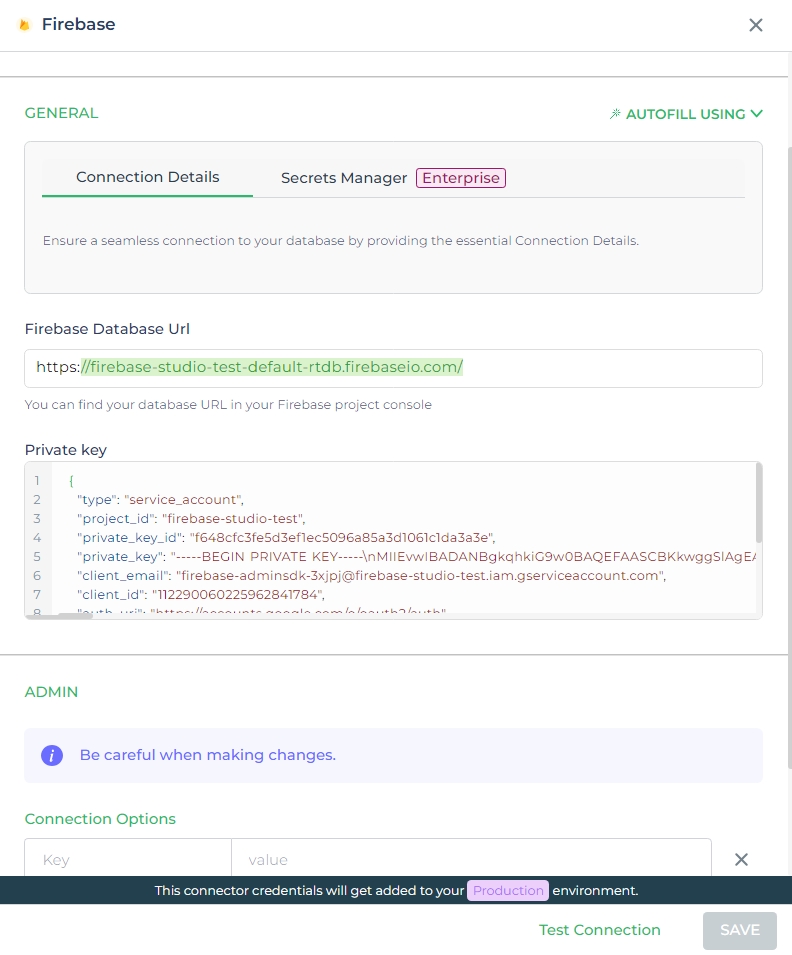
| Firebase Database URL | Enter the URL of your Firebase Realtime Database, e.g., https://your-project.firebaseio.com. |
| Private Key | Paste the contents of the Private Key obtained from the Firebase console or GCP console. |
Admin
| Advanced Option | Description |
|---|---|
| Connection Options | The key and value connection options in database configuration refer to specific settings (keys) and their corresponding values that dictate how the application connects to the database |
| Whitelist IP | Enhance security by restricting database access to specific whitelisted IP addresses. |
Adding Queries for Firebase
Upon successful configuration of the Firebase connector, you gain the ability to handle user-related operations, and you can adeptly manage data-related operations.
Define Query Name: Provide a unique name for your data management query. This name will serve as an identifier in your Connector Library for easy access and management.
Service: Select from the dropdown of list of services provided by the configured Firebase connector. The services available are:
firestore,firebase authandfirebase real time db.
Firebase Auth Action : Select the action you want to perform with respect to the selected service. Depending on the selected service, various actions are available to opt from while adding a query.
| Action | Description |
|---|---|
| Firestore | |
| Query Firestore | Execute a query to retrieve documents from a Firestore collection based on specified criteria. |
| Insert Document | Insert a new document into a Firestore collection. |
| Update Document | Update an existing document within a Firestore collection. |
| Get Document by ID | Retrieve a document from a Firestore collection by its unique identifier. |
| Delete Document | Delete a document from a Firestore collection. |
| Get Collections | Retrieve a list of collections within a Firestore database. |
| Query Collection Groups | Execute a query to retrieve documents from multiple collections that share the same ID. |
| Firebase Auth | |
| List Users | Retrieve a list of users from the Firebase Authentication system. |
| Get User by UID | Retrieve a user by their unique identifier (UID). |
| Get User by Phone Number | Retrieve a user by their associated phone number. |
| Get User by Email | Retrieve a user by their associated email address. |
| Get User by Provider UID | Retrieve a user by their unique identifier assigned by an authentication provider. |
| Create a User | Create a new user account in the Firebase Authentication system. |
| Update a User | Update an existing user's attributes or properties. |
| Delete a User | Delete a user account from the Firebase Authentication system. |
| Firebase Realtime DB | |
| Query Firebase data | Retrieve data from the Firebase Realtime Database based on specified criteria. |
| Set Data | Add or update data at a specific path within the Firebase Realtime Database. |
| Update Data | Modify existing data at a specific path within the Firebase Realtime Database. |
| Append data to the list | Add new data to an existing list at a specific path within the Firebase Realtime Database. |
| Delete data | Remove data from a specific path within the Firebase Realtime Database. |
Set Additional Parameters: Depending on your specific requirements, utilize optional parameters to refine the performing query. Customize the query by implementing filters, sorting criteria, or other pertinent options.
Test and Execute: Prior to finalizing, conduct a test run to verify the query's functionality. Ensure that the data appears correctly within the designated service in your Firebase connector.
Use double curly brackets for dynamic variables. Test with sample values before saving. Link dynamic variables to controls/actions and more for runtime use.
Saved queries appear under your connector in Connector Library.
You cannot edit the service of a query, once the query is already tested and added.
Using Firebase Connector
Service - Firestore
Insert Document
Access Data Management Section or Control Action:
- Begin by navigating to the data management section or the control action where you want to interact with your Firestore database.
Select Firebase Firestore Connector:
Choose the Firebase Firestore Connector from your available options.
Opt for the "Insert Document" action to add new data to your Firestore collection.
Provide a Document ID if desired; otherwise, leave it blank for auto-generation.
Ensure that the data is in valid JSON format.
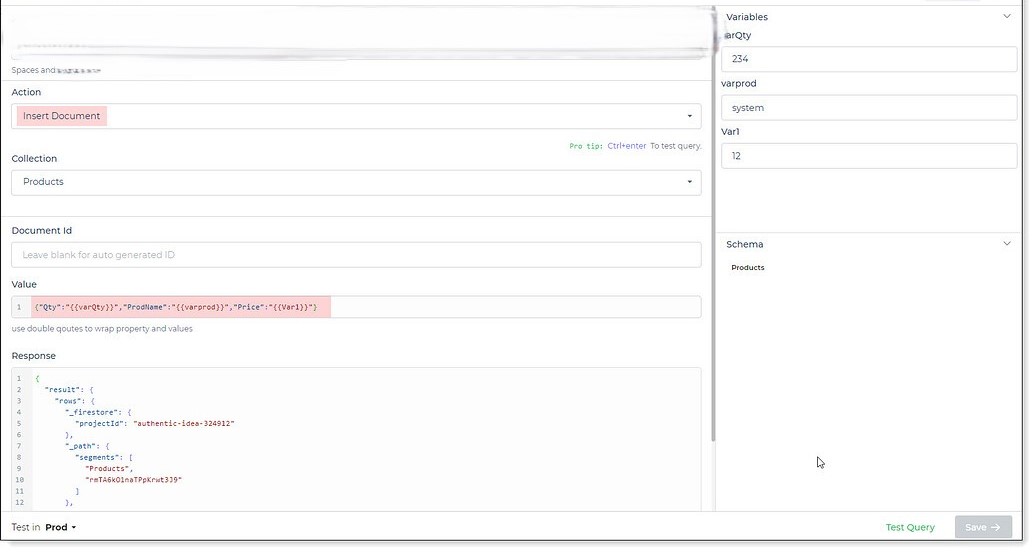
Firestore Insert Document action
Configuration for Data Input:
Configure the action by providing the necessary data in a valid JSON format.
This could involve collecting data from a form submission and adding it using the action.
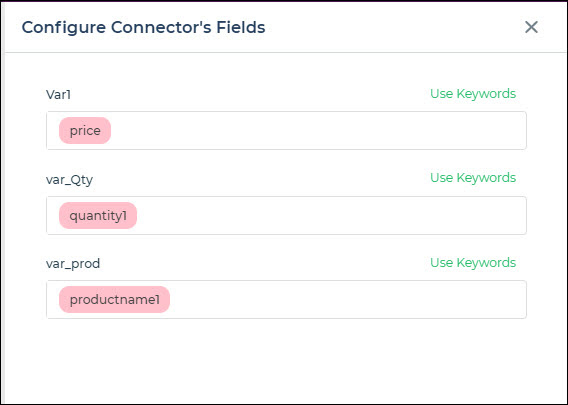
Firestore Form Example
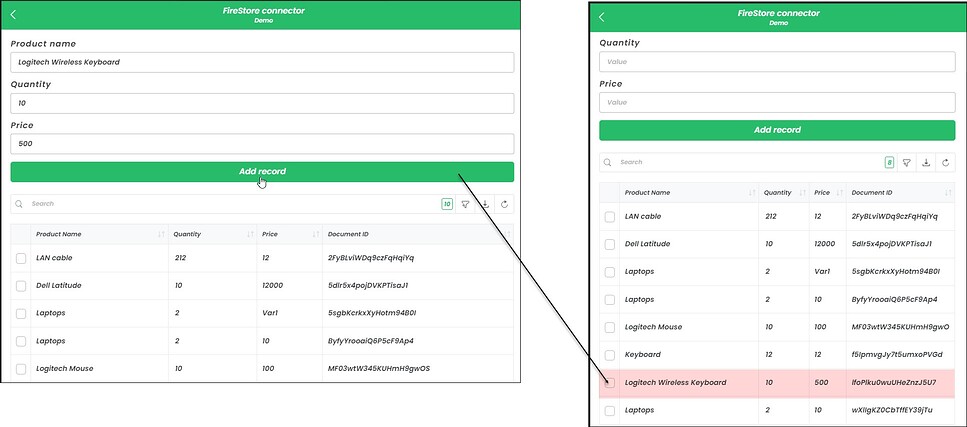
Execute the Action Flow:
- Configure the Connector within the Action Flow or Server Side actions.
- Link the action to a button click or relevant trigger.
- When the form is submitted, the action flow triggers the Connector to save data to your Firestore collection.
Confirmation and Display:
- After the action is executed, use popup or toast actions to display relevant information, such as the created document ID.
- You can also display the added data in a table grid or any other appropriate visualization.
Service - Firebase Auth (User Management)
Get User By Provider UID
Access Data Bind Section or Control Action:
- Navigate to the data bind section of the control.
Select Firebase Auth (User Management) Connector from
Data Bind Options -> Quick Select -> User Queries:- Choose Firebase Auth (User Management) Connector from the available options.
- Opt for the "Get User By Provider UID" query to retrieve user details using the provider UID.
- Click on "Continue" to proceed.

- Test and Finalize:
- Execute the query by testing it with dynamic values for the provider UID.
- Upon successful testing, finalize the configuration.
By adhering to these steps, you can seamlessly harness the capabilities of the Firebase Auth (User Management) Connector to retrieve user details based on the provider UID. This enhances your ability to work with user data effectively within your application, providing an optimized user management experience.
Update a User
The Update a User action provides a method to modify attributes of an established Firebase Authentication user. This
action requires the user's UID (unique identifier) along with an object containing the desired profile information or
user properties to update within the user account's data.
When updating user details by referencing their UID, you can dynamically provide all values, enabling users to conveniently pass the necessary details as parameters to the connector.
In the example below, we demonstrate updating the email address of a user through their UID.
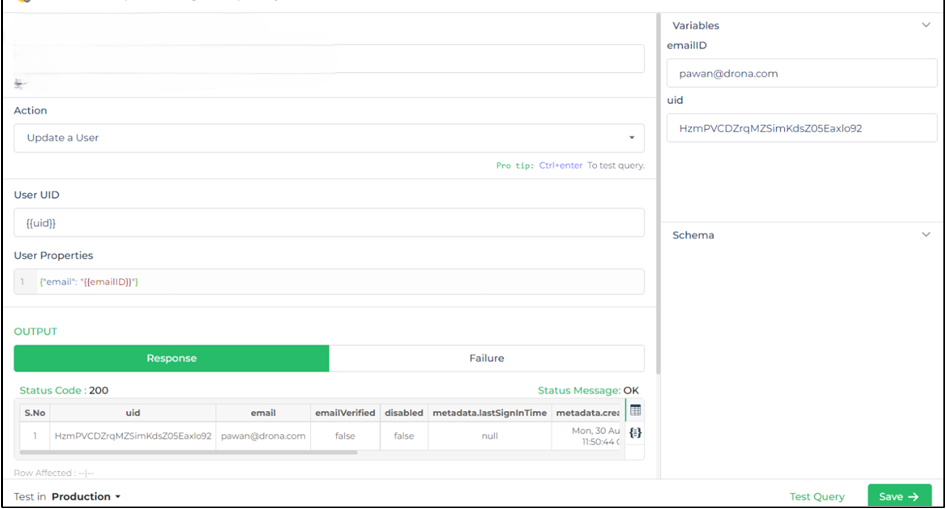
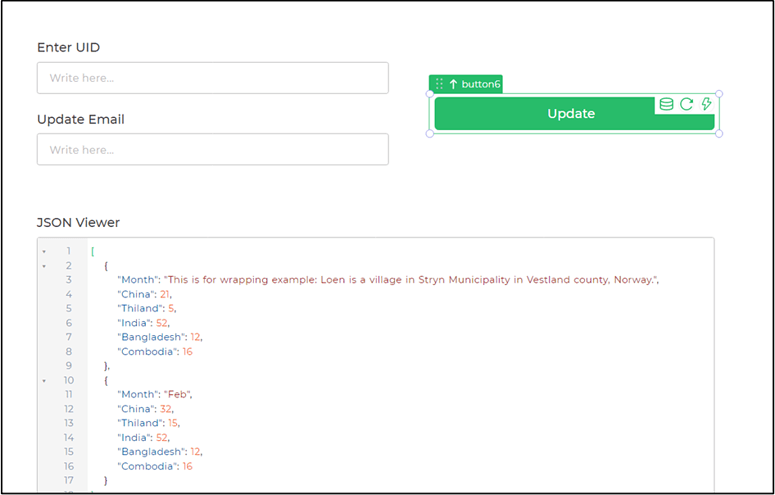
To provide details to make the call, you can use various input controls and actions. Later with controls you can showcase the end result of data after changes.
We'll be using input field to get the UID and emails to pass it as keyword parameters and display the final response in JSON viewer.
Service - Firebase Realtime Database
Appending Data to a List
To append data to a list within the Firebase Realtime Database using the Firebase Realtime Database Connector, follow these steps:
Access Data Bind Section or Control Action:
- Navigate to the data bind section of the control.
Select Firebase Realtime Database Connector from
Data Bind Options -> Quick Select -> Data Queries:- Choose Firebase Realtime Database Connector from the available options.
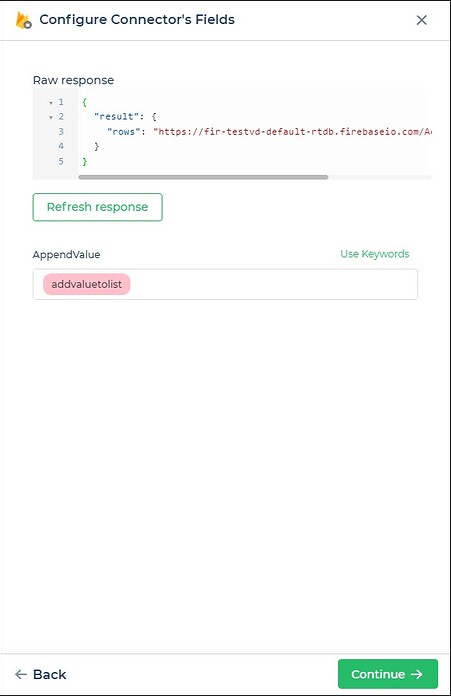
- Select the "Append data to a list" action to add new data to an existing list.
- Click on "Continue" to proceed.
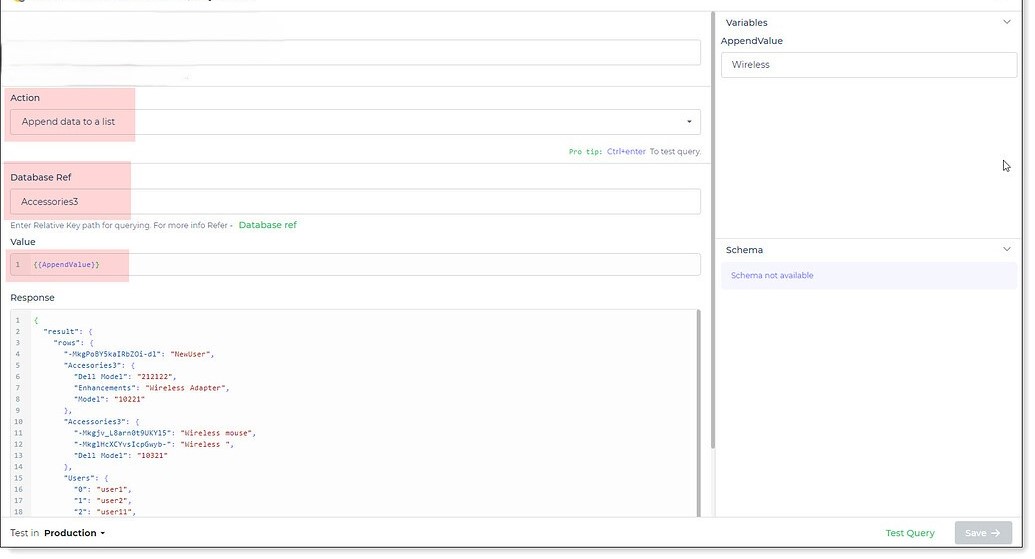
Firebase Realtime Database with append query.
Configure Data Input:
- Specify the Database Ref, which is the reference to the existing list where you want to append data.
- Provide the values to append as dynamic values. This can include any type of data, arrays, or objects.
Integrate with Controls and Actions:
- Integrate this query into your workflow by adding controls like a TextInput field for user input.
- Create an action flow that triggers the Connector action to append data.
- Configure the connector to pass the value from the TextInput control as input.