Custom Control
Before creating your own custom control, please have a look at DronaHQ provided Controls Library that you can readily use.
Overview
Custom control allows you to design your own UI and have your own Actions defined. Creating Custom control requires following things -
- An interface for passing data back and forth between the DronaHQ app and the custom control code.
- Pass Data to your Custom Control
- Pass data to your app from your custom control
- Write HTML Code for your control.
- Defining your own Custom Events
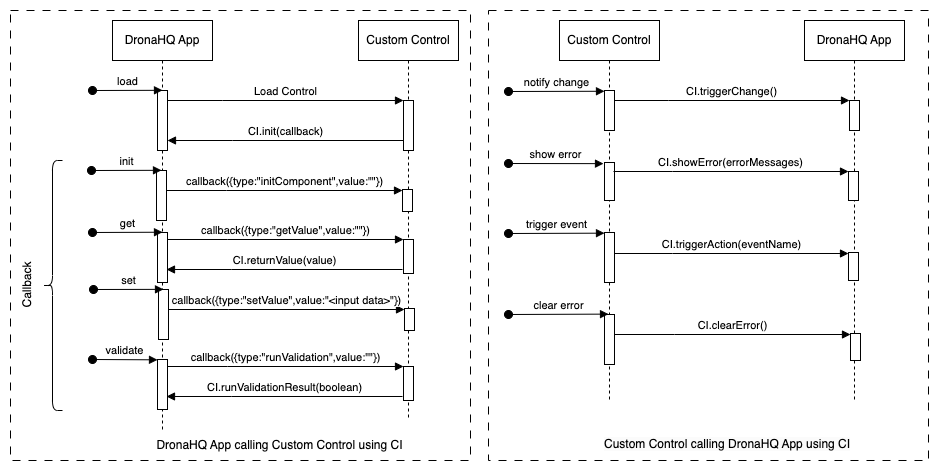
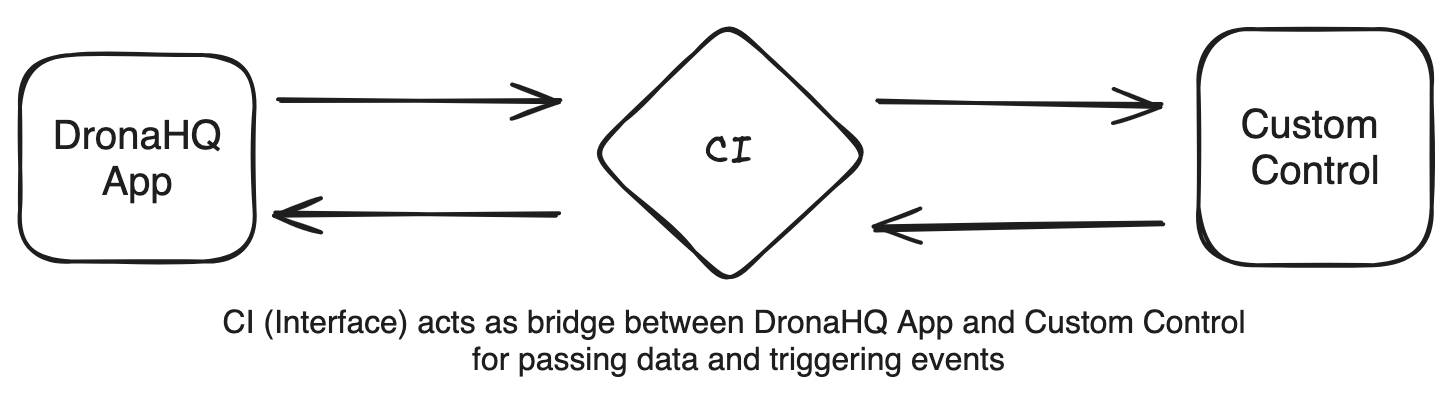
DronaHQ Control Interface (CI)
DronaHQ provides control interface for your custom control to pass data back and forth from your control. For this CI is the interface object that you need to call with methods listed below based on your needs.
| Function | Explanation |
|---|---|
CI.init(callback) | You must call CI.init(callback) method to initialize a bridge between DronaHQ and your Control. callback is a function which will be called by DronaHQ for various needs that will have payload as a argument. |
CI.returnValue(value) | Call this method when you want to return the value from your control to DronaHQ. Here,value argument indicates what data you want to pass from your control. This is usually be used when callback function is called with type getValue. |
CI.triggerChange() | Call this method when want to notify other controls or data query variable to re-evaluate their data when there is any change in your Control's return data. |
CI.showError(errorMessages) | Call this method when you want DronaHQ to display error in default control's error space. Here errorMessages in argument represents array of strings with one or more error messages which you want to display it to user. This should be usually called when callback function is called with type runValidation. |
CI.clearError() | Call this method when you want to remove all the error messaged previously displayed by DronaHQ. This should be usually called when valid data is inputted by the user for your control. |
CI.triggerAction(eventName) | Call this method when you want to trigger a particular event which you have pre-defined in your Custom Events section. Here eventName in argument represents event name he wants to trigger which he has created eg focusout, change, button_click etc; |
CI.returnValidationResult(booleanValue) | You must call this method when callback function is called with type runValidation with either true or false value based on your control's data which is valid or not. |
Callback Function
Syntax:
callback(payload)
Callback function will be automatically called by DronaHQ App whenever it needs to interact with your Custom Control. It could be for Initializing your control, Getting its value for other dependent controls/queries on your control and other interactions listed below. In callback function, payload is passed in the parameter from DronaHQ. payload is a json object with type and value key with below sample format-
{type:"setValue",value:"xyz"}
| type | value | Explanation |
|---|---|---|
| initComponent | empty | This will get called only once in entire lifecycle of your App. Here you can initialize your iframe component, if we wish to have any kind of initialization for your control then you have to write code for it here. You can initialize your visual elements with default values, add event listeners and so on. |
| setValue | BIND DATA value | This will get called whenever your control data needs to be refreshed. If you're binding some data through data binding, you will have to write logic to set value to your visual elements to reflect the corresponding data set from BIND DATA section in your control. In case, you have selected select type for Input Type option in your control, then in value field, you will get json object in [{"name": "<BIND Data value 1>", "selected": false},{"name": "<BIND Data value 2>", "selected": true}] format, where value in name key will be based on your OPTIONS BIND DATA value and value in selected key will be based on your SELECTED OPTIONS BIND DATA value. |
| getValue | empty | This method will get called whenever your control's data is required by any other control or data query in your App that you have referenced. You must return the expected output your control want's to return. For example, in case of Text Input control, you should return the value of Text input control which user has inputted. |
| runValidation | empty | This method will get called whenever a validation needs to be performed for this control. In this case, you should validate your control with the current data that it has and show any error message in case of validation is failed so that will be noticed by end user. |
| onReload | object | This method will get called whenever iframe reloads i.e on navigation ,resulting in a loss of state . So to preserve the state we provide you 2 values returnData and formulaData , here returnData will be last saved value in control and formulaData will be the data which is binded through data binding section. The value will be {returnData: "xyz",formulaData: "xyz@email.com"} |
Example:
  const callback = function (payload) {
            if (payload.type == "initComponent") {
              // here you can initialize your iframe component when needed

            }
            if (payload.type == "setValue") {
                // your control will get the data from app, so you can have your logic acc to your value
                let input = document.getElementById('in1');
                input.value = payload.value;
            }
            if (payload.type == "getValue") {
                // this method is ued to set the return value of your control
                let input = document.getElementById('in1');
                let val = input.value;
                CI.returnValue(val);
            }
            if (payload.type == "onReload"){
                // here you can reset the state of your control
                let fmlValue = payload.value.formulaData;
                let returnData = payload.value.returnData;
                let input = document.getElementById('in1');
                input.value = fmlValue;
            }
            if (payload.type == "runValidation") {
                // checks whether your control is valid or not
                if (isNaN(input.value) || input.value.includes('@')) {
                    CI.returnValidationResult(false);
                }
                else {
                    CI.returnValidationResult(true);
                }
            }
        }
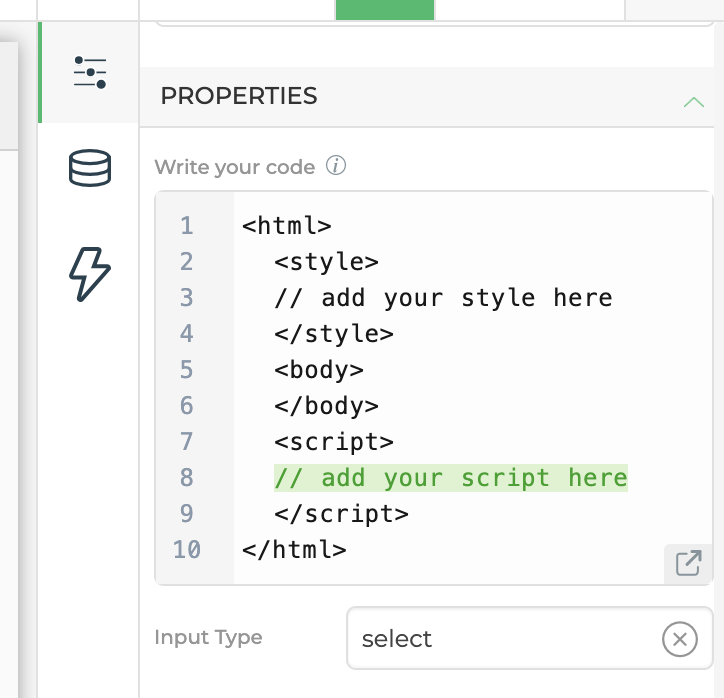
Define Input Type
Input type defines whether your control has only single BIND data option or multiple BIND data option (Options and Selected Options).
| Input Type | Explanation |
|---|---|
| single | If single is selected, then you can directly provide data under BIND DATA option. This is default option selected for a new control. |
| select | If select is selected, then your control will have 2 BIND DATA options - Options and Selected Options. Recommended to use with controls like dropdowns, checkbox, etc. |
Pass Data to your Custom Control
You can define input data that you want your Custom Control to be initialized with. You can get this data in your callback method with type as setValue and value in payload.value. It can either be another control, keyword, data query variable or any json object.
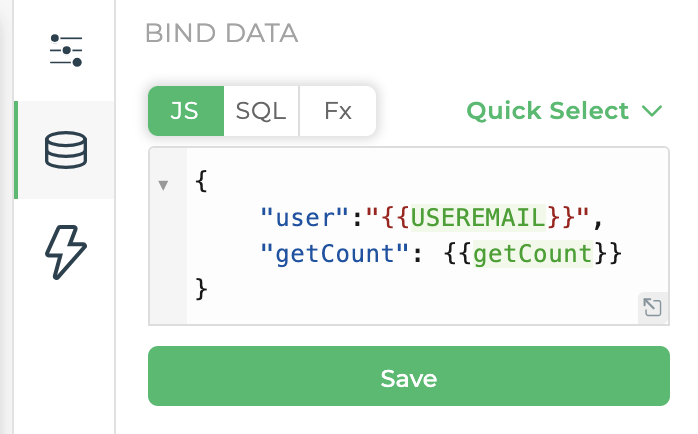
In the following example code, you are initializing the input control of html with {{USEREMAIL}} keyword passed in user key.
Example:
<html>
  <body>
    <h1>Input</h1>
    <input id="in1" type="text" placeholder="Your name">
    <script>
      const callback = function (payload) {
        if (payload.type == "setValue") {
          try {
            // Parse the payload value as JSON if it has been stringified
            let inputPayload = JSON.parse(payload.value);

            // Get the input element
            let input = document.getElementById('in1');
            // Set the input element with the user's email from the parsed JSON
            input.value = inputPayload.user;
          } catch (error) {
            console.error("Error processing the payload:", error);
          }
        }
      };
      CI.init(callback);
    </script>
  </body>
</html>
Pass data to your app from your custom control
You can also access data from your custom control in other controls and data queries in your app. In the following example code, addEventListener method on input control notifies DronaHQ of change in controls value, which then calls callback method of type getValue to get the updated value from the custom control. This value can be accessed in your app using {{customcontrol}} where customcontrol is unique name of your Custom Control.
 <html>
   <body>
       <h1>Input</h1>
       <input id="in1" type="text" placeholder="Your name">
       <script>
           let input = document.getElementById('in1');
           const callback = function (payload) {
               if (payload.type == "getValue") {
                   let val = input.value;
                   CI.returnValue(val);
               }
           }
           CI.init(callback);
           input.addEventListener("input", function (e) {
                   // Notify change to any other control or data query variable
                   CI.triggerChange();
           });
       </script>
   </body>
 </html>
Write HTML Code
In property->Write your code section, you can put the HTML, CSS, and JavaScript code which handles the appearance and behavior of the custom control. DronaHQ places this code in an iFrame within your DronaHQ app.
Javascript Example
Here is the example of Sample Custom Control using Javascript
<html>
  <style>
      input[type=text] {
          width: 100%;
          border: 2px solid #aaa;
          border-radius: 4px;
          margin: 8px 1px;
          outline: none;
          padding: 8px;
          box-sizing: border-box;
          transition: .3s;
      }
      input[type=text]:focus {
          border-color: dodgerBlue;
          box-shadow: 0 0 8px 0 dodgerBlue;
      }
  </style>
  <body>
      <h1>Input</h1>
      <input id="in1" type="text" placeholder="Your name">
      <script>
          let input = document.getElementById('in1');
          const callback = function (payload) {
              if (payload.type == "initComponent") {
              }
              if (payload.type == "setValue") {
                  input.value = payload.value;
                  let errorList = [];
                  if (input.value.includes('@')) {
                    errorList.push("does not accept special character");
                    CI.showError(errorList);
                  }
                  else{
                    CI.clearError();
                  }
              }
              if (payload.type == "getValue") {
                  let val = input.value;
                  CI.returnValue(val);
              }
               if (payload.type == "onReload"){
                  let fmlValue = payload.value.formulaData;
                  let returnData = payload.value.returnData;
                  input.value = fmlValue;
              }
              if (payload.type == "runValidation") {
                  if (isNaN(input.value) || input.value.includes('@')) {
                      CI.returnValidationResult(false);
                  }
                  else {
                      CI.returnValidationResult(true);
                  }
              }
          }
          CI.init(callback);
          input.addEventListener("input", function (e) {
              let errorMessages = [];
              if (input.value.includes('@')) {
                  errorMessages.push("Does not accept special character!");
              }
              if (errorMessages.length > 0) {
                  // DronaHQ to display error message for this control
                  CI.showError(errorMessages);
              } else {
                  // Clear any error messages previously showed for this control
                  CI.clearError();
                  // Notify change to any other control or data query variable
                  CI.triggerChange();
                  // TODO: You can add Custom Event named - on_change
                  CI.triggerAction("on_change");
              }
          });
      </script>
  </body>
</html>
React Example
Here is the example of Sample Custom Control using React
<html>
    <style>
      input[type=text] {
        width: 100%;
        border: 2px solid #aaa;
        border-radius: 4px;
        margin: 8px 1px;
        outline: none;
        padding: 8px;
        box-sizing: border-box;
        transition: 0.3s;
      }

      input[type=text]:focus {
        border-color: dodgerBlue;
        box-shadow: 0 0 8px 0 dodgerBlue;
      }
    </style>
    <script src="https://unpkg.com/react@17/umd/react.development.js" crossorigin=""></script>
    <script src="https://unpkg.com/react-dom@17/umd/react-dom.development.js" crossorigin=""></script>
    <script src="https://unpkg.com/@babel/standalone/babel.min.js"></script>
  <body>
      <div id="root"></div>
      <script type="text/babel">
        const { useState , useEffect} = React;

        const App = () => {
          const [inputValue, setInputValue] = useState('');
          const callback = function (payload) {
            if (payload.type == "setValue") {
              setInputValue(payload.value);
            }
            if (payload.type == "getValue") {
              CI.returnValue(inputValue);
            }
            if (payload.type == "onReload"){
              setInputValue(payload.value.formulaData)
            }
            if (payload.type == "runValidation") {
              if (inputValue.includes('@')) {
                CI.returnValidationResult(false);
              } else {
                CI.returnValidationResult(true);
              }
            }
          };
        CI.init(callback);
        const handleInputChange = (e) => {
            let value = e.target.value;
            setInputValue(value);
        };
        useEffect(() => {
            // This effect will execute after every state update of inputValue
            let errorMessages = [];
            if (inputValue.includes('@')) {
              errorMessages.push("Does not accept special character!");
            }
            if (errorMessages.length > 0) {
              // DronaHQ to display error message for this control
              CI.showError(errorMessages);
            } else {
              // Clear any error messages previously showed for this
              CI.clearError();
              // Notify change to any other control or data query variable
              CI.triggerChange();
              // TODO: You can add Custom Event named - on_change
              CI.triggerAction("on_change");
            }
        }, [inputValue]);
          return (
            <div>
              <h1>Input</h1>
              <input
                type="text"
                placeholder="Your name"
                value={inputValue}
                onChange={handleInputChange}
              />
            </div>
          );
        };
        ReactDOM.render(<App />, document.getElementById('root'));
      </script>
  </body>
</html>
Custom Events
Custom Events allow to have a predefined list of events that your custom control provides. Using Custom Events, user can build their Action flow which will get triggered when your custom control triggers the event. For example, you can define a button_click event which will be fired whenever a user presses the button in your Custom Control.
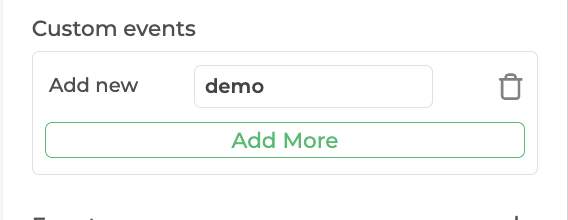
Adding Custom Events
In the property section, you have an option to add one or more custom events that you want in your Custom Control. You can add custom events using ADD MORE option and provide a friendly name. You can also update the event name and delete any event using delete action.
Here is a example of code block how you can add custom events.
<html>
  <head>
<link href="/static/fonts/montserrat/Montserrat.css" rel="stylesheet"></head>
<style>
  body{
    font-family: "Montserrat", sans-serif;
  }
  .Heading{
    font-size: 1rem;
    font-weight: 600;
  }
  .doc-tag{
    position: absolute;
    right: 1rem;
    top: 0.7rem;
    text-decoration: none;
    font-size: 0.75rem;
    color: #26bc6a;

  }
  p{
    font-size:0.75rem;
  }
  .hilight{
    text-decoration: none;
    font-size: 0.75rem;
    color: #26bc6a;
  }
  button{
    border: 0px;
    border-radius: 5px;
    padding:10px;
    background: #26bc6a;
    color: white;

  }
</style>

<body>
  <div class="Heading">Custom Control</div>
  <a class="doc-tag" href="https://docs.dronahq.com/reference/controls/custom-control/" target="_blank">Read Docs</a>
  <p>Here is the <span class="bindedData hilight"></span> that you binded to the control you can access it in the <a href="https://docs.dronahq.com/reference/controls/custom-control/#pass-data-to-your-custom-control" class="hilight">setValue</a> callback type </p>
  <p><b>Counter: <span class="counter">0<span></b></p>
  <ul>
    <li><p>Clicking on Trigger Change, you will see counter value passed to control referring custom control</p></li>
    <li><p>Configure event named demo, that will get trigger on the click of Trigger Event</p></li>
  </ul>
  <button class="change">Trigger Change</button> <button class="event">Trigger Demo Event </button> <button class="showerror">Show Error</button> <button class="clearerror">Clear Error</button>
</body>
<script>
  let counter = 0;
  const callback = function (payload) {
    if (payload.type == "initComponent") {
    }
    if (payload.type == "setValue") {
      let data;
      try{
        data = JSON.parse(payload.value);
      }catch(err){
        data["text"] = "";
      }
      document.querySelector(".bindedData").innerText = data.text;
    }
    if (payload.type == "getValue") {
      let val = counter;
      CI.returnValue(val);
    }
    if (payload.type == "runValidation") {
      CI.returnValidationResult(true);
    }
  }
  CI.init(callback);
  document.addEventListener("DOMContentLoaded", (event) => {
    document.querySelector(".change").addEventListener("click",function(e){
       counter = counter + 1;
       document.querySelector(".counter").innerText = counter;
       CI.triggerChange();
       document.querySelector(".counter").innerText = counter;
    });
    document.querySelector(".event").addEventListener("click",function(e){
       CI.triggerAction("demo");
    });
    document.querySelector(".showerror").addEventListener("click",function(e){
       CI.showError(["custom error message"]);
    });
    document.querySelector(".clearerror").addEventListener("click",function(e){
       CI.clearError()
    });
  });
</script>
</html>
Trigger Custom Event
For triggering any custom event of your control, you should call CI.triggerAction("event_name"); , where event_name should be the friendly name you provided when adding the event. For example, you can have custom event named - on_change to call whenever user is inputting data to any Input control in your Custom Control using CI.triggerAction("on_change"); method call.
<html>
  <script>
      // TODO: You can add Custom Event named - on_change
      CI.triggerAction("on_change");
  </script>
</html>
Limitations
Below are the limitations currently when building your Custom Control -
- You can not directly run any DATAQUERY variable.
- You can not call DronaHQ Custom functions (Fx formulas, UTILITY, HELPER, DATAQUERY).
- You can not access other controls data, data query variable and keywords unless you pass it in DATA BIND section.
- You can not trigger other control's/screen's Events.
- You can not invoke DronaHQ JS Objects directly in your html code.
- You can not use THEME variables for your custom control.